Data Quality API usage guide
Authenticating to the API
Generate your API token following API keys and authentication. Use this token to authenticate your requests.
Add Check Runs API example with dbt integration
This section demonstrates how to integrate dbt test results into data.world using the Data Quality (DQ) API. It covers how to authenticate, construct API requests, and convert dbt test outputs into the required API format. Whether you're using the API Explorer UI or automating with Python, this guide walks through the full process—from generating test results to verifying them in the data.world interface.
Running the dbt tests
Define quality tests in your dbt model YAML files. See dbt docs for more details.
For example:
sources:
  - name: raw_orders
    description: Orders data from Google Drive. Loaded by Fivetran.
    database: solutions_stack

    schema: raw
    tables:
      - name: campaigns
        freshness:
          warn_after: {count: 1, period: day}
          error_after: {count: 2, period: day}
        description: The table contains records of marketing campaigns. Each record represents a single campaign and includes its unique identifier, name, and associated spending amount, as well as the account to which it belongs.
        columns:
          - name: campaign_id
            description: Unique identifier for each campaign.
            tests:
              - not_null
              - unique
Run the tests from the CLI:
dbt test --select source:raw_orders.campaigns
Access the dbt test results. After running the tests, find the results in target/run_results.json. Each entry under the results key corresponds to one test.
Example test results from the results node:
    {
      "status": "pass",
      "timing": [
        {
          "name": "compile",
          "started_at": "2025-05-23T20:05:42.171831Z",
          "completed_at": "2025-05-23T20:05:42.194830Z"
        },
        {
          "name": "execute",
          "started_at": "2025-05-23T20:05:42.257772Z",
          "completed_at": "2025-05-23T20:05:42.915783Z"
        }
      ],
      "thread_id": "Thread-9 (worker)",
      "execution_time": 0.7857208251953125,
      "adapter_response": {
        "_message": "SUCCESS 1",
        "code": "SUCCESS",
        "rows_affected": 1,
        "query_id": "01bc8c15-0e10-2ea4-0000-6c45083a099e"
      },
      "message": null,
      "failures": 0,
      "unique_id": "test.solutions_stack.source_not_null_raw_orders_campaigns_campaign_name.9a0ff6ed3b",
      "compiled": true,
      "compiled_code": "\n    \n    \n\n\n\nselect campaign_name\nfrom solutions_stack.raw.campaigns\nwhere campaign_name is null\n\n\n",
      "relation_name": null,
      "batch_results": null
    },
Format the results for the API. To submit test results to the DQ API, you need to structure the data in a specific JSON format. For our example, this formatting was done manually using values from run_results.json, but it could be automated by parsing that file and mapping the fields to the required API schema.
Here's a simple python example:
import requests
import os

API_URL = "https://api.data.world/v0/dataquality/checkruns/se-master-main"
API_TOKEN = os.getenv("DQ_API_TOKEN")
COLLECTION_IRI = "https://8bank-se-main.app.linked.data.world/d/ddw-catalogs/cat.aae974a2d45ee3ffc82ea8f096493d39"


if __name__ == "__main__":

    # add params
    params = {
        "collectionIri": COLLECTION_IRI
    }

    # build the payload
    payload = { "checkRuns": [
    {
        "config": {
            "description": "Check that the campaign_name field in the raw.campaigns table is not null.",  # manual,
            "source": "dbt",  # manual
            "dimension": "VALIDATION",  # manual
            "resource": {
                "iri": "https://8bank-se-main-catalog-sources.app.linked.data.world/d/ddw-catalogs/dbt-source.01605cbbfda10889710fb1813f1612c3", # get this from data.world catalog for the object being tested
                "type": "IRI"
            },
            "id": "test.solutions_stack.source_not_null_raw_orders_campaigns_campaign_name.9a0ff6ed3b", # unique_id
            "query": "\n    \n    \n\n\n\nselect campaign_name\nfrom solutions_stack.raw.campaigns\nwhere campaign_name is null\n\n\n", # compiled_code
            "title": "source_not_null_raw_orders_campaigns_campaign_name", # part of unique_id
            "lastUpdated": "2025-05-12T21:42:17Z"  # no dbt equivalent?
        },
        "result": "PASS",  # status
        "runSuccessful": True,  # adapter_response.code"
        "end": "2025-05-12T21:42:15Z", # timing.name == "execute" -> completed_at
        "start": "2025-05-12T21:42:14.21Z" # timing.name == "execute" -> started_at
    }
] }
    headers = {
        "accept": "application/json",
        "content-type": "application/json",
        "authorization": "Bearer " + API_TOKEN,
    }

    response = requests.post(API_URL, params=params, json=payload, headers=headers)

    print(response.text)
This script can be run with:
python load_dbt_tests_to_dw.py
Making the Add check runs API call
Use the Add Check Runs end point to try the Add check runs API.
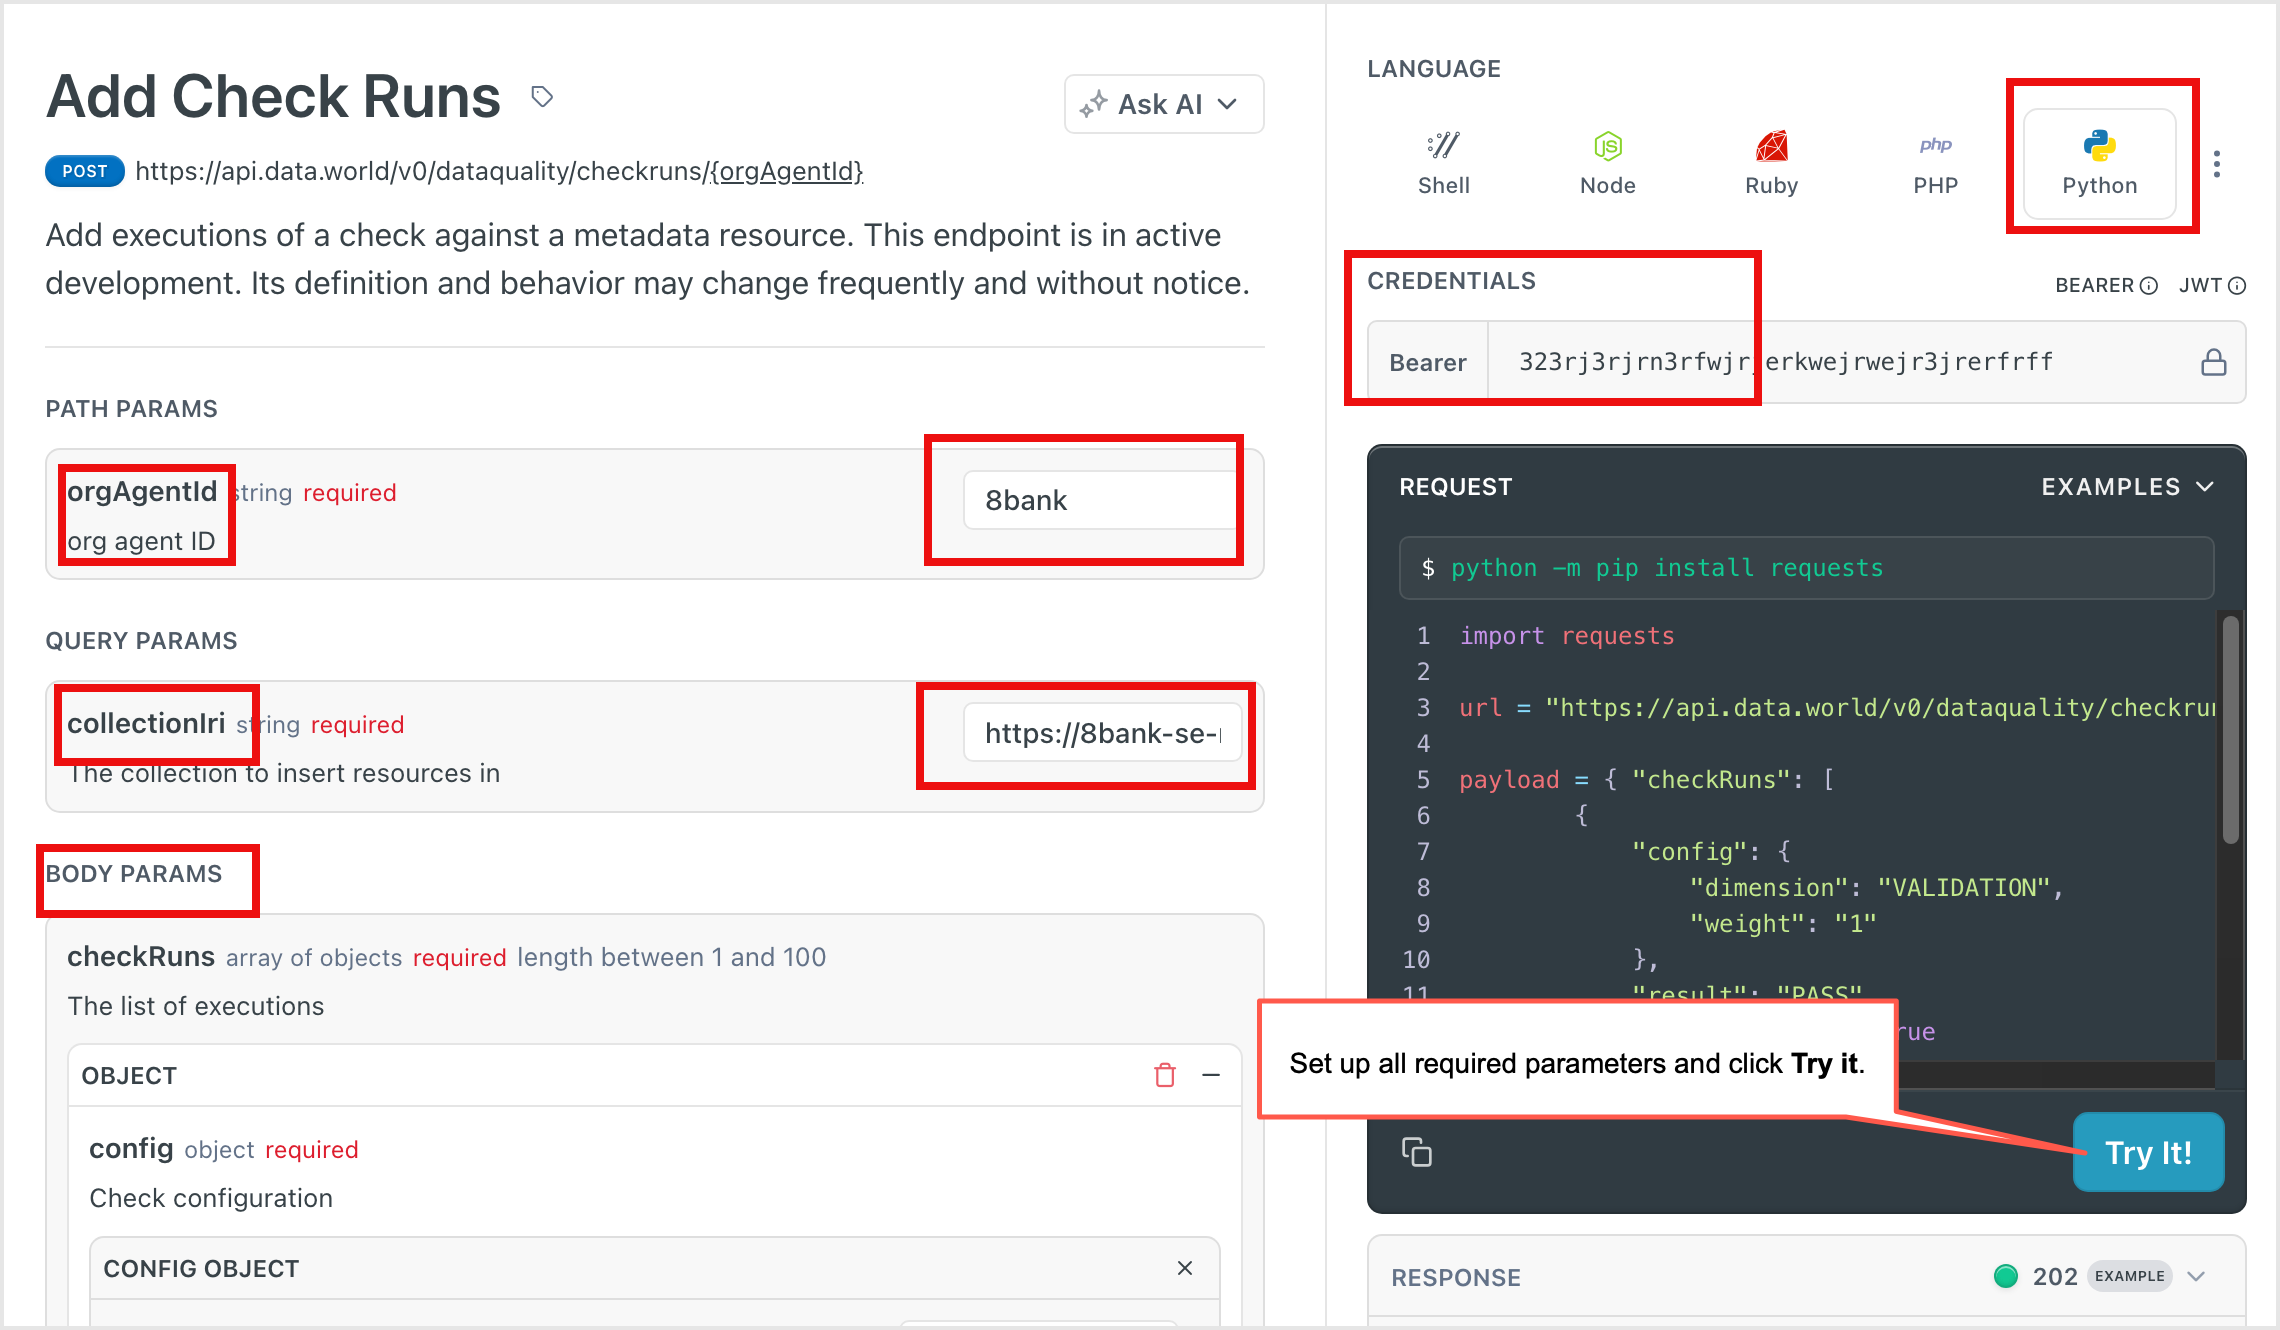
Select your language first. In the example we will use Python.
Add your API token under the CREDENTIALS section.
In PATH PARAMS, enter your orgAgentId. You can find this in the application URL: For example, if the URL is https://8bank.app.data.world/se-main, your orgAgentId is se-main.
In QUERY PARAMS, input the collectionIri. You can find this information from the collection page in data.world.
In BODY PARAMS, configure the test results. You can submit one or more objects.
Click Try It! to test your call. Check the Response section for success or error details.
Once successful, copy the auto-generated code and use it in your Python script or automation workflow.
Viewing the data quality information in the data catalog
To verify that the data quality information is now available in the catalog, do the following.
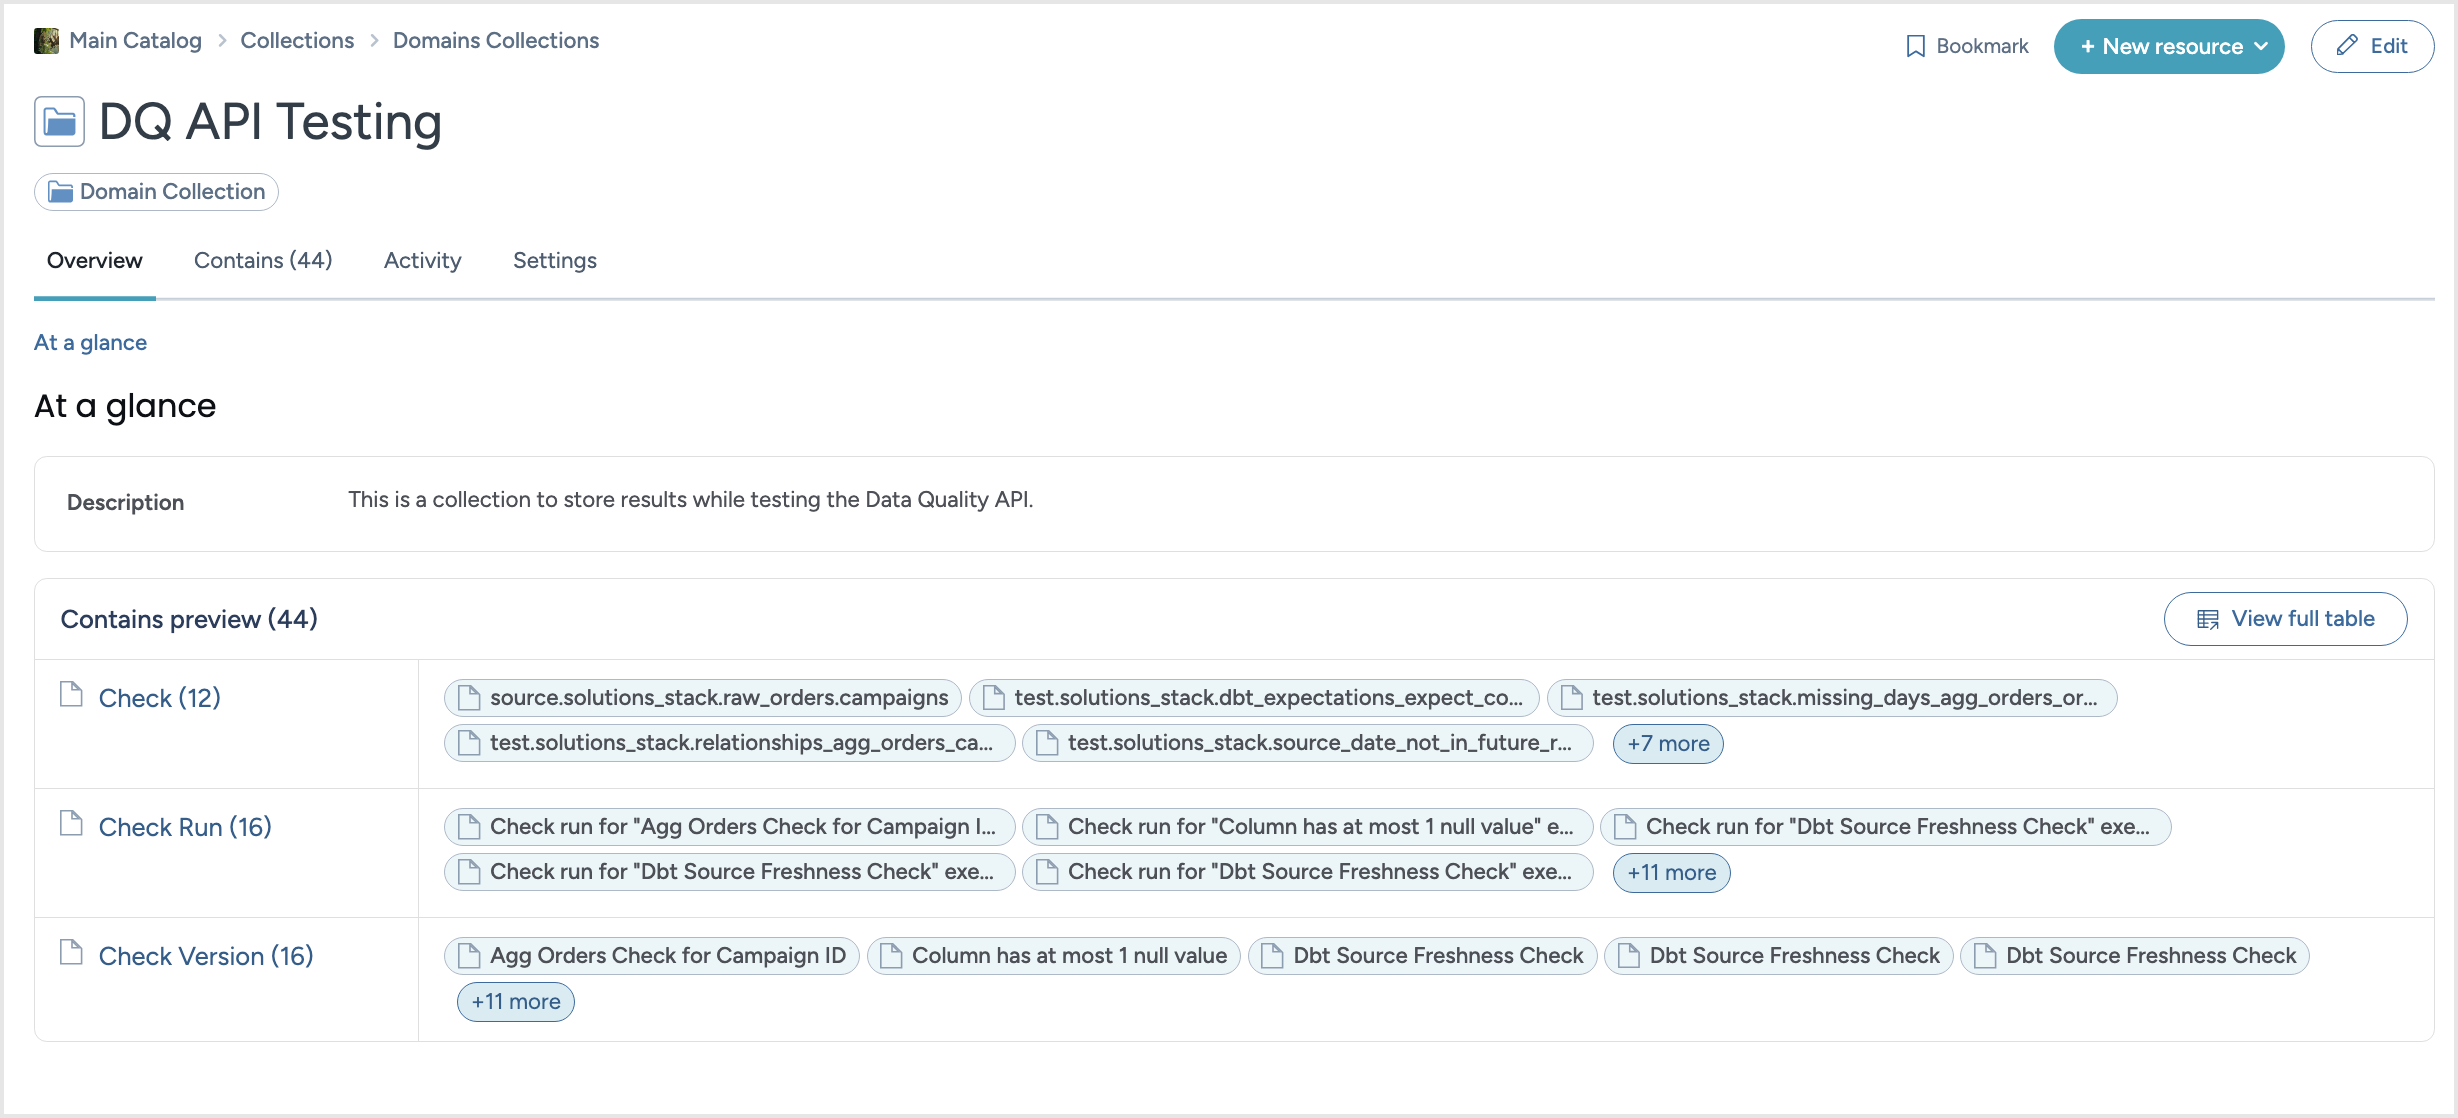
Navigate to the data.world collection you specified in your API call. You should see related resources like Check, Check Run, and Check Version.
Check: Your Data Quality Test.
Check Run Each DQ test ran against your catalog resource.
Check Version: A snapshot of a Check in a point in time. Its main component is a query that is executed against a Resource.
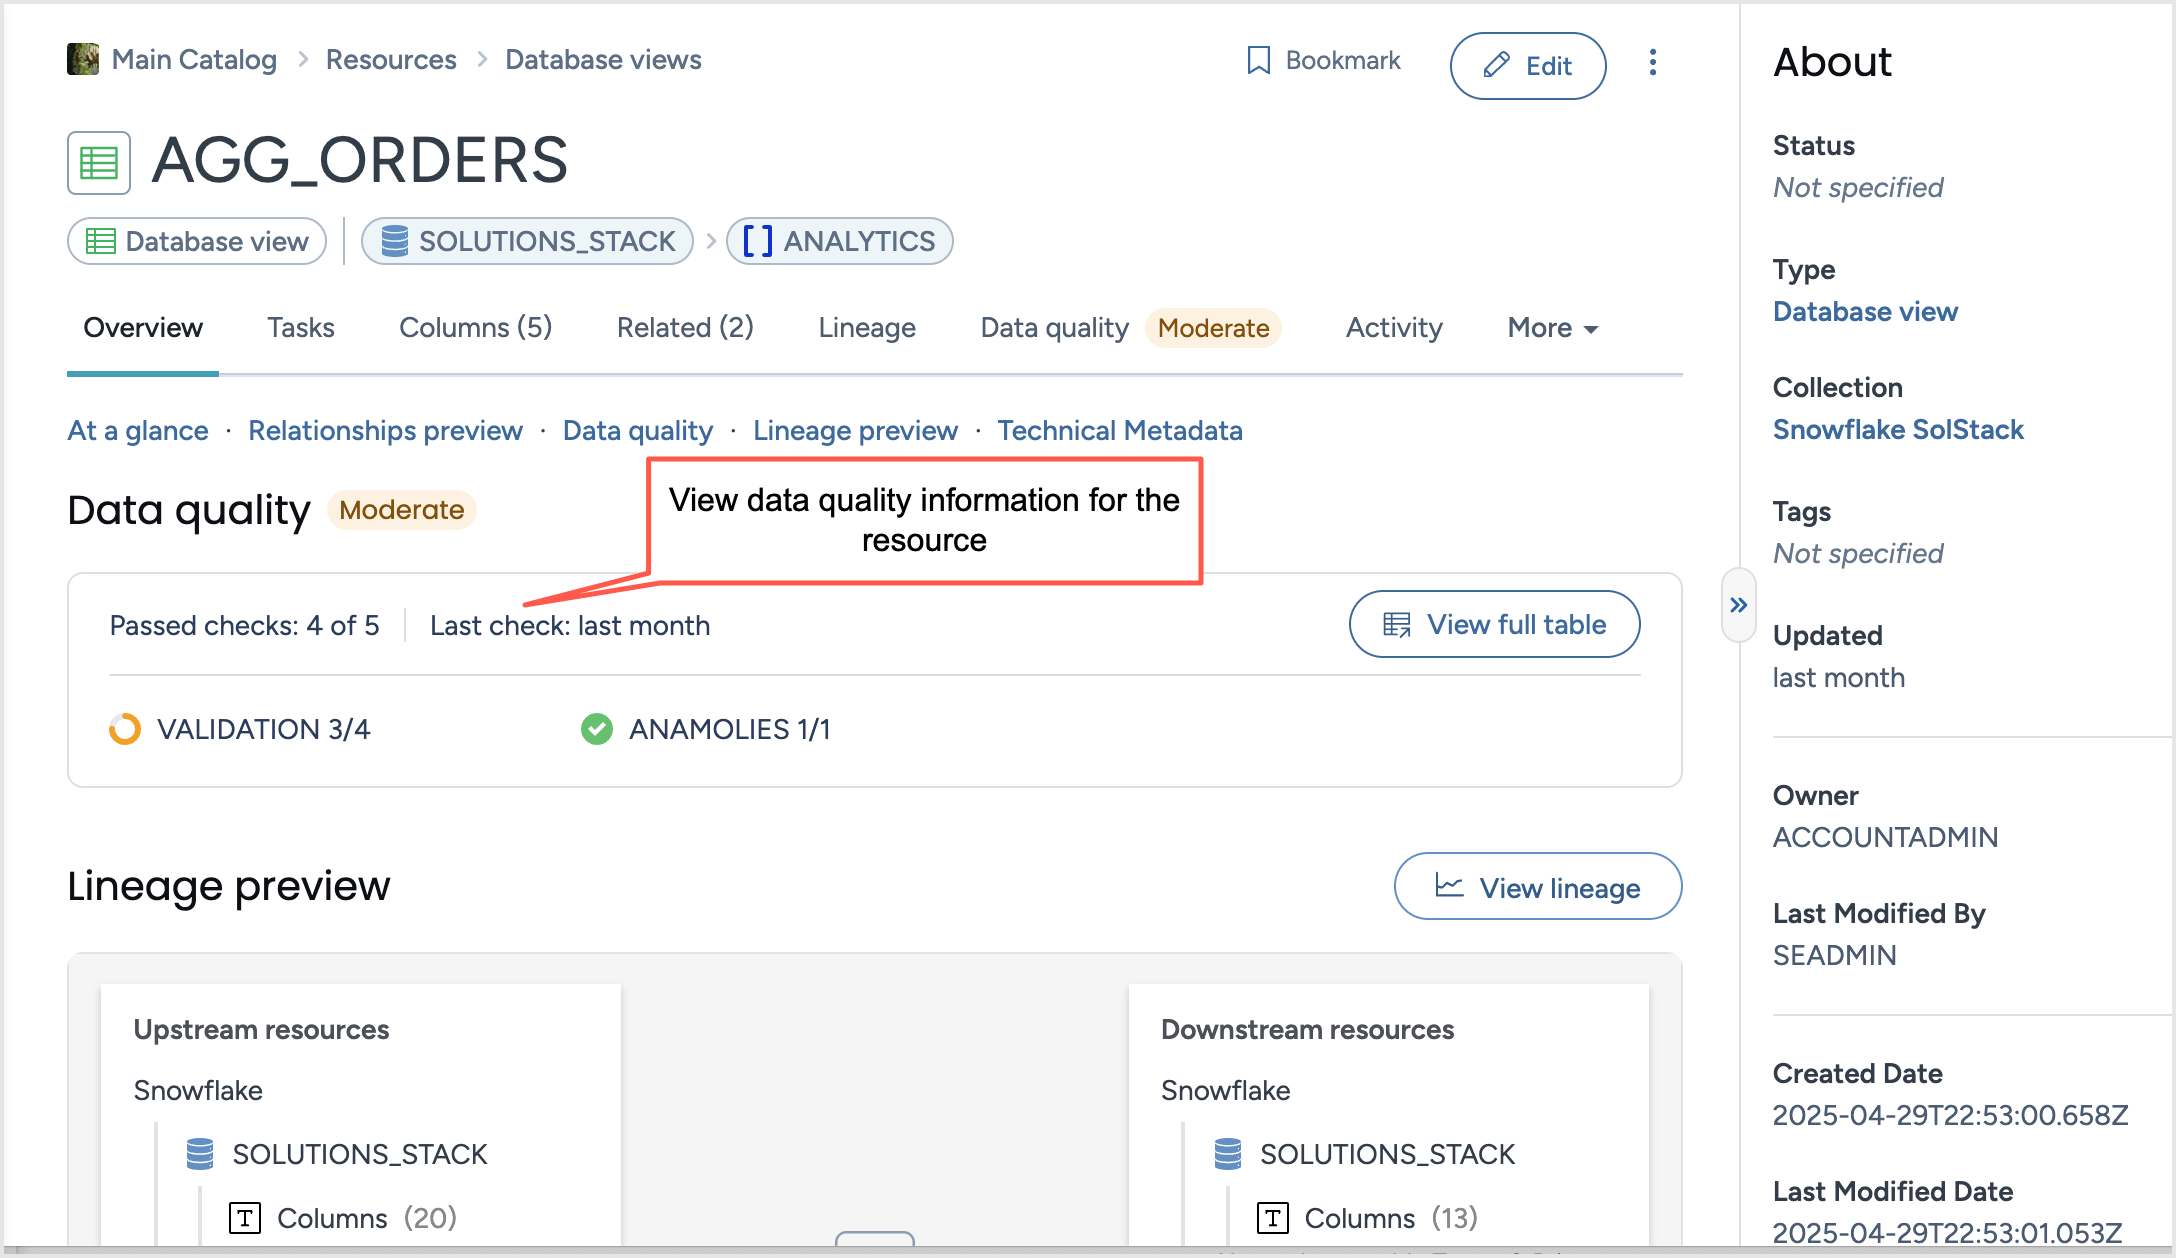
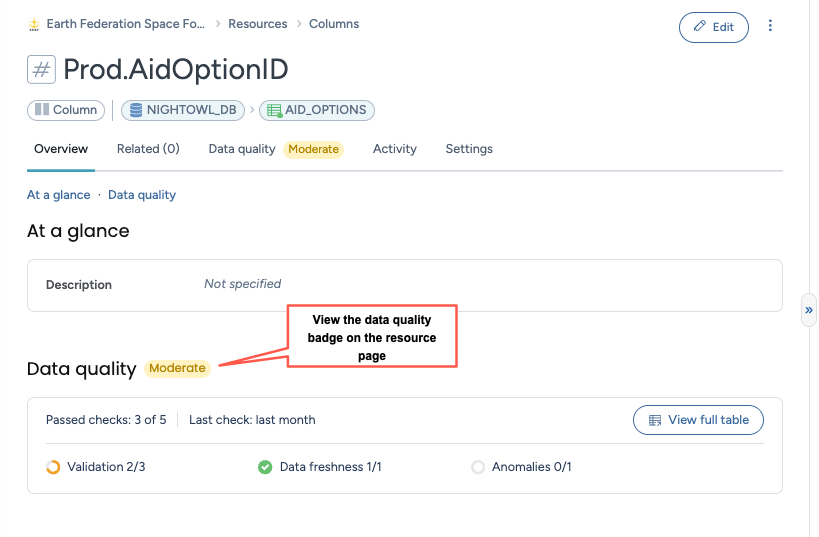
Browse to a resource in the catalog to see the Data Quality information on the resource page. The Overview tab of the resource page displays a summary information about the quality checks. Click the View full table button to browse to the Data quality tab.
On the Data quality tab you will see the following details about the data quality checks:
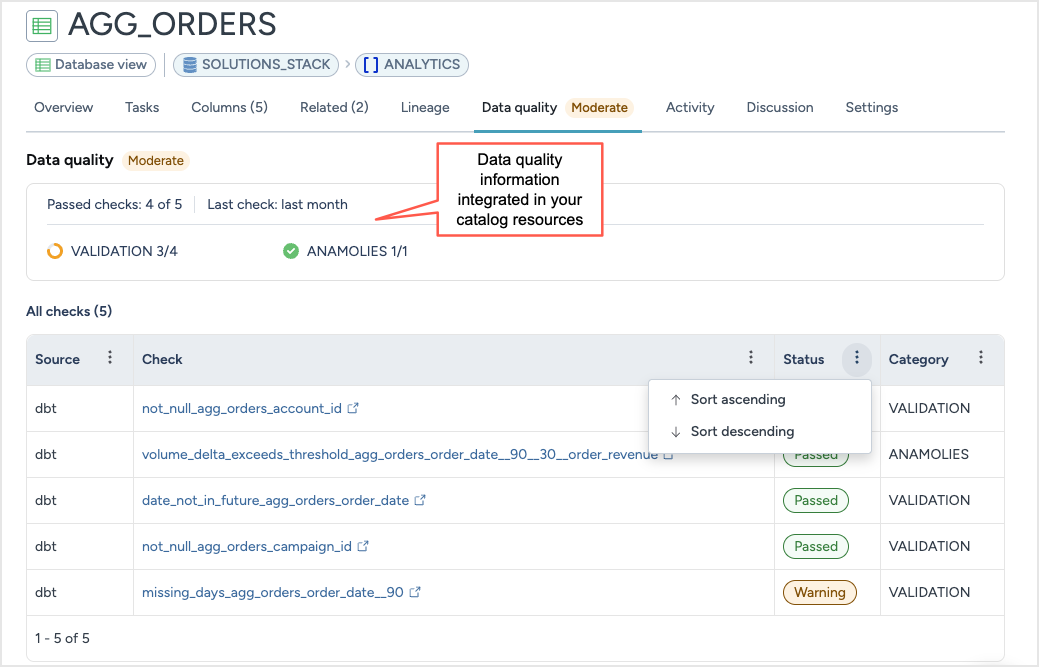
Source of the check, such as, dbt.
Check that was performed. Click the check link to view the details of the check in the Source system.

Status of the check, such as, Passed, Warning, etc.
Category of the check, such as Validation, Anomalies, etc.
Add Badges API example with Python script
In this section you’ll learn how to apply quality badges—such as Good (green color), Moderate (yellow color), or Poor (red color)—to catalog resources using the Data Quality API. Badges provide visual indicators of data health directly in the catalog and help users quickly assess the reliability of data assets. This section walks through identifying the target resource, selecting a badge, and making the API call using Python.
Configuring API Calls in Python
Determine which resource to add badge to. Find the IRI of the resource you want to add a badge to. Navigate to the resource in data.world, copy the Resource IRI from the Settings tab > Technical details section.
Determine the badge you want to add. There are three default badges to choose from. Choose one and grab the IRI - you will need this in the API call.
Table 1.Badge name
Badge IRI
GoodBadge
https://dwec.data.world/v0/default-profile/GoodBadge
ModerateBadge
https://dwec.data.world/v0/default-profile/ModerateBadge
PoorBadge
https://dwec.data.world/v0/default-profile/PoorBadge
Here is an example Python script to make the AddBadges call. For this example we are adding a GoodBadge to a view, using the Resource IRI.
import requests
import os

API_URL = "https://api.data.world/v0/dataquality/badges/se-master-main"
API_TOKEN = os.getenv("DQ_API_TOKEN")
# specific resource IRI the badge will be applied to
RESOURCE_IRI = "https://8bank-master-catalog-sources.app.linked.data.world/d/ddw-catalogs/tbl.810cd9def295"


if __name__ == "__main__":

    # build the payload
    payload = { "badges": [
        {
            "resource": {
                "type": "IRI",
                "iri": RESOURCE_IRI
            },
            "badgeIri": "https://dwec.data.world/v0/default-profile/GoodBadge",
        }
    ] }
    headers = {
        "accept": "application/json",
        "content-type": "application/json",
        "authorization": "Bearer " + API_TOKEN,
    }

    response = requests.post(API_URL, json=payload, headers=headers)

    print(response.text)
Run the following script.
python call_add_badges.py
Making an Add Badges API call
Use the Add Badges end point to try the data quality API.
Select your language first. In the example we will use Python.
Add your API token under the CREDENTIALS section.
In PATH PARAMS, enter your orgAgentId. This is the org containing the resources you want to add a badge to. You can find this in the application URL: For example, if the URL is https://8bank.app.data.world/se-main, your orgAgentId is se-main.
In BODY PARAMS, configure the test results. You can submit one or more objects.
Click Try It! to test your call. Check the Response section for success or error details.
Once successful, copy the auto-generated code and use it in your Python script or automation workflow.
Viewing data quality badges in the data catalog
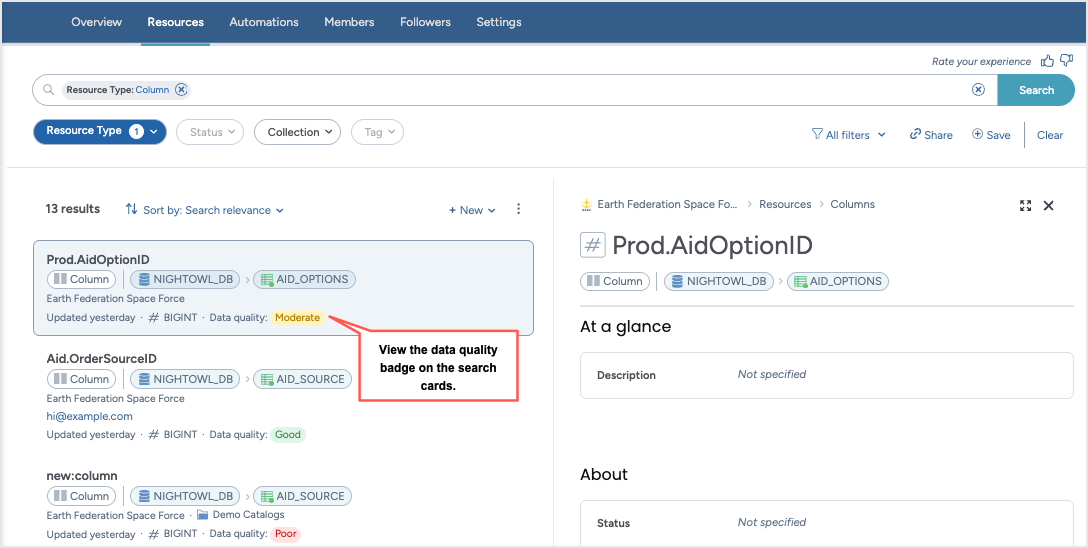
Navigate to the resource you updated and check that it has a badge.
The badge is also visible on the search cards.
Adding custom badges
If the default badge label (Good, Moderate, Poor) do not work, you can consider to create a custom badge with the value you desire. The default color remains Red for Negative, Green for Positive, Yellow for Neutral. This section goes through how to add custom Data Quality Badges.
Example payload of a call to use one of the custom badges would look like this:
payload = {
        "badges": [
            {
            "resource": {
                "type": "IRI",
                "iri": "https://saleseng-se-master-catalog-sources.app.linked.data.world/d/ddw-catalogs/dbt-source.d5e141d4085f5677e90c8f0b5026a2ca"
            },
            "badgeIri": "https://saleseng-se-master-catalog-config.app.linked.data.world/d/profile/FreshBadge"
            }
        ]
    }
Adding custom badges using CTK
Follow these steps to create custom data quality badges using CTK.
To do this, create a .ttl file. For the orgprofile value, follow this structure, where <catalog_config_org> is your catalog config org: <https://<catalog_config_org>.app.linked.data.world/d/profile/>
Example .ttl file:
Each badge needs a relationship to a sentiment. The name and rdfs:label of each badge is customizable.
@prefix orgprofile: <https://saleseng-se-master-catalog-config.app.linked.data.world/d/profile/>
@prefix kos-data-quality: <https://open-kos.org/ext/kos-data-quality/> .
@prefix rdfs: <http://www.w3.org/2000/01/rdf-schema#> .

orgprofile:FreshBadge a kos-data-quality:Badge ;
    kos-data-quality:hasSentiment kos-data-quality:BADGE_SENTIMENT_POSITIVE ;
    rdfs:label "Fresh" .

orgprofile:StaleBadge a kos-data-quality:Badge ;
    kos-data-quality:hasSentiment kos-data-quality:BADGE_SENTIMENT_NEGATIVE ;
    rdfs:label "Stale" .

orgprofile:WarningFreshnessBadge a kos-data-quality:Badge ;
    kos-data-quality:hasSentiment kos-data-quality:BADGE_SENTIMENT_NEUTRAL ;
    rdfs:label "Freshness Warning" .
Upload the ttl file to the ddw-catalogs dataset in your main organization.