Working with extracted and virtualized data
This section provides an overview of working with extracted and virtualized data. For more detailed information and a deeper understanding on how to work with data, see Advanced work with queries.
Querying extracted and virtualized data
This section walks you through the process of writing simple and federated queries against the extracted and virtualized data. For detailed deep dive into querying data, see this documentation.
Writing simple queries
To write a simple query:
Browse to the dataset where you added your virtualized or extracted tables from the data source.
On the dataset Overview page, click the Launch workspace button.
Click the Add button and from the dropdown menu, select SQL query. The Untitled SQL query page opens.
Type your query in the editor and click the Run query button.
You can browse and analyze your query results by viewing the table.
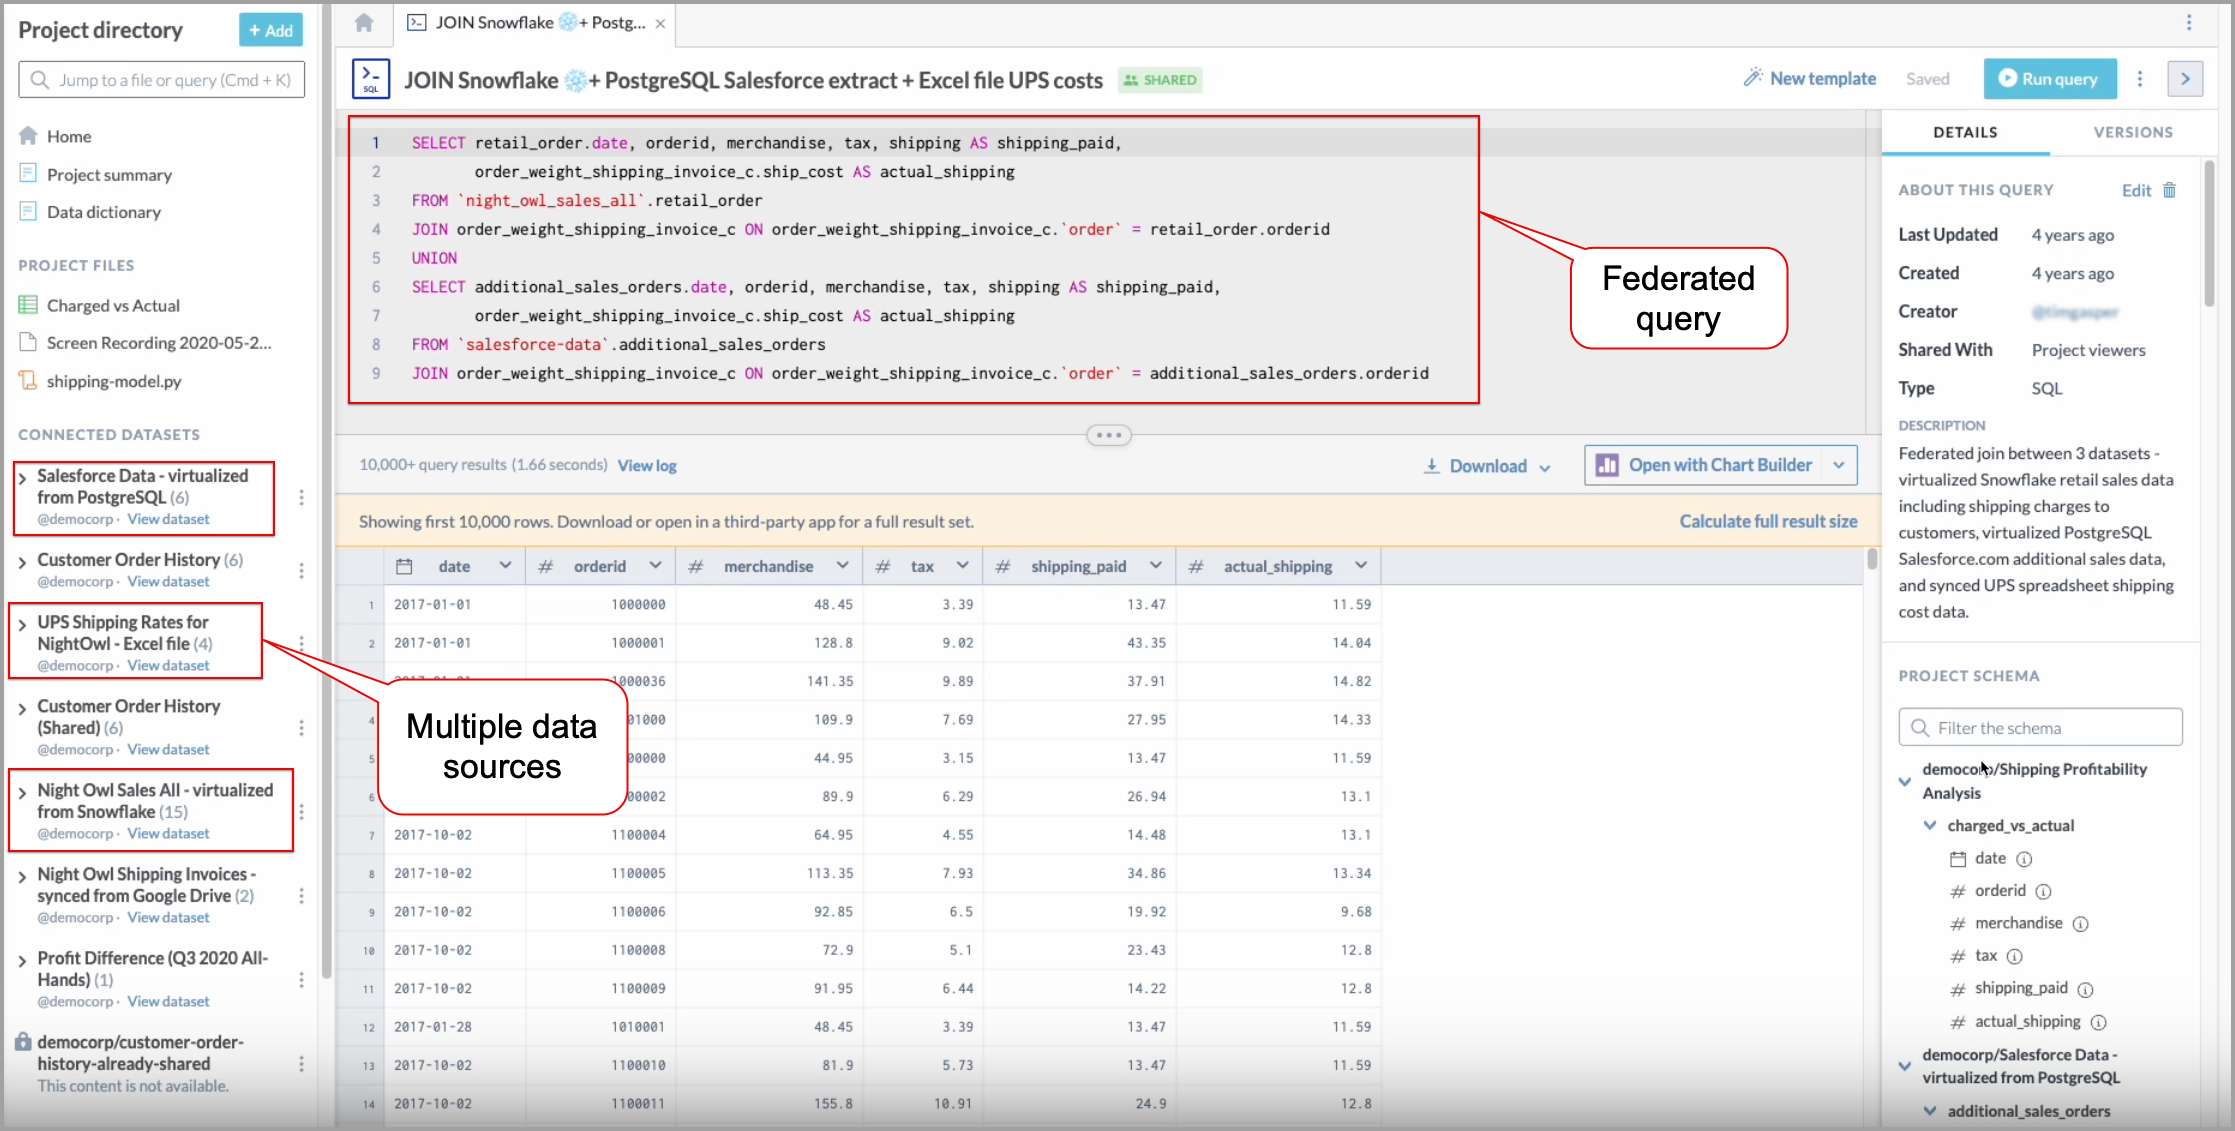
Writing federated queries
Federated querying is a powerful feature that allows you to conduct queries across multiple virtualized datasets within a project, treating them as if they were one database. Regardless of their diverse formats or locations, you can access and manipulate data seamlessly with this tool. This makes federated querying an indispensable asset for exploratory querying where data from different sources need to be combined. By leveraging our knowledge graph, we make this process efficient and effective for your data needs.
Important
To perform a federated query, you need two or more virtualized datasets available within your organization. These datasets can range across various formats and sources.
Tips for writing federated queries
Consider leveraging the UNION and JOIN commands in your queries:
UNION: Use UNION when combining results from similar structured queries across different data sources. Ensure the number and types of columns match in each query.
JOIN: Use JOIN to combine related data from different tables or databases based on a related column.
When writing a federated query, it is essential to ensure that the data types in the fields you are joining match across the different data sources.
Note
View our SQL documentation to learn more about writing federated queries.
To run a federate query:
Browse to the Catalog experience.
On the Home page, click New > Project.
Provide a Project name. Click Create project. Your project has been created page opens.
Click on the Continue button. The Project directory page opens.
In the Project directory, click the Add button and from the dropdown menu, select Dataset. Connect a dataset to this project window opens.
In the Connect a dataset to this project window, select the datasets you want to connect by clicking Connect. Once complete, click Done.
Your connected datasets are listed in the Connected datasets.
In the Project directory, click the Add button and from the dropdown menu, select SQL query. The Untitled SQL query space opens.
Enter your federated query into the editor and click on Run query button. An example of a federated SQL query could be:
SELECT *
FROM dataset1.table1
INNER JOIN dataset2.table2
ON table1.id = table2.id;
You can browse and analyze your query results by viewing the table.
Creating insights
Insights are a way to encapsulate your findings, conclusions, and key points from your data projects. Through insights, you can highlight the most significant parts of your project, making it easier for collaborators and viewers to grasp the essence of your data analysis.
To create a new insight:
From the browser address bar, copy the URL of a saved query.
Go to the Project directory, click the Add button and from the dropdown menu, select Insight.
In the text field, provide a brief description of your insight and click Create. The New Insight page opens.
Paste the URL address of the query into the brackets starting with @ symbol. For example, it will look like this: @(https://data.world/8bank/cust-address-project/workspace/query?queryid=7aecb14b-e11f-42e4-b793-80e00ba).
Click Done. The Name your insight to save window opens.
In the Name your insight to save window, provide the name of the insight and a brief description. Click Save insight.
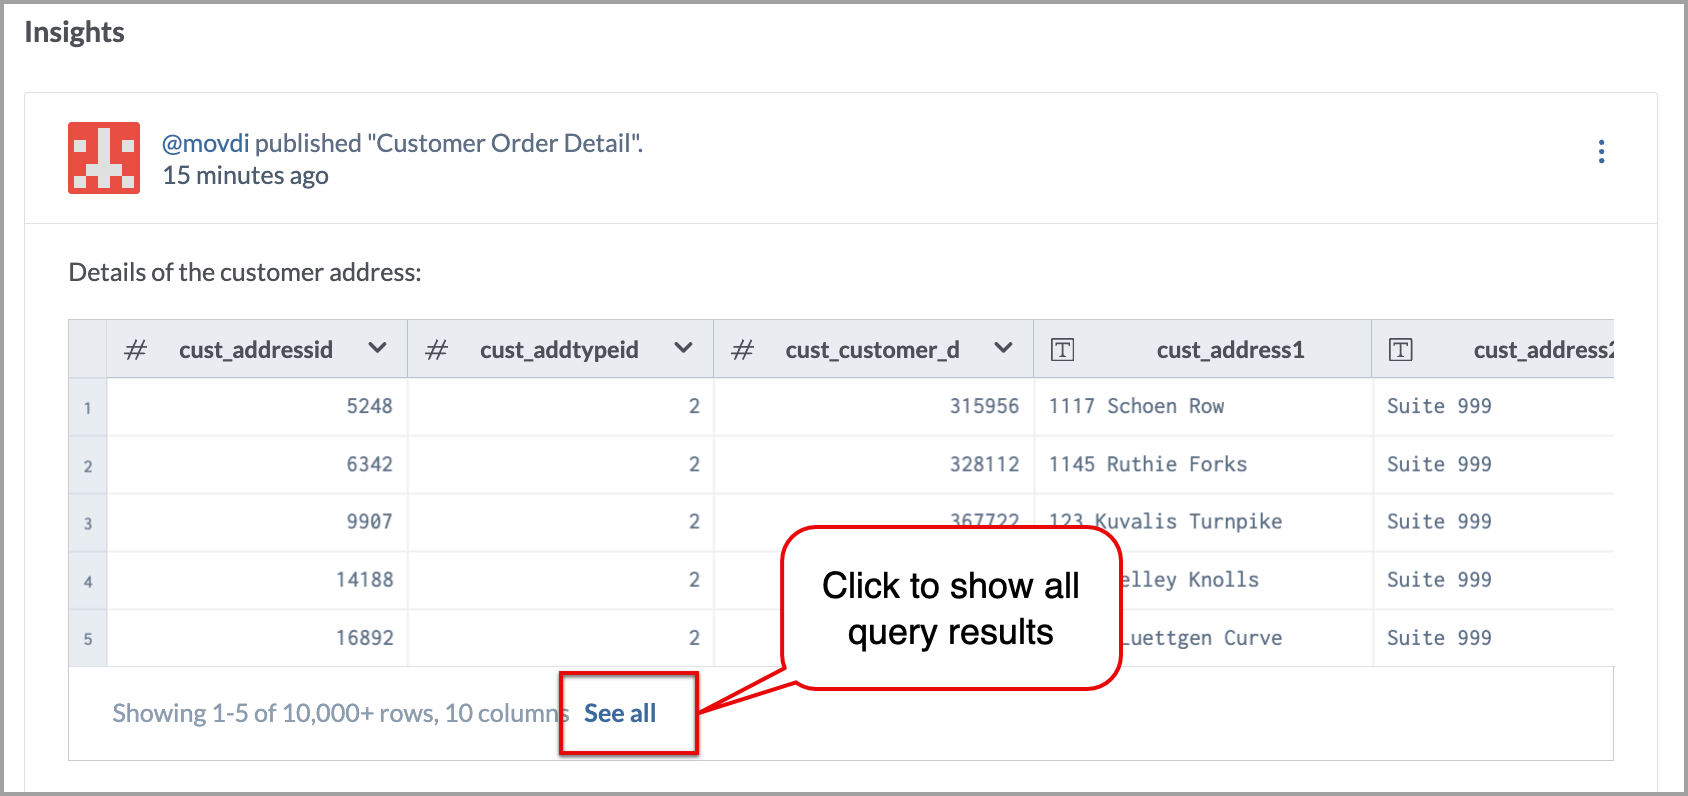
Now you can see the results are returned in the insight details. If you go back to the project itself, you can see the insight is also shown in the project.
You can click on the See all in the insight section to open up the query and show all of the results.
Working with query results
After you run the query, it returns you the results. You can download, save, embed, and connect resulted data to third-party apps.
To download query results:
After running your query, click the Download button in the query results area to reveal a dropdown menu with the file format options.
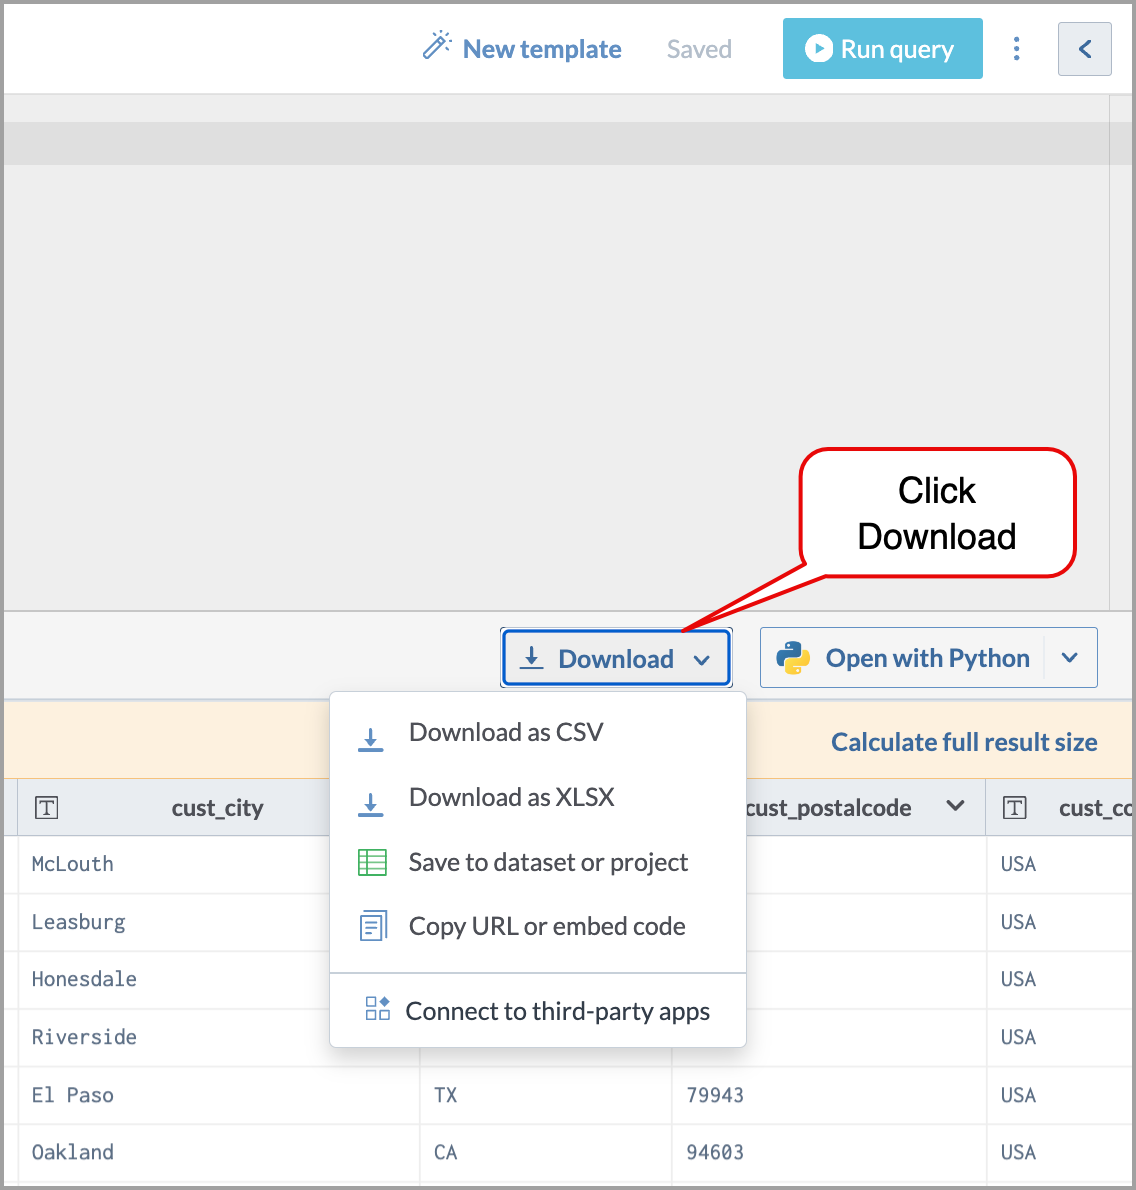
From the dropdown menu, choose the file format you desire for your data file. You can choose either .csv or .xlsx file format.
Your download will begin automatically. Once the download is complete, open the downloaded file using your preferred spreadsheet program to work with your data.
To save query results as tables to dataset or project:
You have an option to save a copy of your results as tables to datasets and projects. While saving the tables you get to define how the data is updated in the saved tables. The main reasons you might want to save your query as a new data file are security and ease of analysis.
From the Download dropdown menu, select Save to dataset or project. The Choose how data updates window opens.
In the Choose how data updates window, do one of the following:
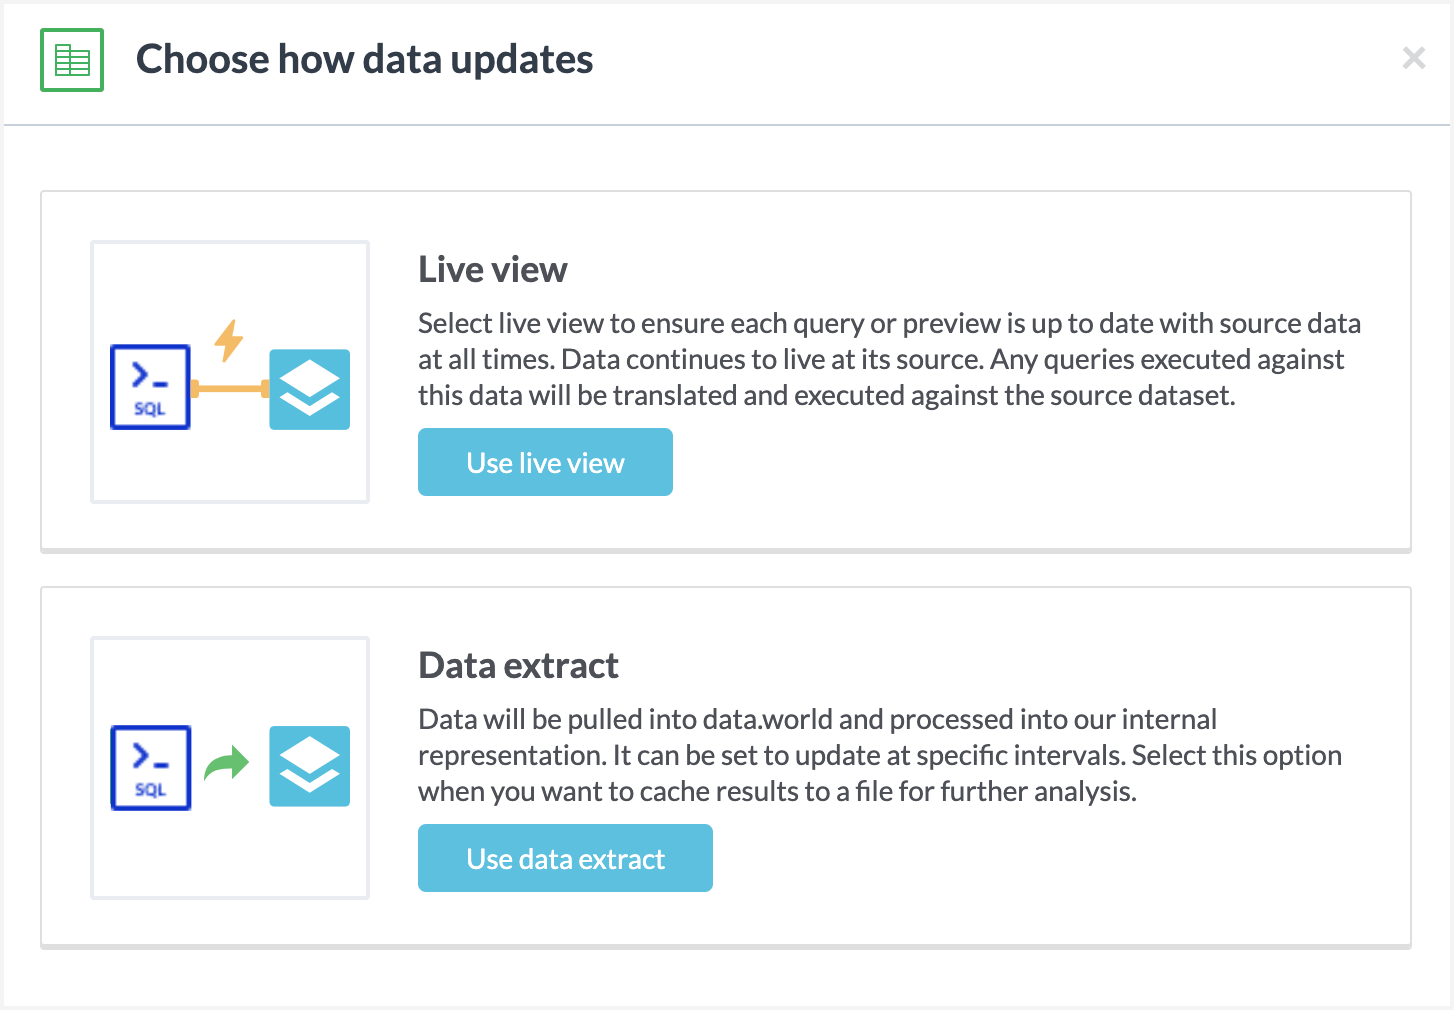
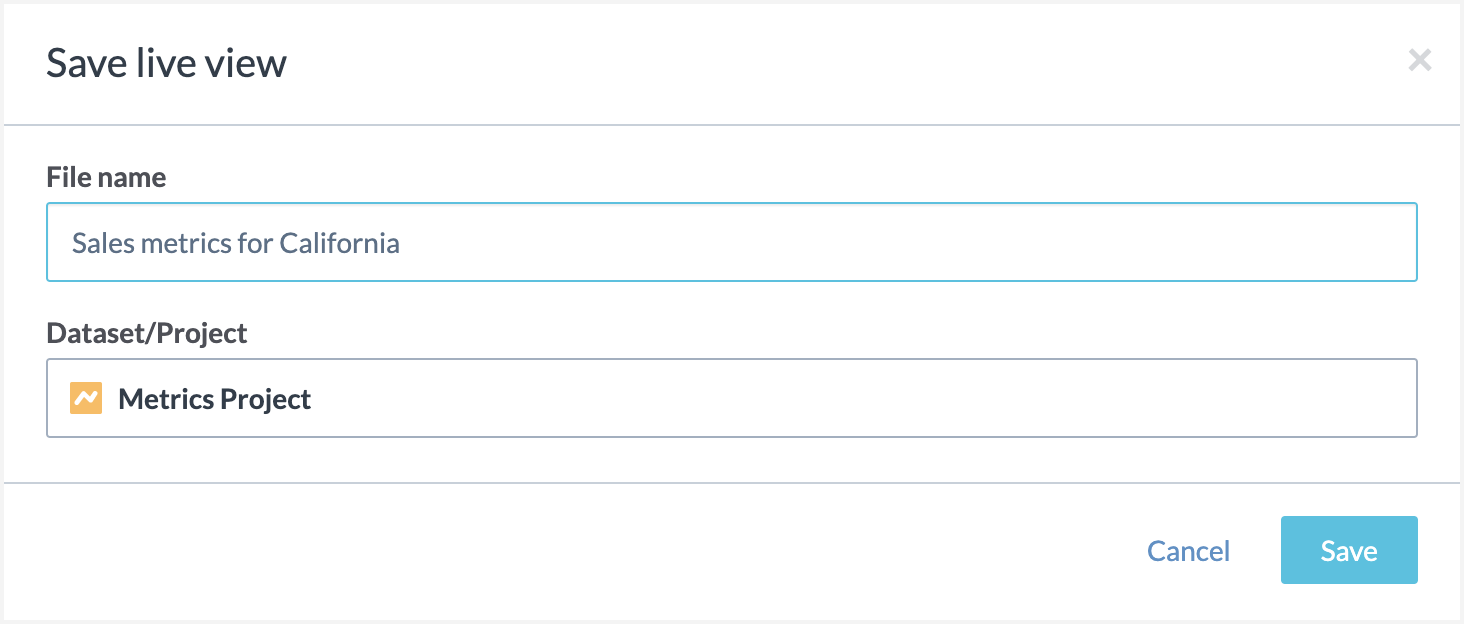
If you want a live link for the query results:
Click the Live view option to ensure each query or preview is up to date with source data at all times. Data continues to live at its source. Any queries executed against this data will be translated and executed against the source dataset.
In the next window, provide a name for the file.
Select from the list of datasets and projects. You can also select the option to save to a dataset, which saves the query results to the new dataset and automatically links the new dataset to the project.
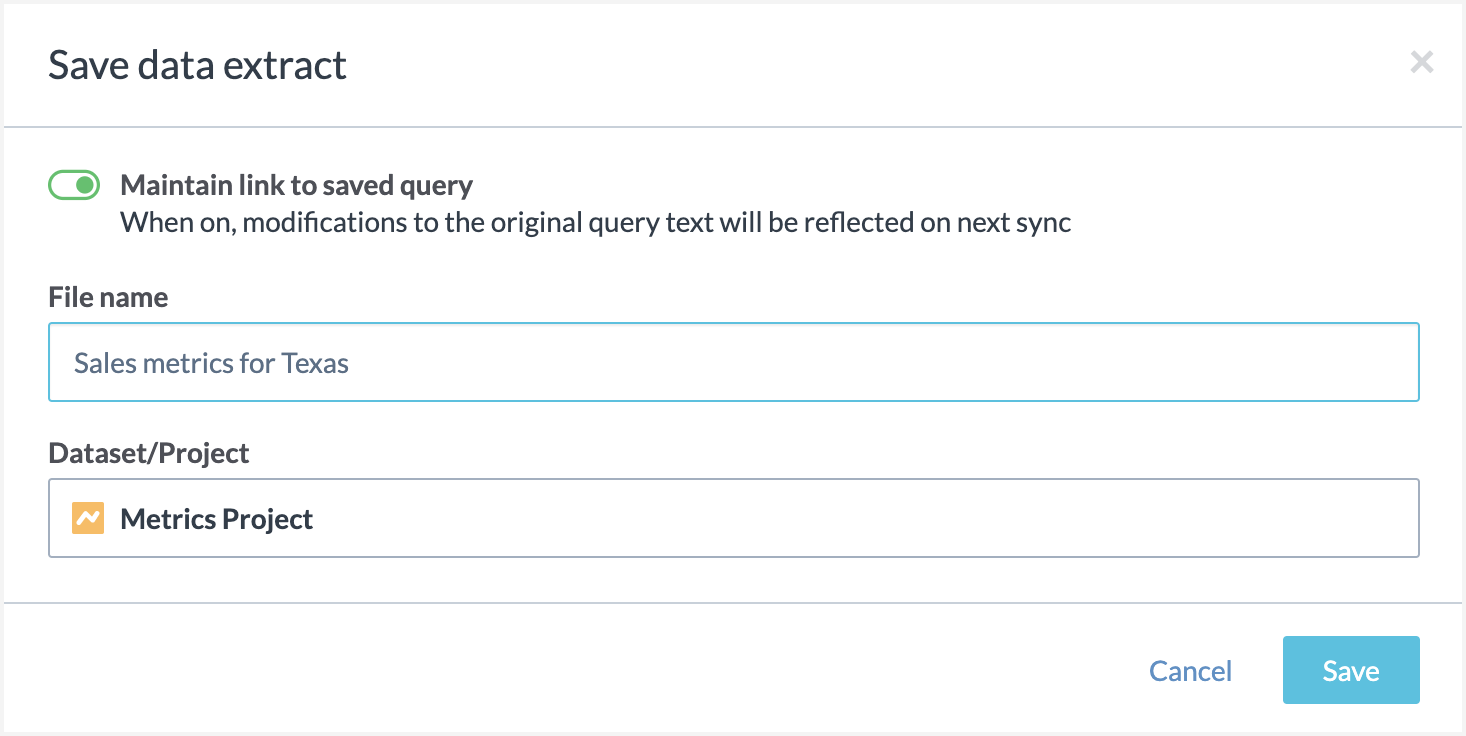
If you want a data extract of the query results:
Click the Data extract option if want the data to be pulled into data.world and processed into the internal representation. It can be set to update at specific intervals. Select this option when you want to cache results to a file for further analysis
In the next window, enable the Maintain link to saved query option if you want the modifications to the original query text will be reflected on next sync
Provide a name for the file.
Select from the list of datasets and projects. You can also select the option to save to a dataset, which saves the query results to the new dataset and automatically links the new dataset to the project.
To copy the URL or embed code:
Another option for accessing query results is through URLs and embedable code for markdown.
From the Download dropdown menu, select Copy URL or embed code. The Share or embed this query window opens.
In the Share or embed this query window, do the following:
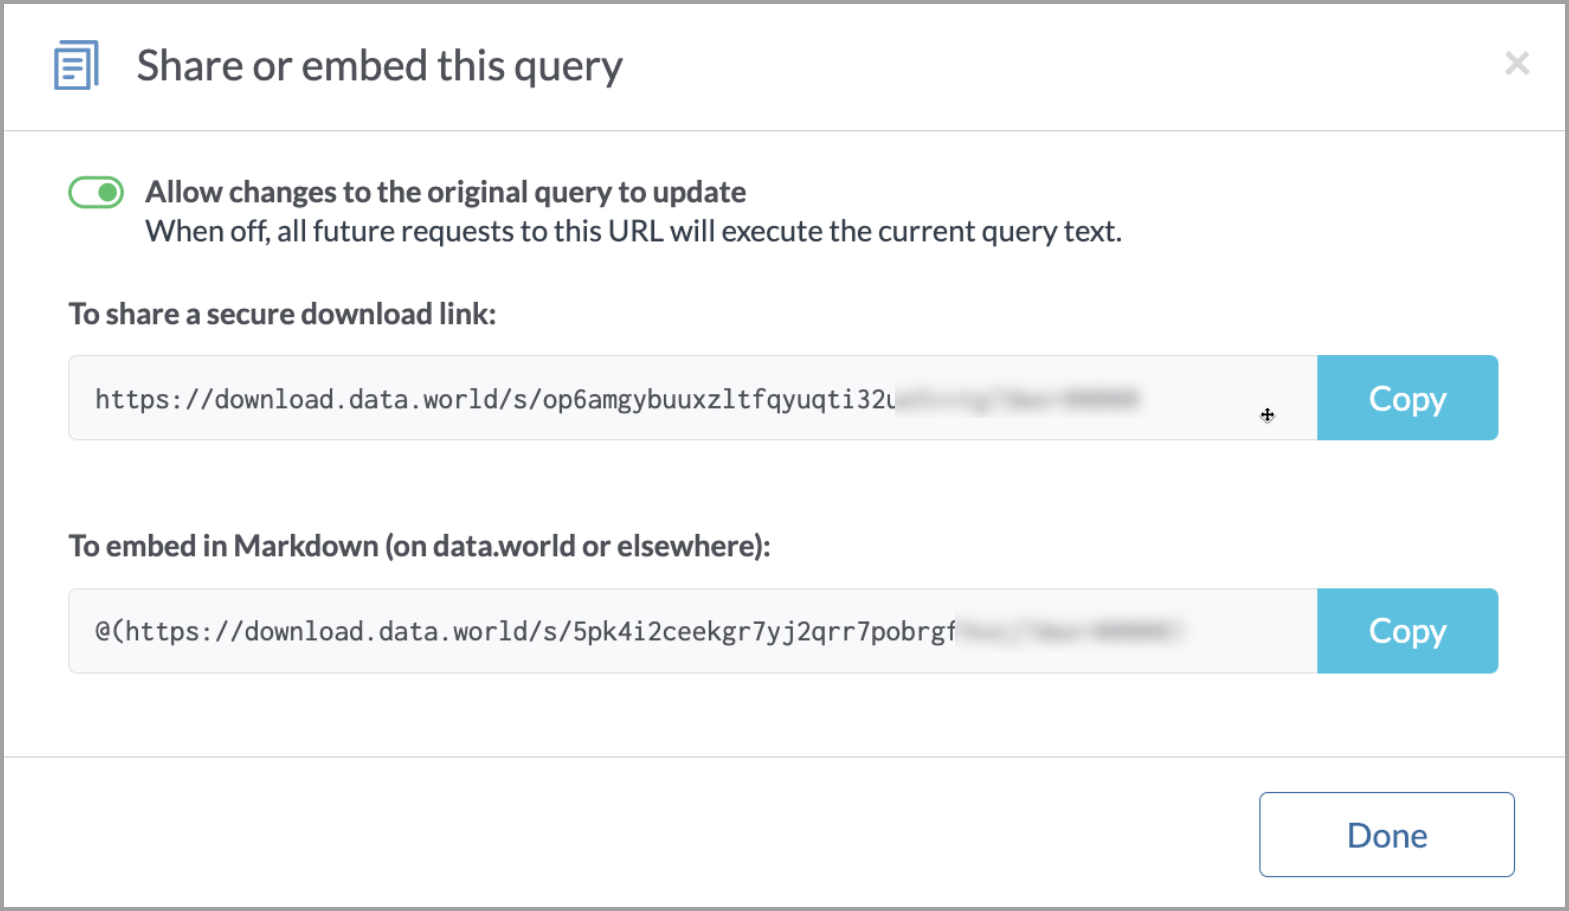
Enable the Allow changes to the original query to update option if you want the updates to the query to automatically update the results for the shared URL or embeddable code. Note that the URLs in the next two fields change when you toggle this option.
Next, copy the URLs to the download link or the embeddable code for markdown.
Download URL: A link to download the latest results for the query in CSV format. This URL can be used in the application or can be shared outside the application as download link.
Embeddable markdown code: Generate code for embedding the results of the query on a page that supports markdown. For example, use this code to highlight the results in a summary of a project in the application. You can also use this embeddable code in any third-party apps that support markdown.
Click Done to close the window.
To connect to third-party apps:
From the Download dropdown menu, select Connect to third-party apps. The Open in a third-party app to dig deeper into your data window opens.
If you want to use the built-in Chart Builder app, click the Open with Chart Builder option. When prompted, authorize the Chart Builder app to connect using your account. The next screen shows the Chart Builder. Use it to create charts from the query.
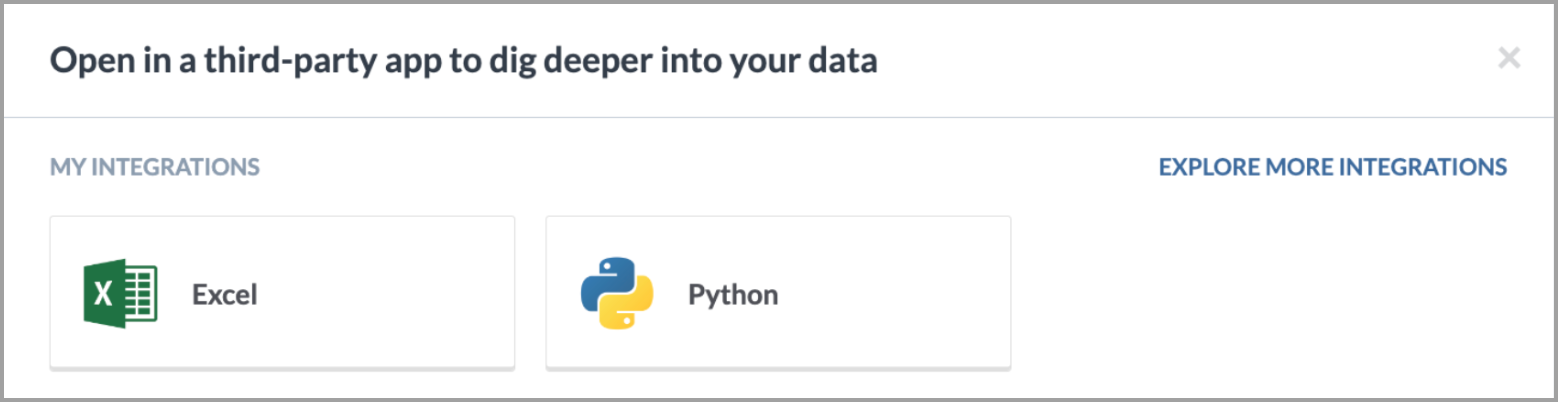
If you want to enable another integration, click the Add more integrations option. From the list of presented integrations, select the one you want to enable.
When you access the query results area after this, the Open in app button now shows the list of enabled integrations, with an option to add more integrations.
Saving a query to a project or dataset
To save a query to a project or dataset:
In the Workspace page on the Untitled query tab, click the Untitled SQL query section. The Save a copy of this SQL query window opens.
In the Save a copy of this SQL query window, provide the name of the query and a brief description. Click the New project dropdown and do one of the following:
To save a query to the new project, from dropdown select New project > click Continue. The Save the query to a new project window opens. Next, provide the name of the project. Click Create. The query is saved to the new project.
To save a query to an existing project or dataset, from dropdown choose the project or dataset name and click Save. The query is saved to the existing project.
Tip
When naming a table derived from a query, ensure it indicates it is a subset of a larger dataset. For instance, if you have customer transactions data for January 2023, name it Jan2023_Customer_Transactions_Sample. This clarifies that it is a specific January sample from the larger 2023 customer transactions dataset.