Advanced configuration: Setting up an SSH Tunnel for Connection to an AWS RDS Database
If your database resides on Amazon Web Services (AWS) and is not publicly accessible, you can establish a connection to it via an SSH tunnel using data.world.
This setup involves launching a publicly accessible SSH server, also known as a bastion server, within the same AWS Virtual Private Cloud (VPC) as your AWS database. Next, you will configure data.world to connect to your SSH server, rather than directly linking to the database. The SSH server will then forward data.world's requests to the private database.
This connection method ensures your database remains out of public internet reach - the SSH server manages security and access control for connections to your database.
Pre-configuration tasks
Finding the VPC, endpoint, and port for the database
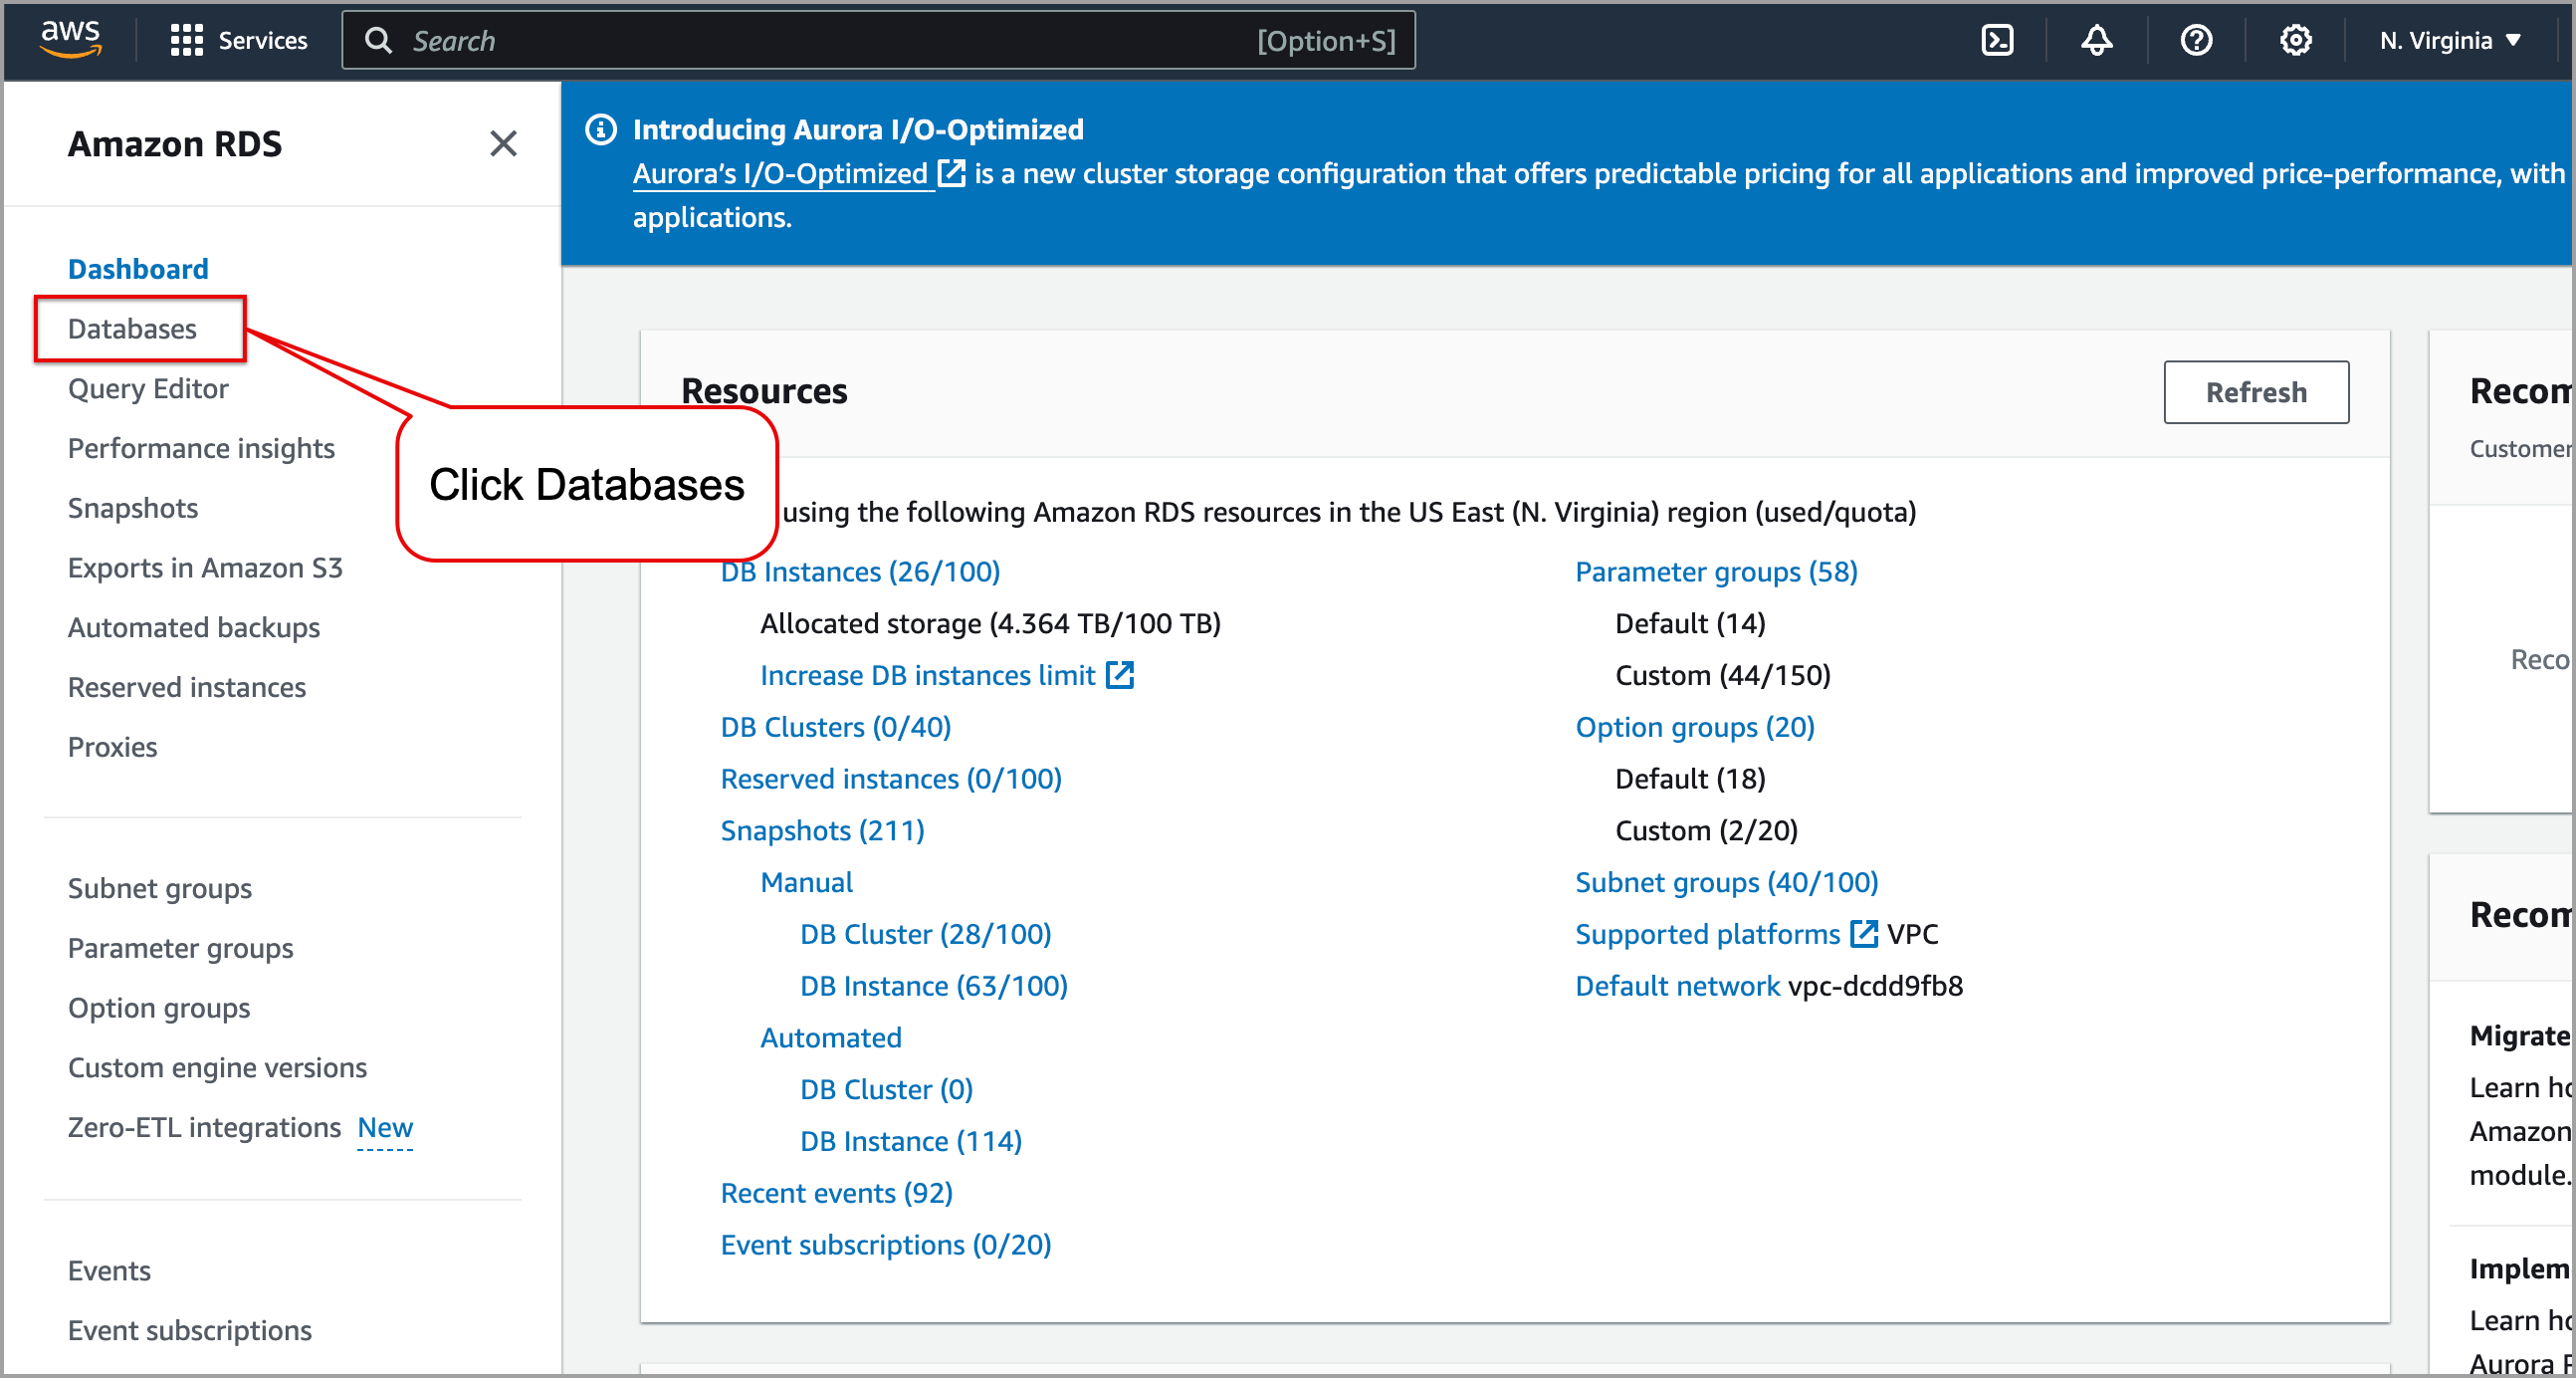
To find the VPC, endpoint, and port of the AWS RDS database:
Go to the Amazon RDS console and click Databases on the left sidebar.
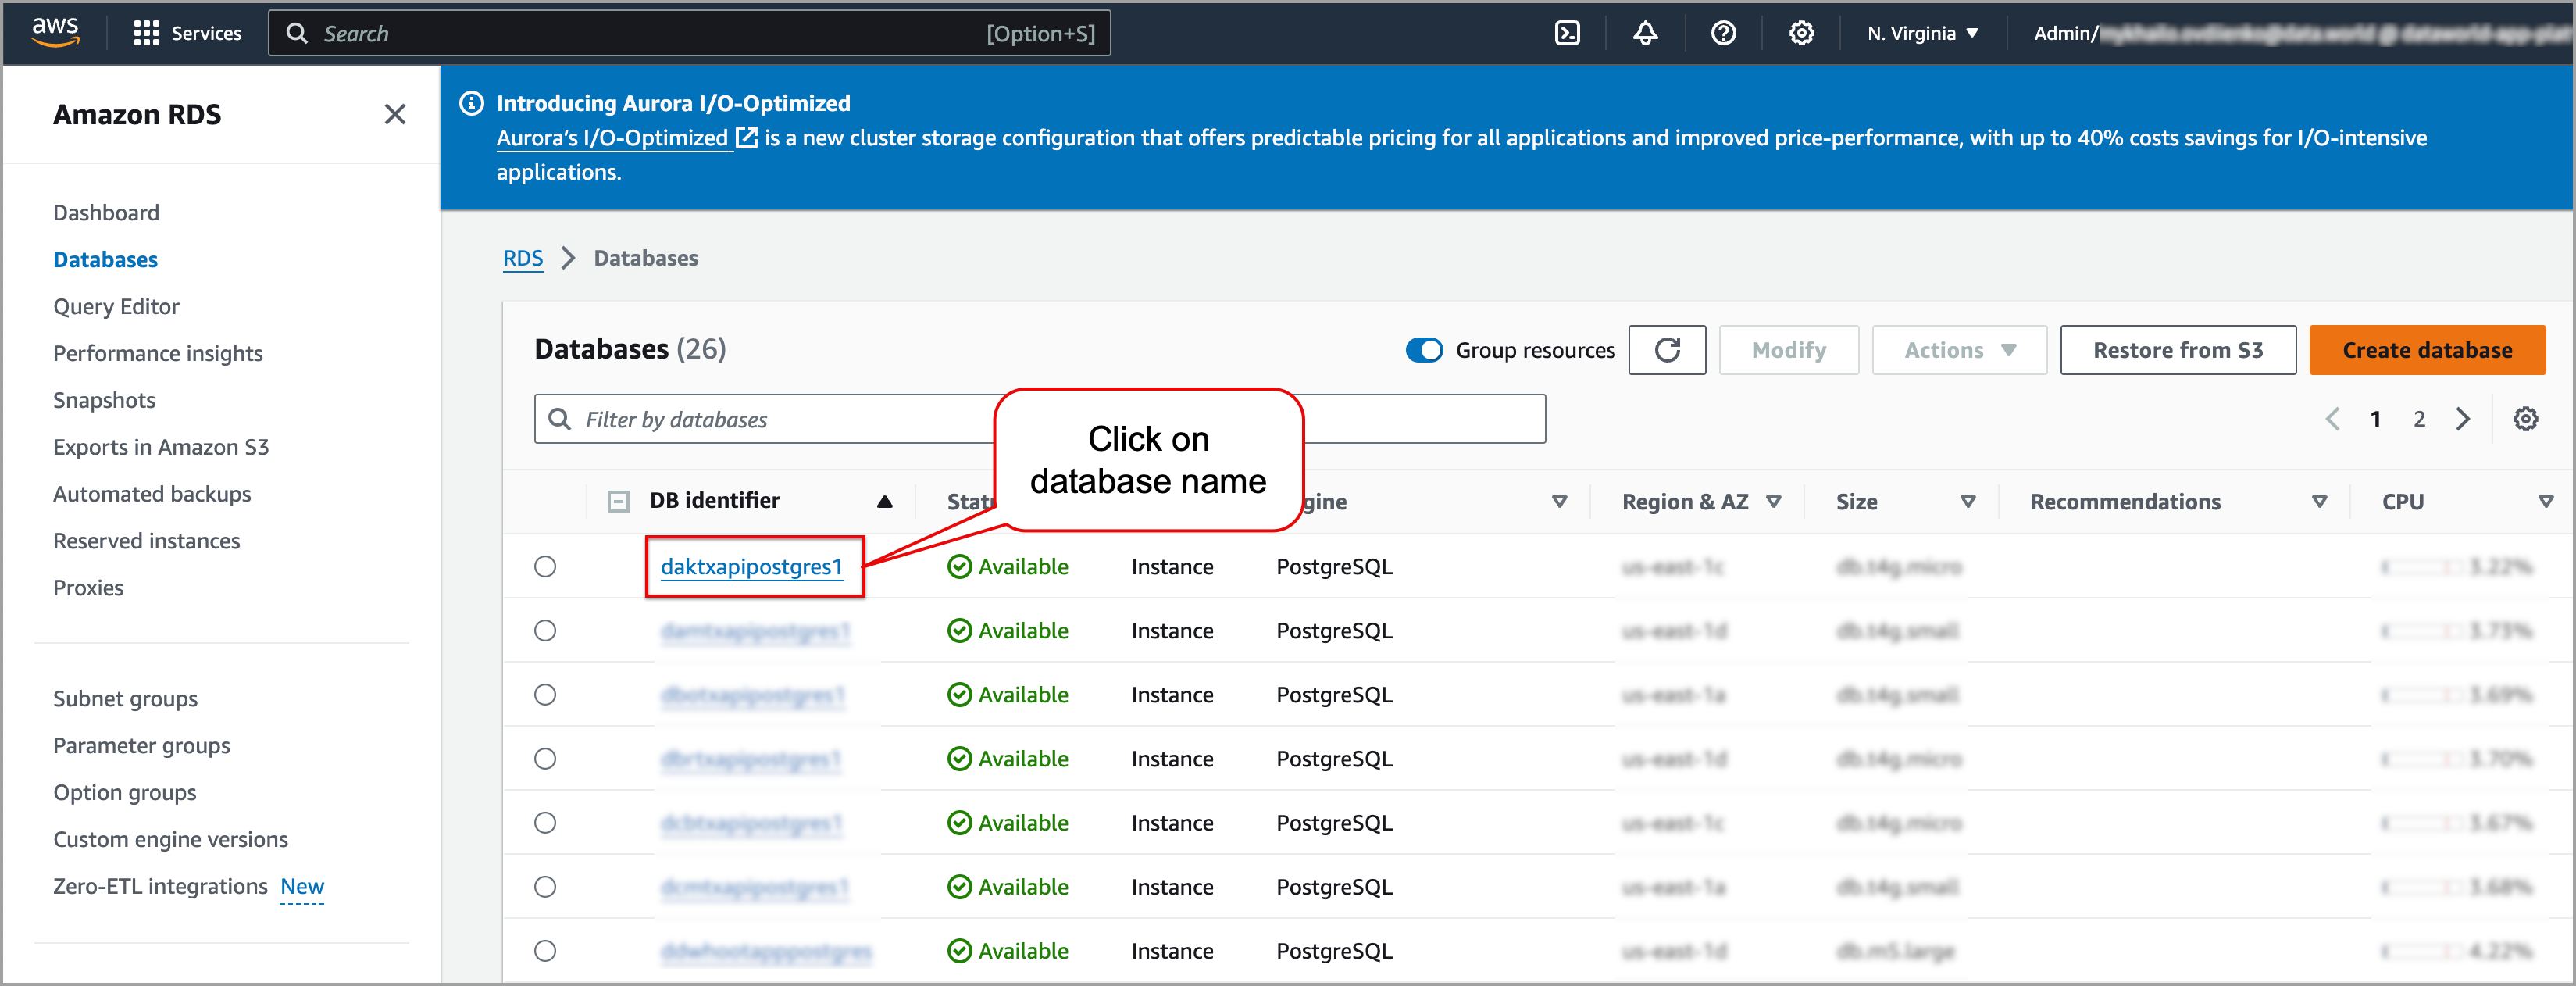
From the Databases list, in the DB identifier column, click the name of the database to open its details page.
From the Connectivity & security section of your database, note down the following details:
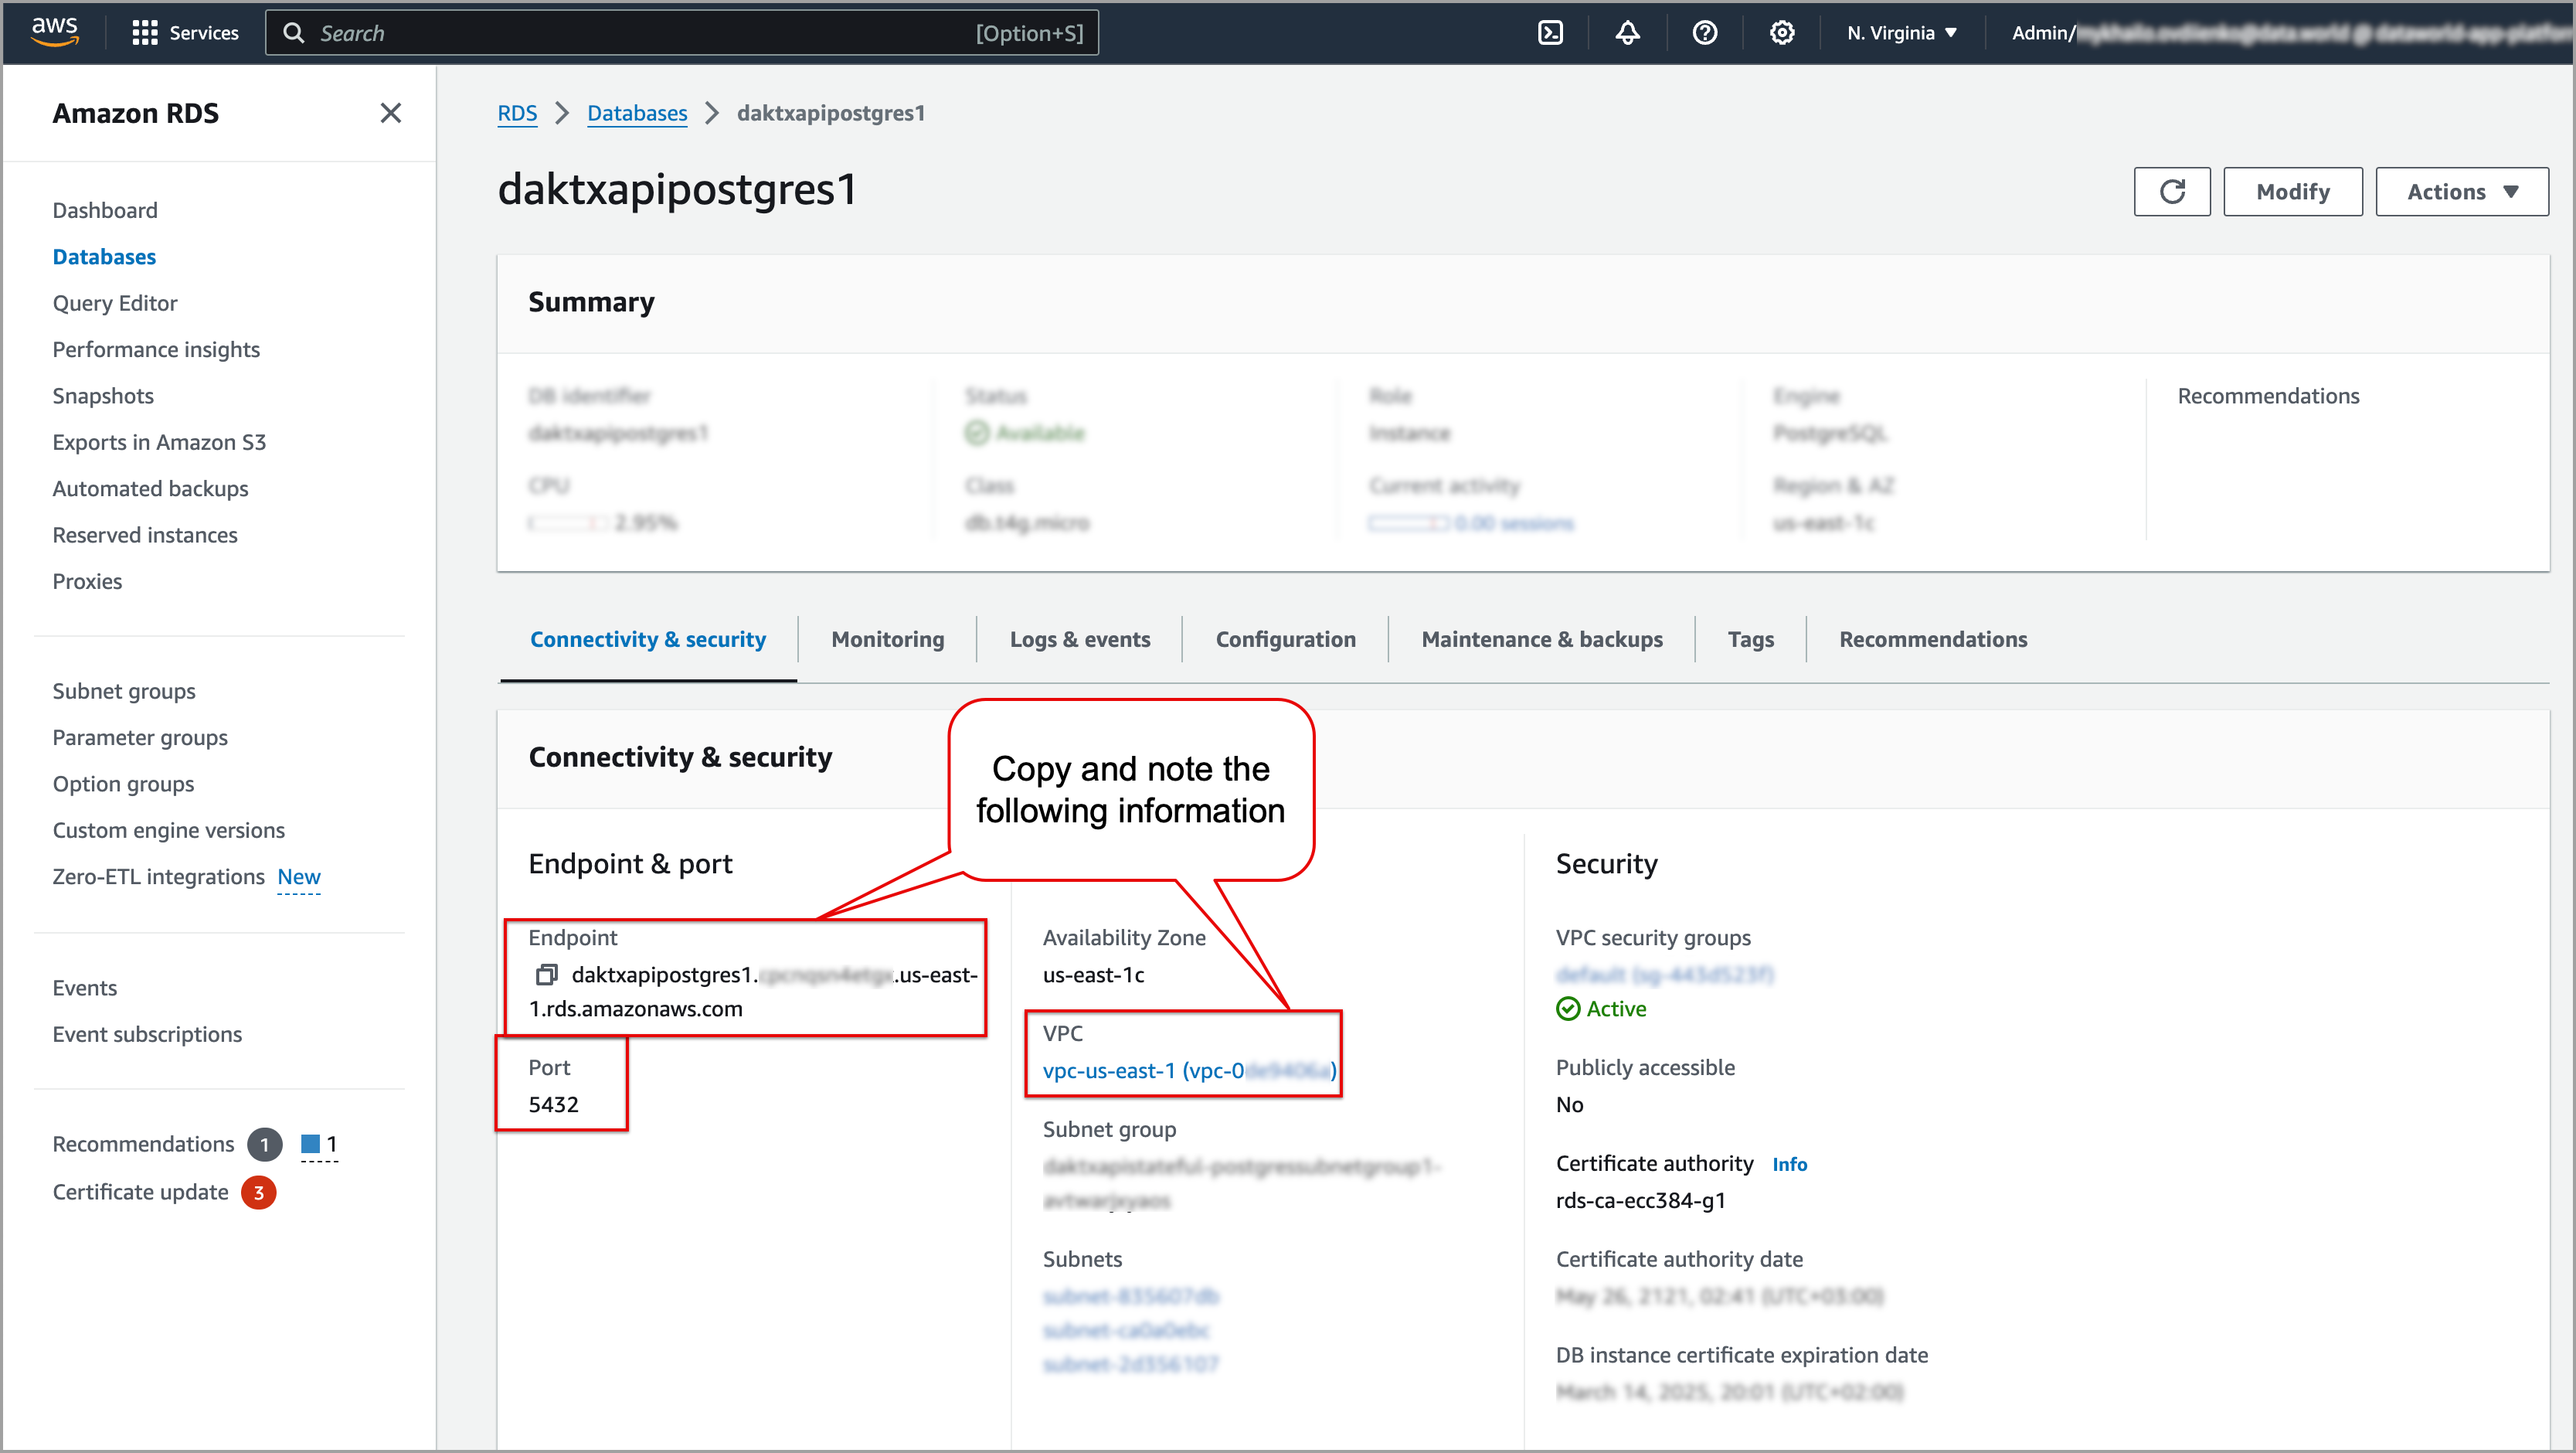
Endpoint. For example, bxjtyzapiywvpglmn7.mqxkls7bhgra.us-east-1.rds.amazonaws.com.
Port. For example, 5432.
VPC. For example, vpc-us-east-1 (vpc-0de4306a).
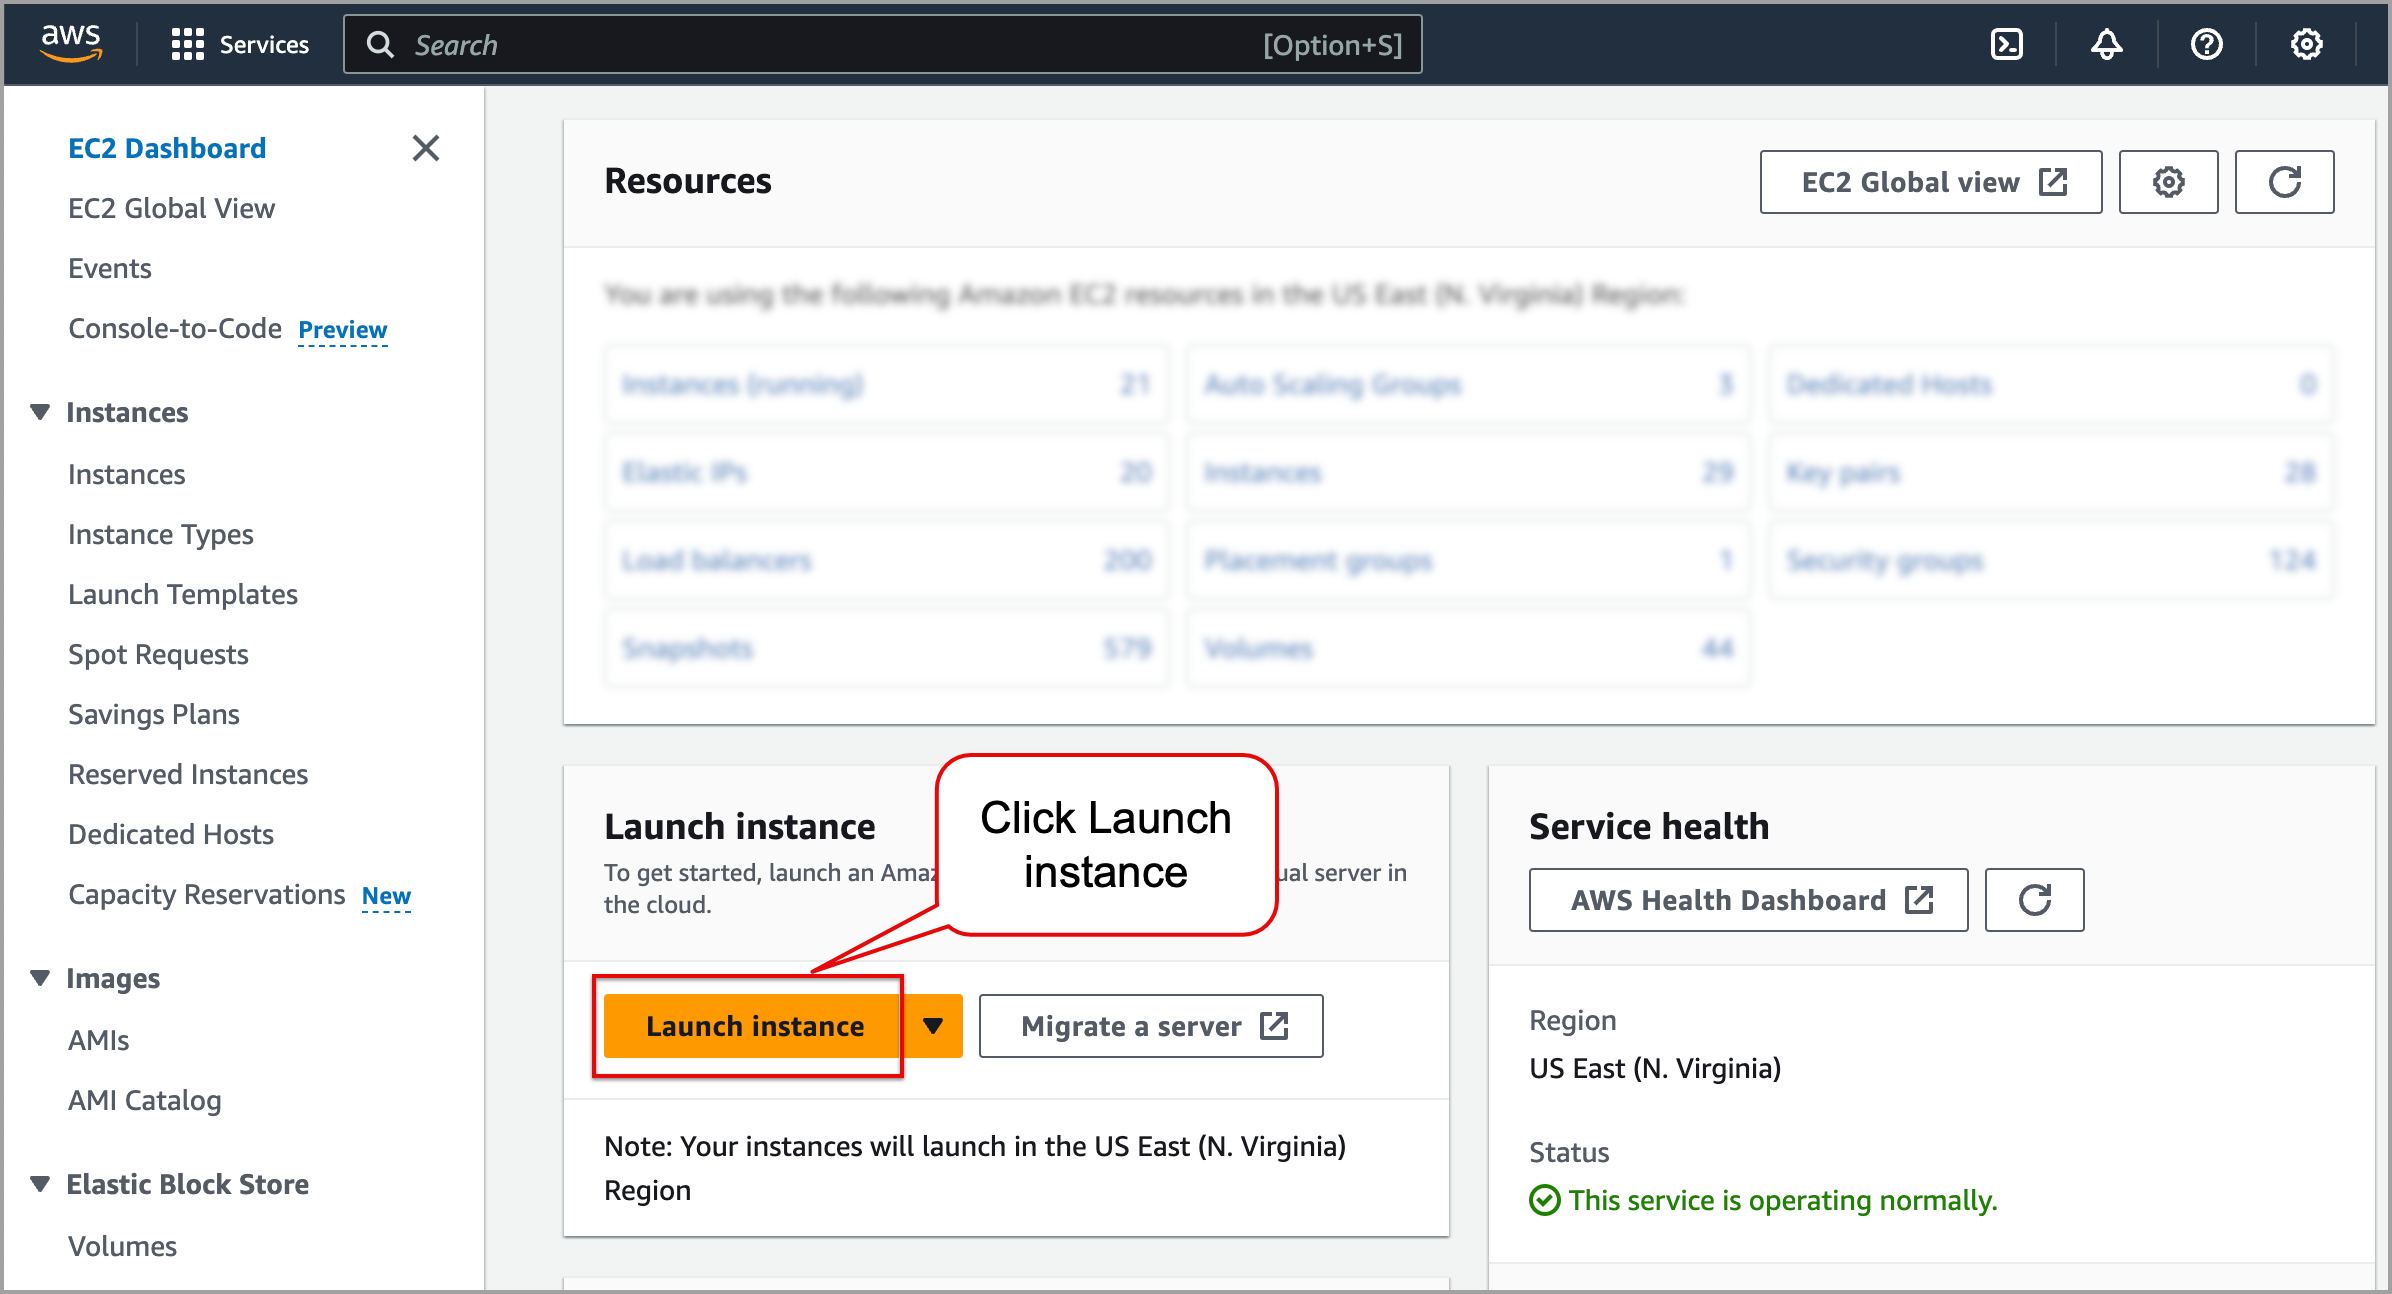
Creating an SSH server on an Amazon EC2 instance
Go to the Amazon EC2 console and click Launch instance.
In the Name and tags section, in the Name field, provide the name of the instance. Optionally, you can also add additional tags to the instance.
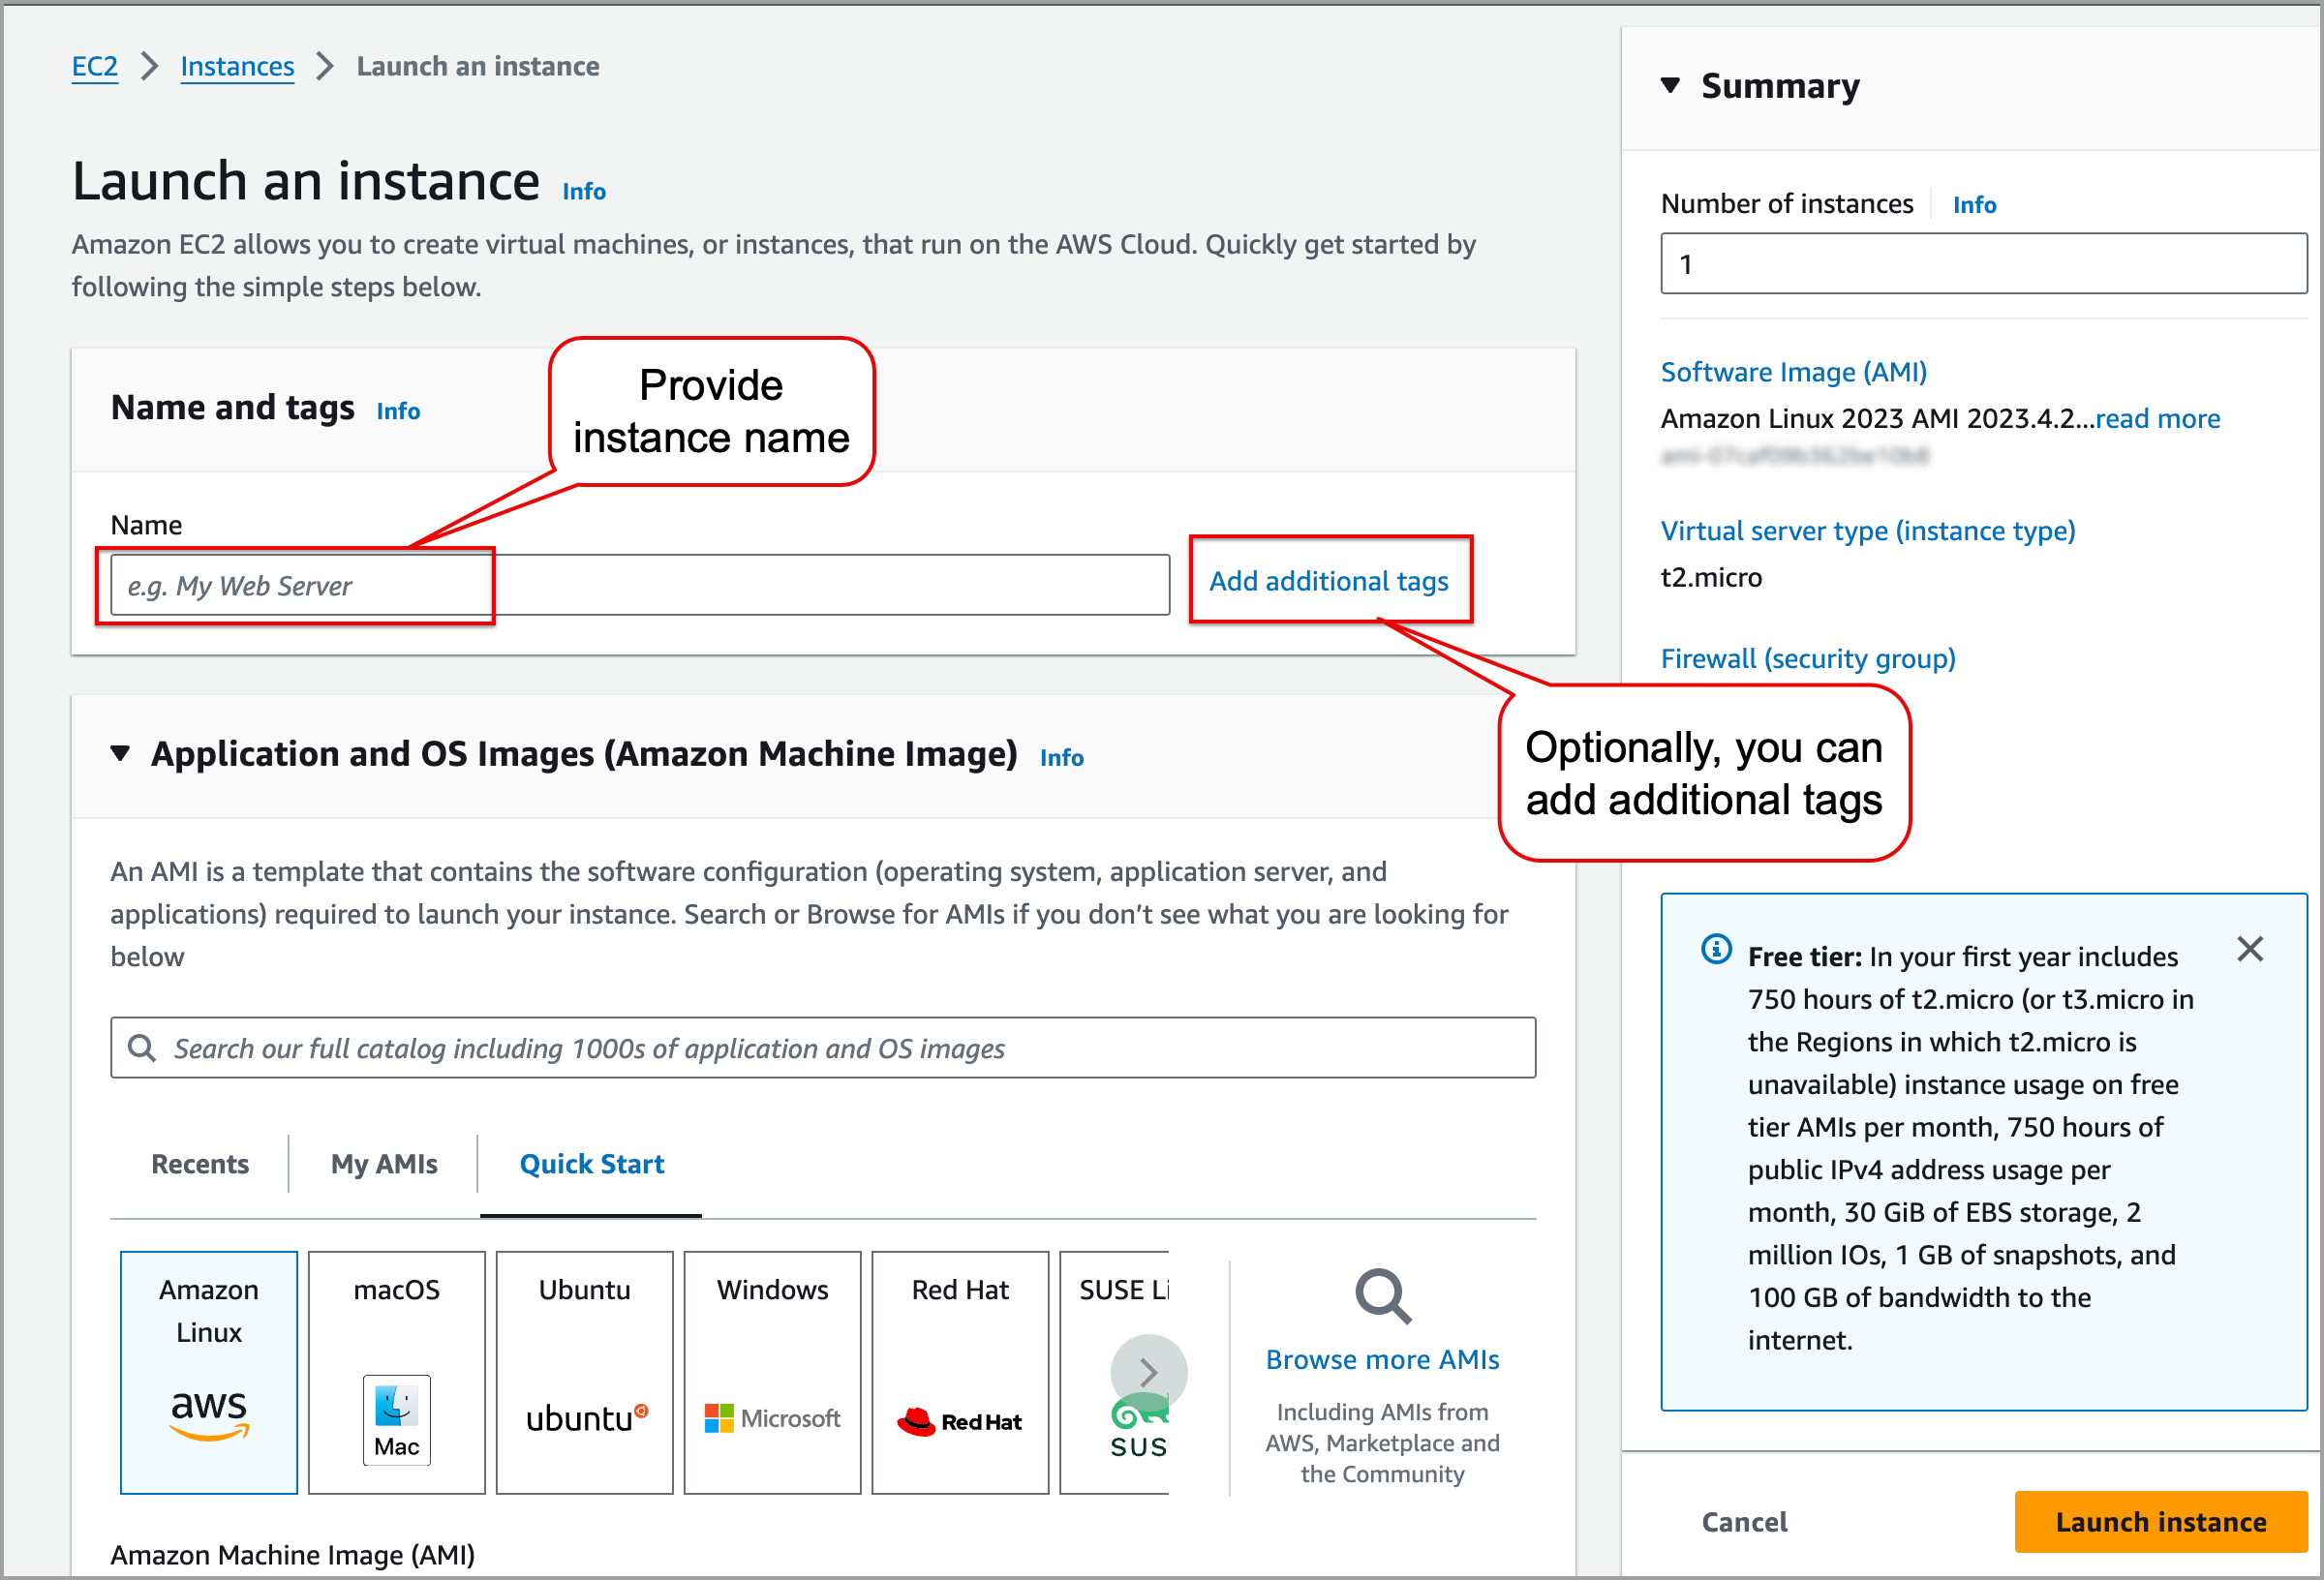
In the Application and OS Images (Amazon Machine Image) section, choose any Linux-based AMI. For example, Amazon Linux, Ubuntu, Red Hat, SUSE Linux, Debian.
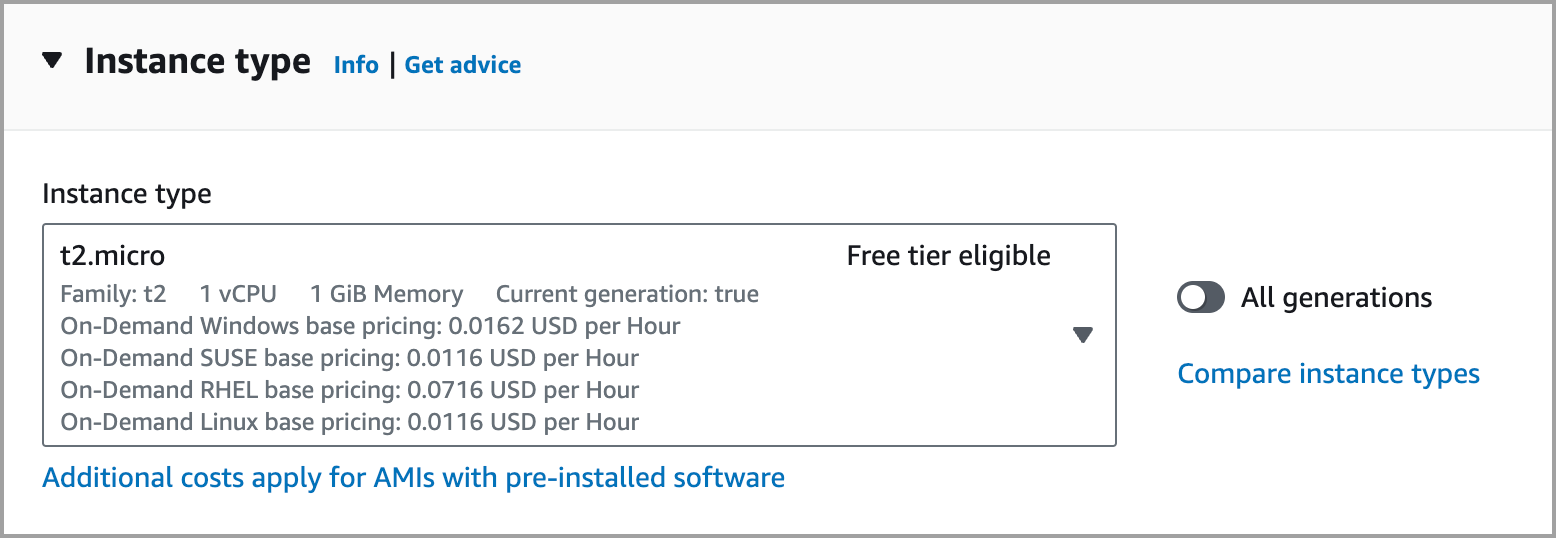
In the Instance type section, choose an instance type. This will be a low-memory and storage application. Depending on your usage requirements, a free tier t2.micro instance may be sufficient.
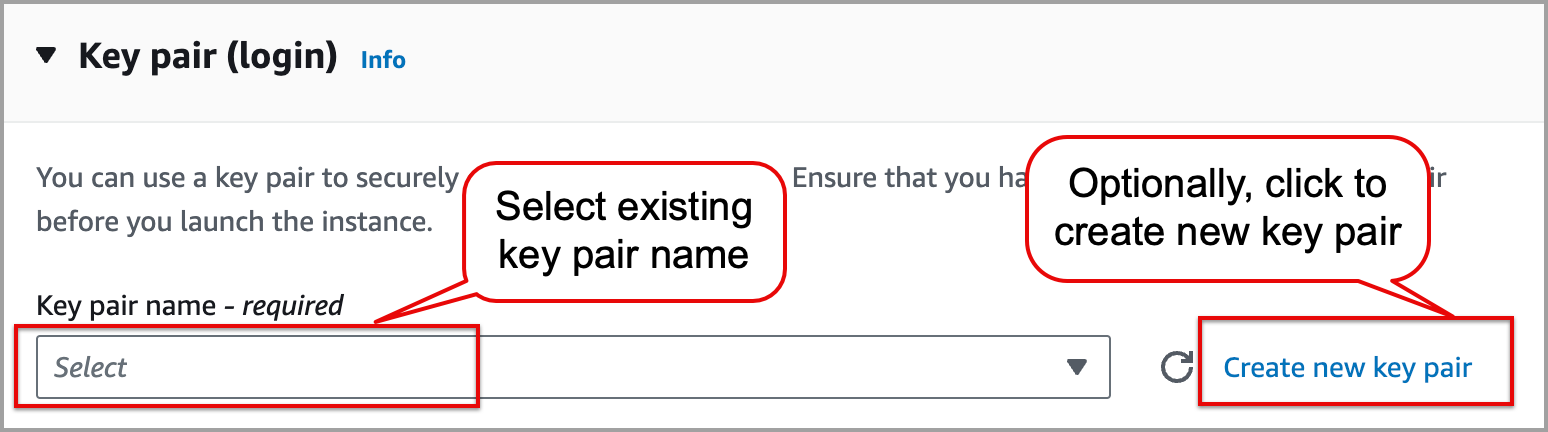
In the Key pair (login) section, from the dropdown menu, select an existing key pair. You need to have a copy of the key .pem file stored on your local computer from when you created the keys. If you need to create a new key pair, go to the Amazon EC2 key pairs and Amazon EC2 instances documentation page for more details.
In the Network settings section, click the Edit button. Use the following parameters for the network settings:
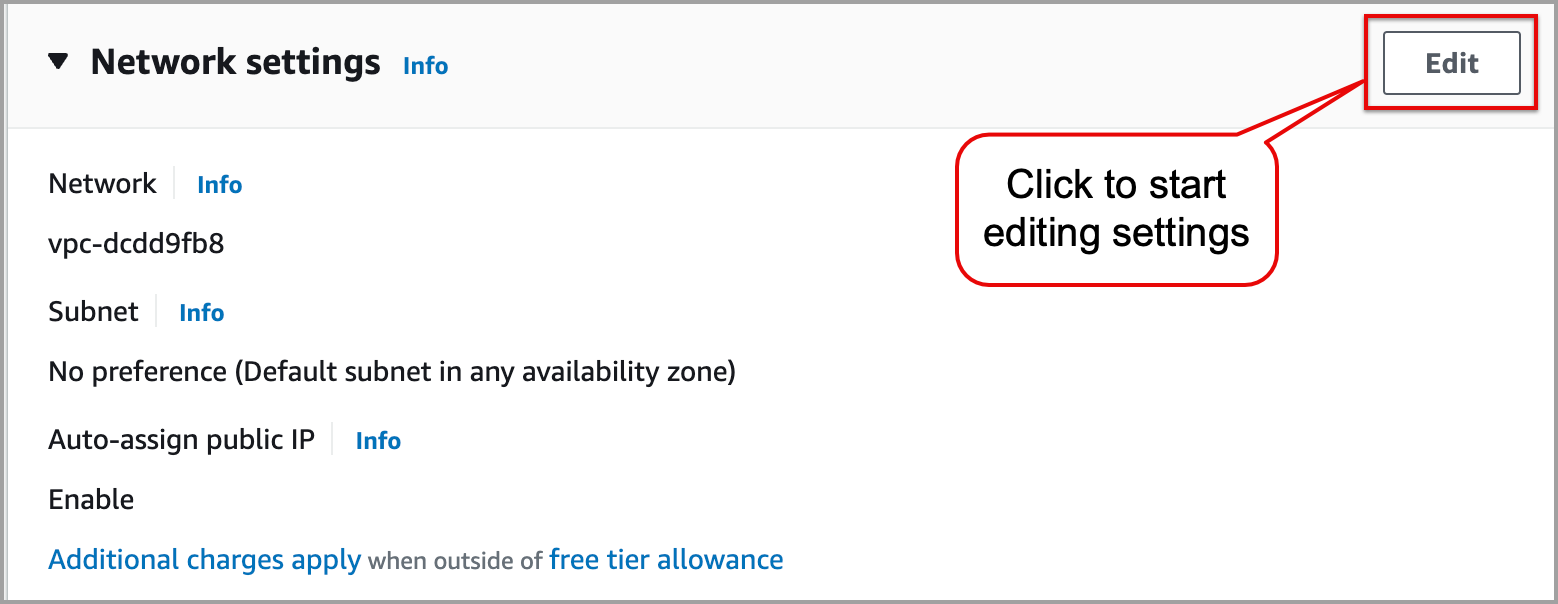
In the VPC dropdown, select your previously noted database's VPC from the Connectivity & security section of the AWS RDS.
In the Subnet dropdown, choose a public subnet.
In the Auto-assign public IP dropdown, select Enable.
In the Firewall (security groups) section, select Create security group. Provide the following parameters for the security group:
In the Security group name field, provide data.world to SSH.
In the Description field, provide Bastion server for forwarding requests from data.world to private database.
Within the Network settings section, in the Inbound Security Group Rules section, you need to create four security group rules. Click Add security group rule to add a new group.
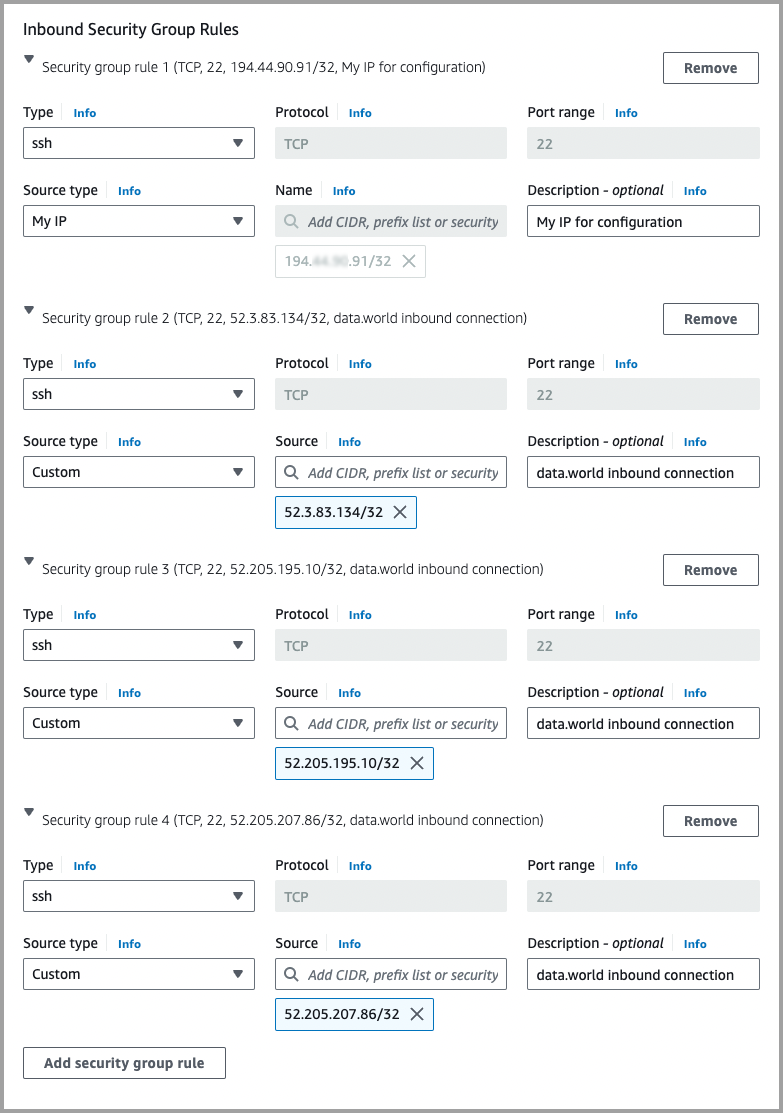
For the Security group rule 1, use the following parameters:
From the Type dropdown, select ssh.
In the Protocol field, keep default as TCP.
In the Port range field, keep default 22.
From the Source type dropdown, select My IP.
In the Description field, provide My IP for configuration.
For the Security group rule 2, use the following parameters:
From the Type dropdown, select ssh.
In the Protocol field, keep default as TCP.
In the Port range field, keep default as 22.
From the Source type dropdown, select Custom.
In the Source field, provide 52.3.83.134/32.
In the Description field, provide data.world inbound connection.
For the Security group rule 3, use the following parameters:
From the Type dropdown, select ssh.
In the Protocol field, keep default as TCP.
In the Port range field, keep default as 22.
From the Source type dropdown, select Custom.
In the Source field, provide 52.205.195.10/32.
In the Description field, provide data.world inbound connection.
For the Security group rule 4, use the following parameters:
From the Type dropdown, select ssh.
In the Protocol field, keep default as TCP.
In the Port range field, keep default as 22.
From the Source type dropdown, select Custom.
In the Source field, provide 52.205.207.86/32.
In the Description field, provide data.world inbound connection.
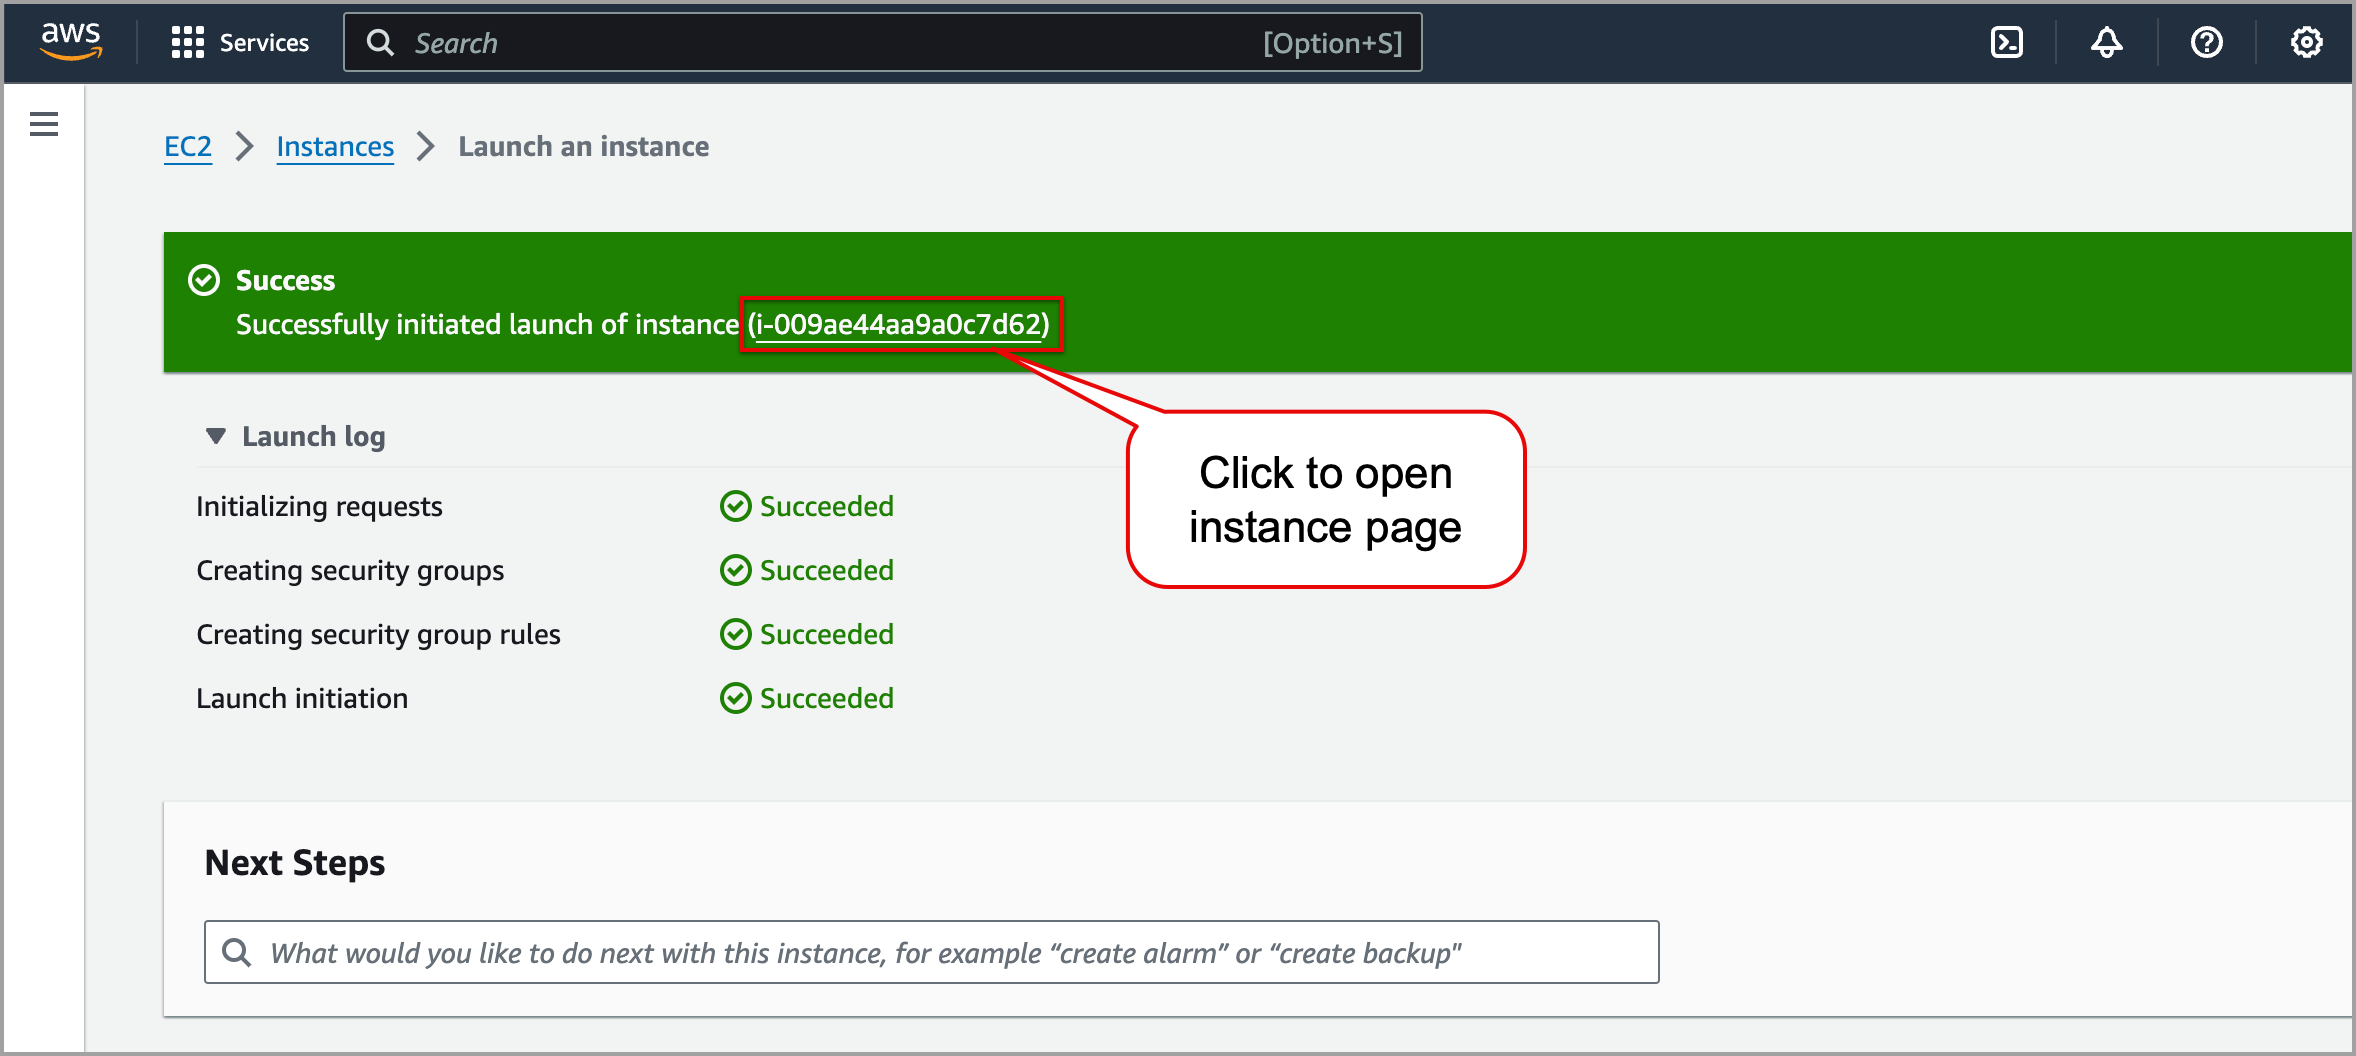
Maintain all the remaining settings at their standard values. Click Launch instance. You should see a confirmation Success message.
Click on the Instance ID from the Successfully initiated launch of instance confirmation message. The Instances page opens.
In the Instance ID column, click on your instance ID. Instance summary page opens.

On the Instance summary page, note down the following details:
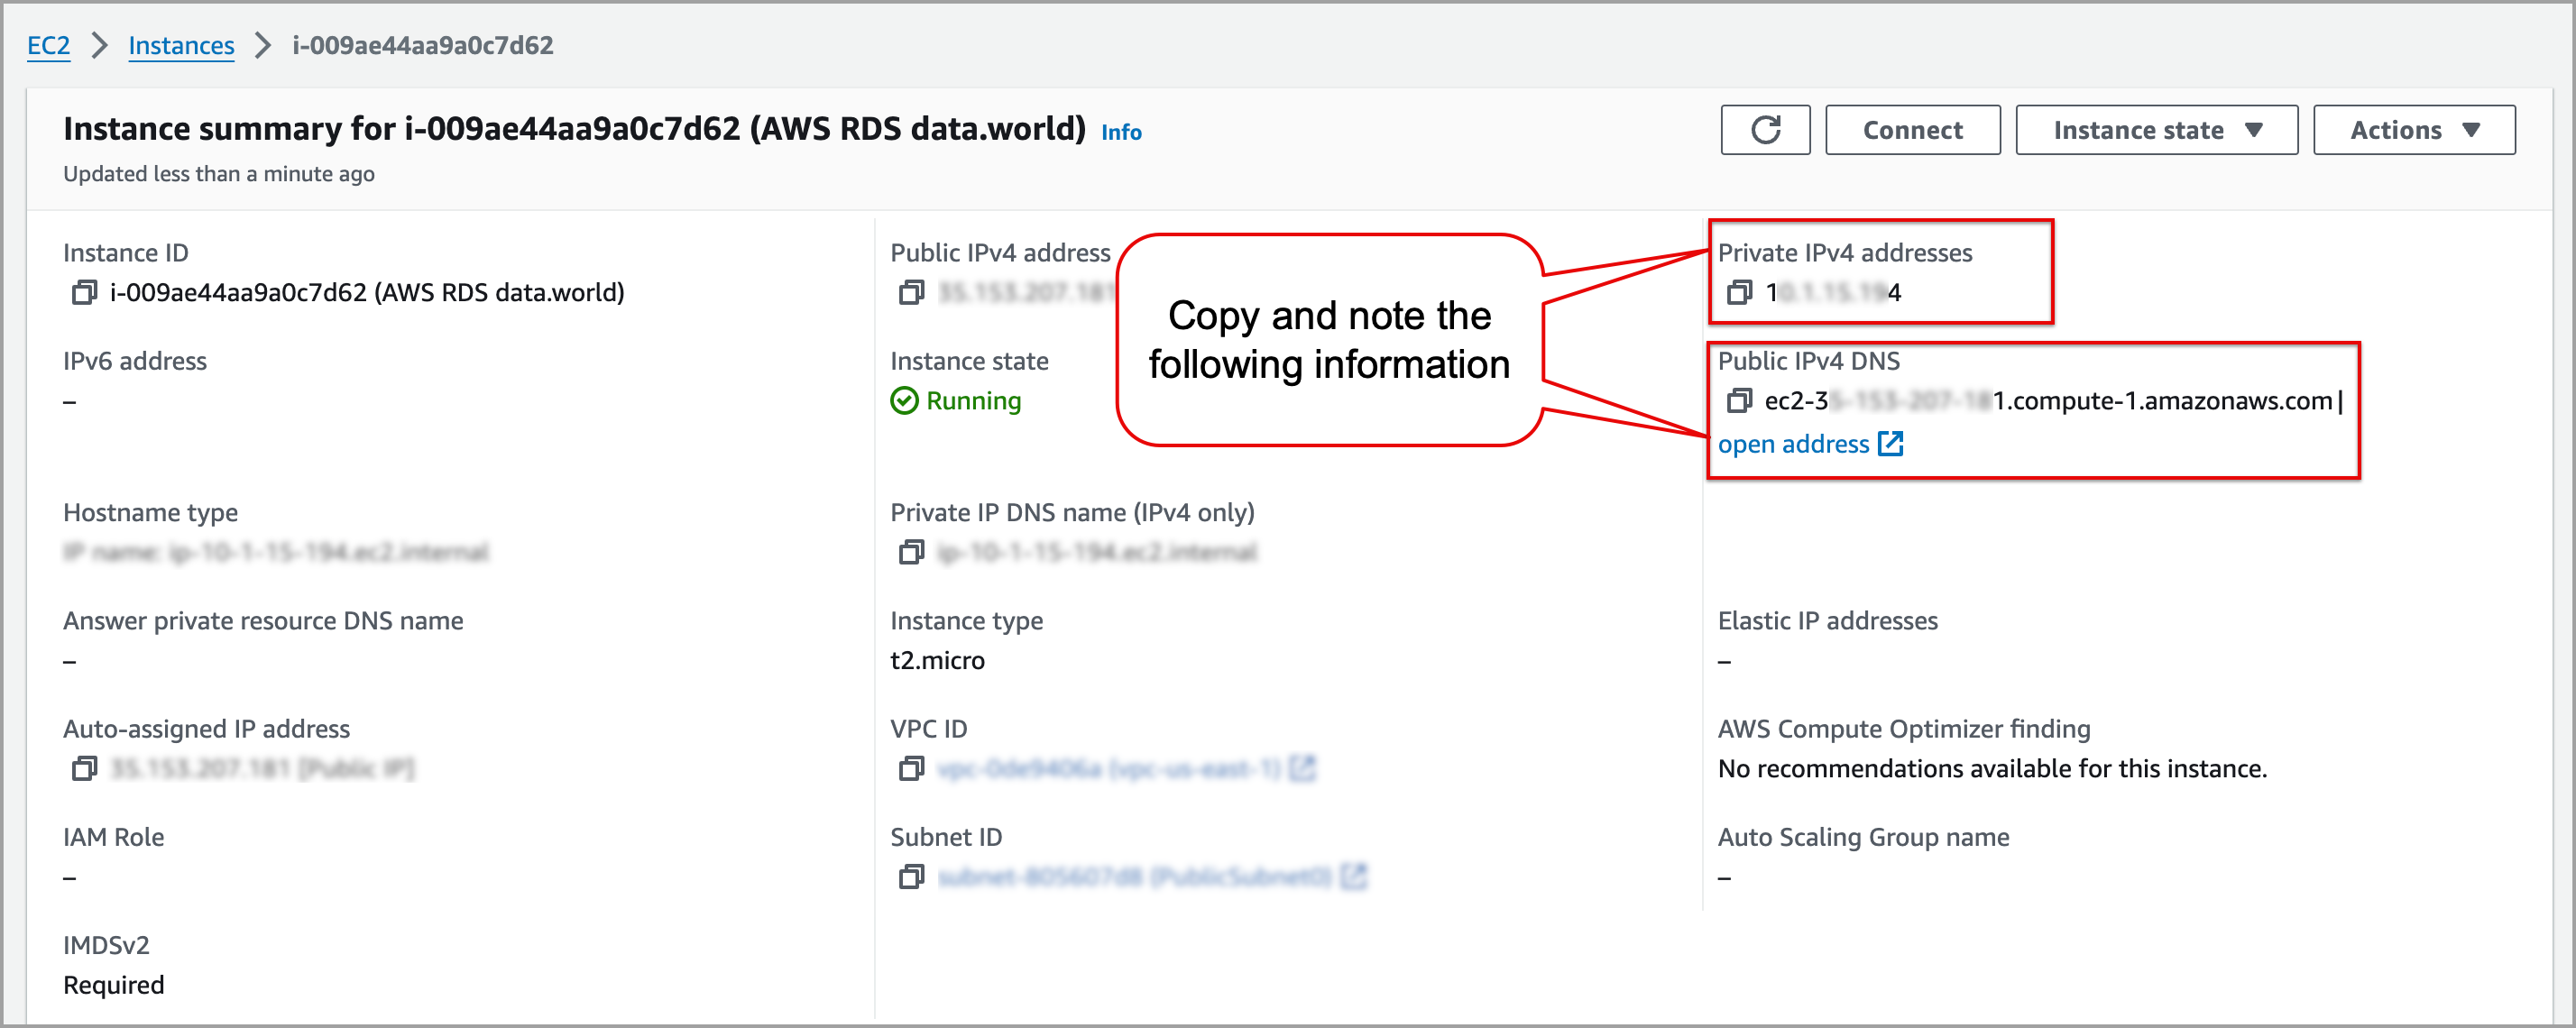
Public IPv4 DNS. For example, ec2-87-135-207-131.compute-1.amazonaws.com.
Private IPv4 addresses. For example, 10.2.16.198.
Creating a new security group
Go to the AWS EC2 Security groups page, and click Create security group.
On the Create security page, in the Basic details section, provide the following parameters:
In the Security group name field, provide SSH to your database name.
In the Description field, provide allows traffic from the SSH server to database.
In the VPC dropdown, select your previously noted database's VPC from the Connectivity & security section of the AWS RDS.
In the Inbound rules section, click the Add rule button. Use the following parameters for the rule:
From the Type dropdown, select Custom TCP.
In the Protocol field, keep default as TCP.
In the Port range field, provide the port number of the database.
From the Source type dropdown, select Custom. Next to the dropdown, in the blank field, provide the previously noted Private IPv4 address with /32 added to the end. For example, 10.2.16.198/32.
Maintain all the remaining settings at their standard values. Click Create security group.
On the following Modify DB instance page, in the Schedule modifications section, choose when to apply modifications.
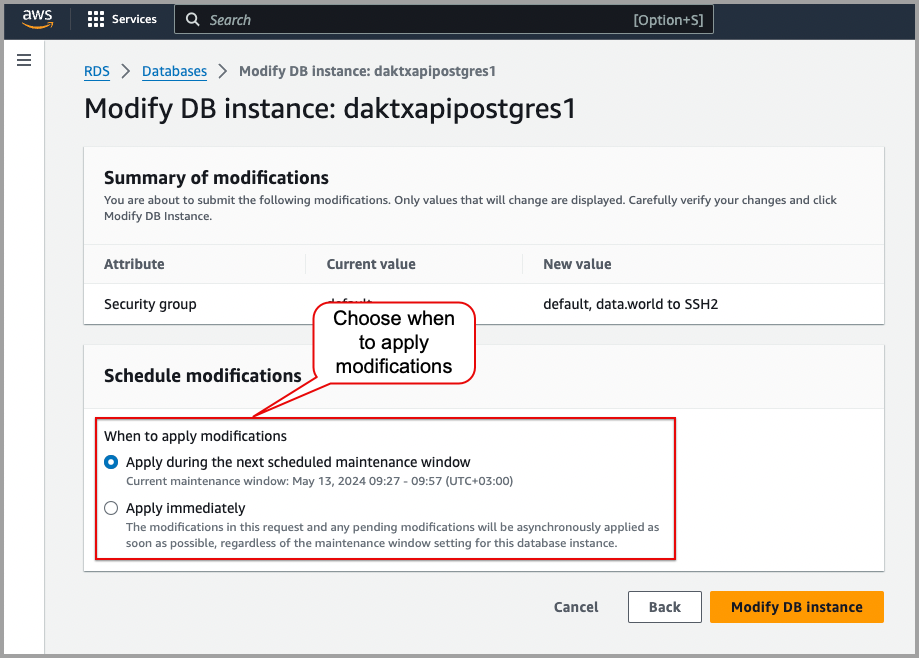
Click the Modify DB instance button.
Adding the security group to your database
Go to the Amazon RDS console and click Databases on the left sidebar.
From the Databases list, in the DB identifier column, click the name of the database to open its details page.
On the database details page, click the Modify button in the upper-right corner.
In the Connectivity section, from the Security group dropdown menu, select your previously created security group.
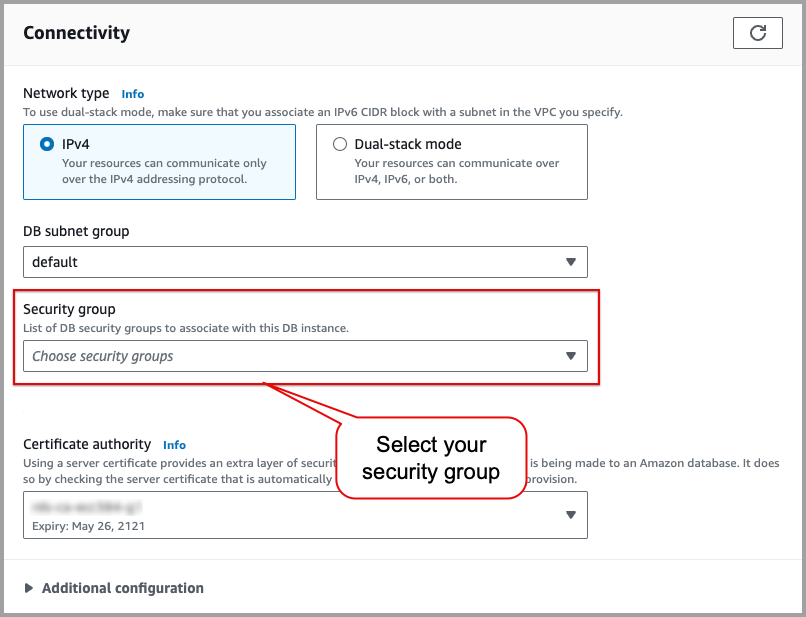
Click the Continue button to save the changes.
Configuring an SSH user for data.world to use to connect
Open your Terminal.
If you are using MacOS or Linux, launch a new Terminal window.
If you are on Windows, utilize an SSH client like Putty or OpenSSH.
Within the Terminal window, move to the location where your downloaded .pem key file is saved.
Improve the security of the key file by making it non-publicly viewable.
chmod 400 ssh_tunnel.pemReplace ssh_tunnel with the name of your key file.
Establish connection to your AWS SSH server.
Use the Terminal to connect to your AWS SSH server with the default user for your EC2 instance.
AWS generates a command that is specific to your instance. Locate this command in your EC2 Instance details page.
The command format is as follows:
ssh -i "your key file.pem" <Your default EC2 user>@<Your EC2 Public DNS>
For the other options, check out Amazon connect to your Linux instance guide.
Once you are connected to your server, create a user group named datadotworld:
sudo groupadd datadotworld
Create a user named ddw:
sudo useradd -m -g datadotworld ddw
Switch to the user named ddw:
sudo su - ddw
Create a hidden directory called .ssh to upload your public key, setting its permissions appropriately:
mkdir ~/.ssh
chmod 700 ~/.ssh
Enable read and write permissions for the owner on that file.
Create an empty file called authorized_keys and provide read and write access to its owner:
touch authorized_keys
chmod 600 authorized_keys
Open your organization in data.world. On the Organization profile page, go to the Settings tab > Connection manager section.
Click the Add connection button.
In the Add an organization-level connection window, choose the database connection.
In the Add a new connection window, click on the Advanced Settings tab and select Use SSH Tunnel.
Copy the value from the SSH public key field.
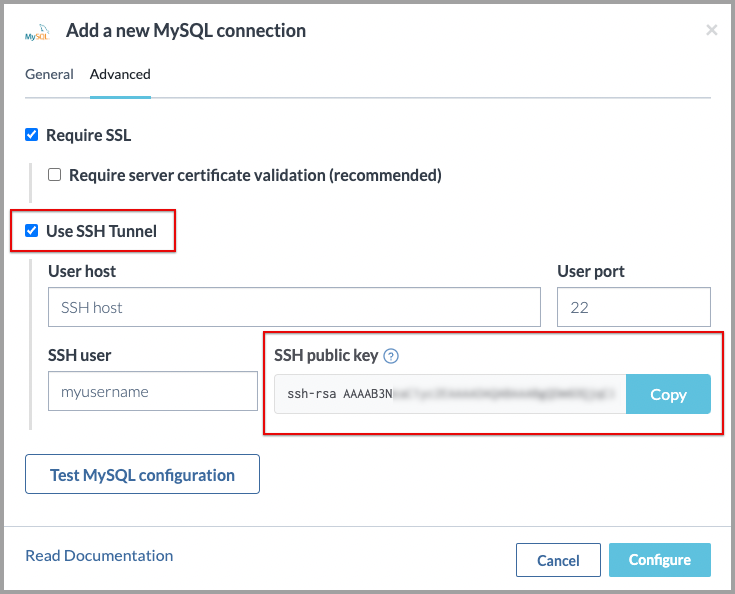
Leave this window open as you will return to it to complete the configuration.
Return to the Terminal and embed the public key into your authorized_keys file with the following command:
echo "<Your Public Key>" >> ~/.ssh/authorized_keys
Replace <Your Public Key> with the key you previously copied from the SSH public key field. Keep the quotation marks as is.
Configuring advanced SSH Tunnel connection options in data.world
On the Organization profile page, go to the Settings tab > Connection manager section.
Locate the connection for which you want to configure the SSH tunnel settings.
In the connection window, On the Advanced tab, set the following:
In the User host field, provide the Public IPv4 DNS you noted from the EC2 Instance summary page.
In the SSH user field, provide the name of the SSH user you created. This is ddw if you followed the naming convention shared in the instructions.
Go to the General tab, update the following fields.
Host/IP: Provide the database endpoint you noted from the Connectivity & security section of the AWS RDS.
Port: Provide the database port you noted from the Connectivity & security section of the AWS RDS.
Click the Test configuration button to test your configuration.
Click Configure to save your configuration.