Running the Confluent Cloud collector on-premise
Note
The latest version of the Collector is 2.330. To view the release notes for this version and all previous versions, please go here.
Generating the command or YAML file
This section walks you through the process of generating the command or YAML file for running the collector from Windows or Linux or MAC OS.
To generate the command or YAML file:
In the Catalog experience, go to the Admin page > Metadata collectors section.
Click the Add a collector button.

On the Choose metadata collector screen, select the correct metadata source. Click Next.
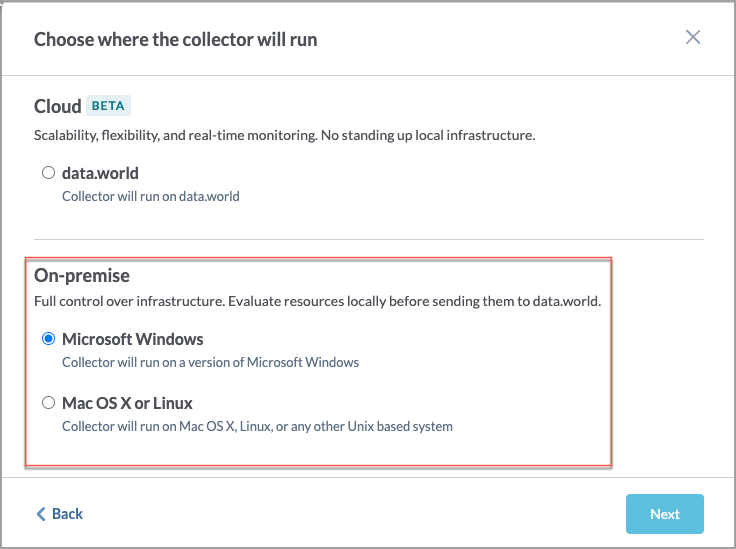
On the Choose where the collector will run screen, in the On-premise section, select if you will be running the collector on Windows or Mac OS or Linux. This will determine the format of the YAML and CLI that is generated in the end. Click Next.
On the On-prem collector setup prerequisites screen, read the pre-requisites and click Next.
On the Configure an on-premises Confluent Cloud Collector screen, set the following properties and click Next.
On the next screen, set the following properties and click Next.
Table 2.Field name
Corresponding parameter name
Description
Required?
Kafka Bootstrap Server
--kafka-bootstrap-server= <kafkaBootstrapServer>
The bootstrap server for the kafka cluster to be cataloged.
Yes
Confluent Cloud API Key
--confluent-cloud-api-key=<confluentCloudApiKey>
The API key for Confluent Cloud.
Yes
Confluent Cloud API Secret
--confluent-cloud-api-secret=<confluentCloudApiSecret>
The API secret for Confluent Cloud.
Yes
Kafka Cluster API Key
--kafka-cluster-api-key= <kafkaClusterApiKey>
The API key for the cluster to be cataloged.
Yes
Kafka Cluster API Secret
--kafka-cluster-api-secret= <kafkaClusterApiSecret>
The API secret for the cluster to be cataloged.
Yes
On the next screen, set the following advanced properties and click Next.
Table 3.Field name
Corresponding parameter name
Description
Required?
Confluent Schema Registry API base URL
--confluent-schema-registry-api-url= <confluentSchemaRegistryApiUrl>
The base URL where Confluent Schema Registry is listening.
No
Confluent Schema Registry username
--confluent-schema-registry-username= <confluentSchemaRegistryUsername>
The password for authentication to Confluent Schema Registry.
No
Confluent Schema Registry password
--confluent-schema-registry-password= <confluentSchemaRegistryPassword>
The username for authentication to Confluent Schema Registry.
No
Max retries
--api-max-retries= <maxRetries>
Specify the number of times to retry an API call which has failed. The default value is 5.
No
Retry delay
--api-retry-delay= <retryDelay>
Specify the amount of time in seconds to wait between retries of an API call which has failed. The default is to try with a delay of 2 seconds between each call.
No
Kafka Include Topic Filter
--include-topic= <kafkaTopicInclude>
Specify topics to include. You can either provide the topic name or a regular expression to be matched on the topic names.
Note: All topics are included if the parameter is not set.
Kafka Exclude Topic Filter
--exclude-topic= <kafkaTopicExclude>
Specify topics to exclude. You can either provide the topic name or a regular expression to be matched on the topic names.
Note: No topic is excluded if the parameter is not set.
On the next screen, provide the Collector configuration name and an optional Configuration description. This is the name used to save the configuration details. The configuration is saved and made available on the Metadata collectors summary page from where you can edit or delete the configuration at a later point. Click Save and Continue.
On the Finalize your collector configuration screen, you are notified about the environment variables and directories you need to setup for running the collector. Select if you want to generate Configuration file ( YAML) or Command line arguments (CLI). Click Next.
Important
You must ensure that you have set up these environment variables and directories before you run the collector.
The next screens gives you an option to download the YAML configuration file or copy the CLI command.
If you selected Command line arguments (CLI), from the Choose how to run the collector dropdown, select Java command or Docker command and note down the generated command. Click Done.
If you selected Configuration file ( YAML), download the generated a YAML file. Click Next.
The final screen displays the command to use for running the collector with the YAML file. From the Choose how to run the collector dropdown, select Java command or Docker command, and note down the generated command.
You will notice that the YAML/CLI has following additional parameters that are automatically set for you.
Warning
Except for the collector version, you should not change the values of any of the parameter listed here.
Table 4.Parameter name
Details
Required?
-a= <agent>
--agent= <agent>
--account= <agent>
The ID for the data.world account into which you will load this catalog - this is used to generate the namespace for any URIs generated.
Yes
--site= <site>
This parameter should be set only for Private instances. Do not set it for public instances and single-tenant installations. Required for private instance installations.
Yes (required for private instance installations)
-U
--upload
Whether to upload the generated catalog to the organization account's catalogs dataset.
Yes
--no-log-upload
Do not upload the log of the collector run to a dataset in data.world. This is the same dataset where the collector output is uploaded. By default, log files are uploaded to this dataset.
Yes
dwcc: <CollectorVersion>
The version of the collector you want to use (For example,
datadotworld/dwcc:2.248)Yes
Add the following additional parameter to test run the collector.
--dry-run: If specified, the collector does not actually harvest any metadata, but just checks the connection parameters provided by the user and reports success or failure at connecting.
We recommend enabling debug level logs when running the collector for the first time. This approach aids in swiftly troubleshooting any configuration and connection issues that might arise during collector runs. Add the following parameter to your collector command:
-e log_level=DEBUG: Enables debug level logging for collectors.
Set the following additional parameters if you want to use the TLS connections to connect to Confluent Cloud.
Important
If you are setting the TLS connection, do not set the --kafka-cluster-api-key and --kafka-cluster-api-secret properties.
Table 5.Parameter name
Details
Required?
--kafka-cluster-ssl-truststore-location
Specify the location of the SSL truststore file. Will be used as ssl.truststore.location property to establish a secure connection to the Kafka cluster.
No
--kafka-cluster-ssl-truststore-password
Specify the password for the SSL truststore. Will be used as ssl.truststore.password property to establish a secure connection to the Kafka cluster.
No
--kafka-cluster-ssl-keystore-location
Specify the location of the SSL keystore file. Will be used as ssl.keystore.location property to establish a secure connection to the Kafka cluster.
Yes
--kafka-cluster-ssl-keystore-password
Specify the password for the SSL keystore. Will be used as ssl.keystore.password property to establish a secure connection to the Kafka cluster.
Yes
--kafka-cluster-ssl-key-password
Specify the password for the SSL key. Will be used as ssl.key.password property to establish a secure connection to the Kafka cluster.
Yes
--kafka-cluster-ssl-keystore-type
Specify the type of the SSL keystore. Will be used as ssl.keystore.type property to establish a secure connection to the Kafka cluster. Default is JKS.
No
Verifying environment variables and directories
Verify that you have set up all the required environment variables that were identified by the Collector Wizard before running the collector. Alternatively, you can set these credentials in a credential vault and use a script to retrieve those credentials.
Verify that you have set up all the required directories that were identified by the Collector Wizard.
Running the collector
Important
Before you begin running the collector make sure you have completed all the pre-requisite tasks.
Running collector using YAML file
Go to the machine where you have setup docker to run the collector.
Place the YAML file generated from the Collector wizard to the correct directory.
From the command line, run the command generated from the application for executing the YAML file. Here is a sample Docker command. Similarly, you can get the Java command from the UI.
Caution
Note that is just a sample command for showing the syntax. You must generate the command specific to your setup from the application UI.
docker run -it --rm --mount type=bind,source=${HOME}/dwcc,target=/dwcc-output \
  --mount type=bind,source=${HOME}/dwcc,target=/app/log -e DW_AUTH_TOKEN=${DW_AUTH_TOKEN} \
  -e DW_CONFLUENT_CLOUD_PASSWORD=${DW_CONFLUENT_CLOUD_PASSWORD} \
  -e DW_CONFLUENT_CLOUD_SECRET=${DW_CONFLUENT_CLOUD_SECRET} datadotworld/dwcc:2.149 \
  --config-file=/dwcc-output/config-confluent_cloud.yml
The collector automatically uploads the file to the specified dataset and you can also find the output at the location you specified while running the collector. Similarly, the log files are uploaded to the specified dataset and can be found in the directory mounted to target=/app/log specified in the command.
If you decide in the future that you want to run the collector using an updated version, simply modify the collector version in the provided command. This will allow you to run the collector with the latest version.
Running collector without the YAML file
Go to the machine where you have setup docker to run the collector.
From the command line, run the command generated from the application. Here is a sample Docker command. Similarly, you can get the Java command from the UI.
Caution
Note that is just a sample command for showing the syntax. You must generate the command specific to your setup from the application UI.
docker run -it --rm --mount type=bind,source=${HOME}/dwcc,target=/dwcc-output \
  --mount type=bind,source=${HOME}/dwcc,target=/app/log datadotworld/dwcc:2.149 \
  catalog-confluent-cloud --agent=8bank --output=/dwcc-output --api-token=${DW_AUTH_TOKEN} \
  --upload=true --name=8bank-collection --upload-location=ddw-catalogs \
  --confluent-schema-registry-password=${DW_CONFLUENT_CLOUD_PASSWORD} \
  --kafka-bootstrap-server=8bank_server --confluent-cloud-api-key=39495 \
  --confluent-cloud-api-secret=${DW_CONFLUENT_CLOUD_SECRET} --kafka-cluster-api-key=34562 \
  --kafka-cluster-api-secret=${DW_CONFLUENT_CLOUD_SECRET}
The collector automatically uploads the file to the specified dataset and you can also find the output at the location you specified while running the collector. Similarly, the log files are uploaded to the specified dataset and can be found in the directory mounted to target=/app/log specified in the command.
If you decide in the future that you want to run the collector using an updated version, simply modify the collector version in the provided command. This will allow you to run the collector with the latest version.
Automating updates to your metadata catalog
Maintaining an up-to-date metadata catalog is crucial and can be achieved by employing Azure Pipelines, CircleCI, or any automation tool of your preference to execute the catalog collector regularly.
There are two primary strategies for setting up the collector run times:
Scheduled: You can configure the collector according to the anticipated frequency of metadata changes in your data source and the business need to access updated metadata. It's necessary to account for the completion time of the collector run (which depends on the size of the source) and the time required to load the collector's output into your catalog. This could be for instance daily or weekly. We recommend scheduling the collector run during off-peak times for optimal performance.
Event-triggered: If you have set up automations that refresh the data in a source technology, you can set up the collector to execute whenever the upstream jobs are completed successfully. For example, if you're using Airflow, Github actions, dbt, etc., you can configure the collector to automatically run and keep your catalog updated following modifications to your data sources.
Managing collector runs and configuration details
From the Metadata collectors summary page, view the collectors runs to ensure they are running successfully,
From the same Metadata collectors summary page you can view, edit, or delete the configuration details for the collectors.
Overview
Some enterprise systems support the use of Secure Sockets Layer (SSL) encrypted communications on all external traffic. If you are harvesting metadata from a source system that requires SSL, you will need to add a CA certificate or self-signed certificate.
Obtaining the Custom SSL Certificate
Obtain the root certificate for your source system issued by your company. Typically your system administrator should be able to provide you with this.
Extending Docker to use custom SSL certificates
If the collector is run via Docker, extend the Docker image and install the custom certificate.
STEP 1: Prepare the Docker File
First, prepare a Dockerfile with the instructions for Docker to install the custom certificate and extend the Docker image.
Ensure you are on the machine where you have downloaded the Docker Image and plan to execute the Collector.
In a directory create the new Dockerfile with the following parameters for your custom SSL Certificate:
Important
The file should be named exactly Dockerfile [without any extensions].
FROM datadotworld/dwcc:<collector_version>
ADD ./<custom_certificate_file_path> <custom_certificate_file_name>
RUN keytool -importcert -alias startssl -cacerts -storepass changeit
-noprompt -file <custom_certificate_file_name>
Replace <collector_version> with the version of the Collector you want to use (For example, datadotworld/dwcc:2.120)
Replace <custom_certificate_file_path> with the path to the custom SSL Certificate.
Replace <custom_certificate_file_name> with the name of your custom SSL Certificate file.
For example, the command will look like:
FROM datadotworld/dwcc:2.120
ADD ./ca.der certificate
RUN keytool -importcert -alias startssl -cacerts -storepass changeit
-noprompt -file certificate
STEP 2: Install the certificate and extend the docker image
Next, execute the the Dockerfile to install the certificate and extend the data.world Collector Docker Image.
Using your terminal of choice, ensure you are in the directory containing the Dockerfile created in step 1.
Next, create the new extended Docker image, called dwcc-cert in this example, by executing the following command:
docker build -t dwcc-cert .
Important things to note:
The command must be all lowercase.
The command must include the period (.) at the end, which directs Docker to use the local directory for the Dockerfile created above.
For the new image, the command uses the name dwcc-cert You can change the name if you want.
STEP 3: Run collector using the custom certificate
Finally, run the collector using the custom Certificate.
Get the standard docker run command for the Data Source you are collecting from.
Change the docker run command to use dwcc-cert image instead of dwcc image.
Sample command for Tableau.
docker run -it --rm --mount type=bind,source=/tmp,target=/dwcc-output \
--mount type=bind,source=/tmp,target=/app/log dwcc-cert \
catalog-tableau --tableau-api-base-url <baseUrl> \
--tableau-password <password> --tableau-username <username> \
-a <account> -n <catalogName> -o "/dwcc-output"
If you are using YAML file for running the collector, edit the command to use dwcc-cert image instead of dwcc image.
docker run -it --rm --mount type=bind,source=${HOME}/dwcc,target=/dwcc-output \
 --mount type=bind,source=${HOME}/dwcc,target=/app/log -e DW_AUTH_TOKEN=${DW_AUTH_TOKEN} \
  -e DW_TABLEAU_PASSWORD=${DW_TABLEAU_PASSWORD} dwcc-cert \
 --config-file=/dwcc-output/config-tableau.yml
Adding custom SSL certificates when using jar
If the collector is run via jar, add the certificate to the JVM truststore.
From the terminal, navigate to the directory containing the certificate.
Run the following command to add the SSL certificate to the truststore:
keytool -importcert -alias startssl -cacerts -storepass changeit -noprompt -file <custom_certificate_file_path>
Replace <custom_certificate_file_path> with the path to the custom SSL Certificate.
For example, the command will look like:
keytool -importcert -alias startssl -cacerts -storepass changeit -noprompt -file ca.der
Finally, run the collector using the original jar file command. Note that this command does not need any modifications.
Troubleshooting SSL certificate issues
Issue: Error observed while building the Docker image
Issue
The following error message occurs when building the Docker image:
ERROR: failed to solve: failed to read dockerfile
Description
The Docker file is not named correctly.
Solution
Ensure that the file created in Step 1 is called exactly Dockerfile without any extensions.
Ensure that you are in the same directory as the Dockerfile when running the docker build <custom_image_name> . command.
Issue: Invalid certificate found error while running the collector
Issue
The following error occurs while running the collector:
Caused by: javax.ws.rs.ProcessingException: javax.net.ssl.SSLHandshakeException: PKIX path building failed: sun.security.provider.certpath.SunCertPathBuilderException: unable to find valid certification path to requested target
Description
There was an issue connecting to the source system using the SSL certificate.
Solution
Check to make sure the SSL certificate has not expired.
Ensure you have the correct SSL certificate for the source system.