Creating database resources with Excel (CTK)
This guide provides a walkthrough for creating a database resources utilizing the SpreadsheetDB_Template.xls file. This process involves downloading a template, editing it to include database metadata, and uploading it back to data.world to enrich your catalog.
Why would I do this?
Using an Excel template to create and update database resources in your catalog is a flexible and user-friendly approach, especially if you prefer direct control over metadata entry or when running collectors isn't an option. This approach offers the following advantages.
Advantage | Description |
|---|---|
Bulk resource creation | Create multiple schemas, tables, and columns at once, saving time compared to entering them individually through a web interface. |
Customizable metadata | The template allows you to add custom fields tailored to your organization, ensuring all relevant information is captured for your data catalog. |
Work offline | Compile and prepare your metadata offline at your convenience, without needing immediate access to the platform. |
Review and collaboration | Share the Excel file with your team for input and validation before uploading, ensuring accuracy and reducing errors. |
STEP 1: Download the SpreadsheetDB_Template.xlsx file
Note
Perform this task in the Catalog Sources organization.
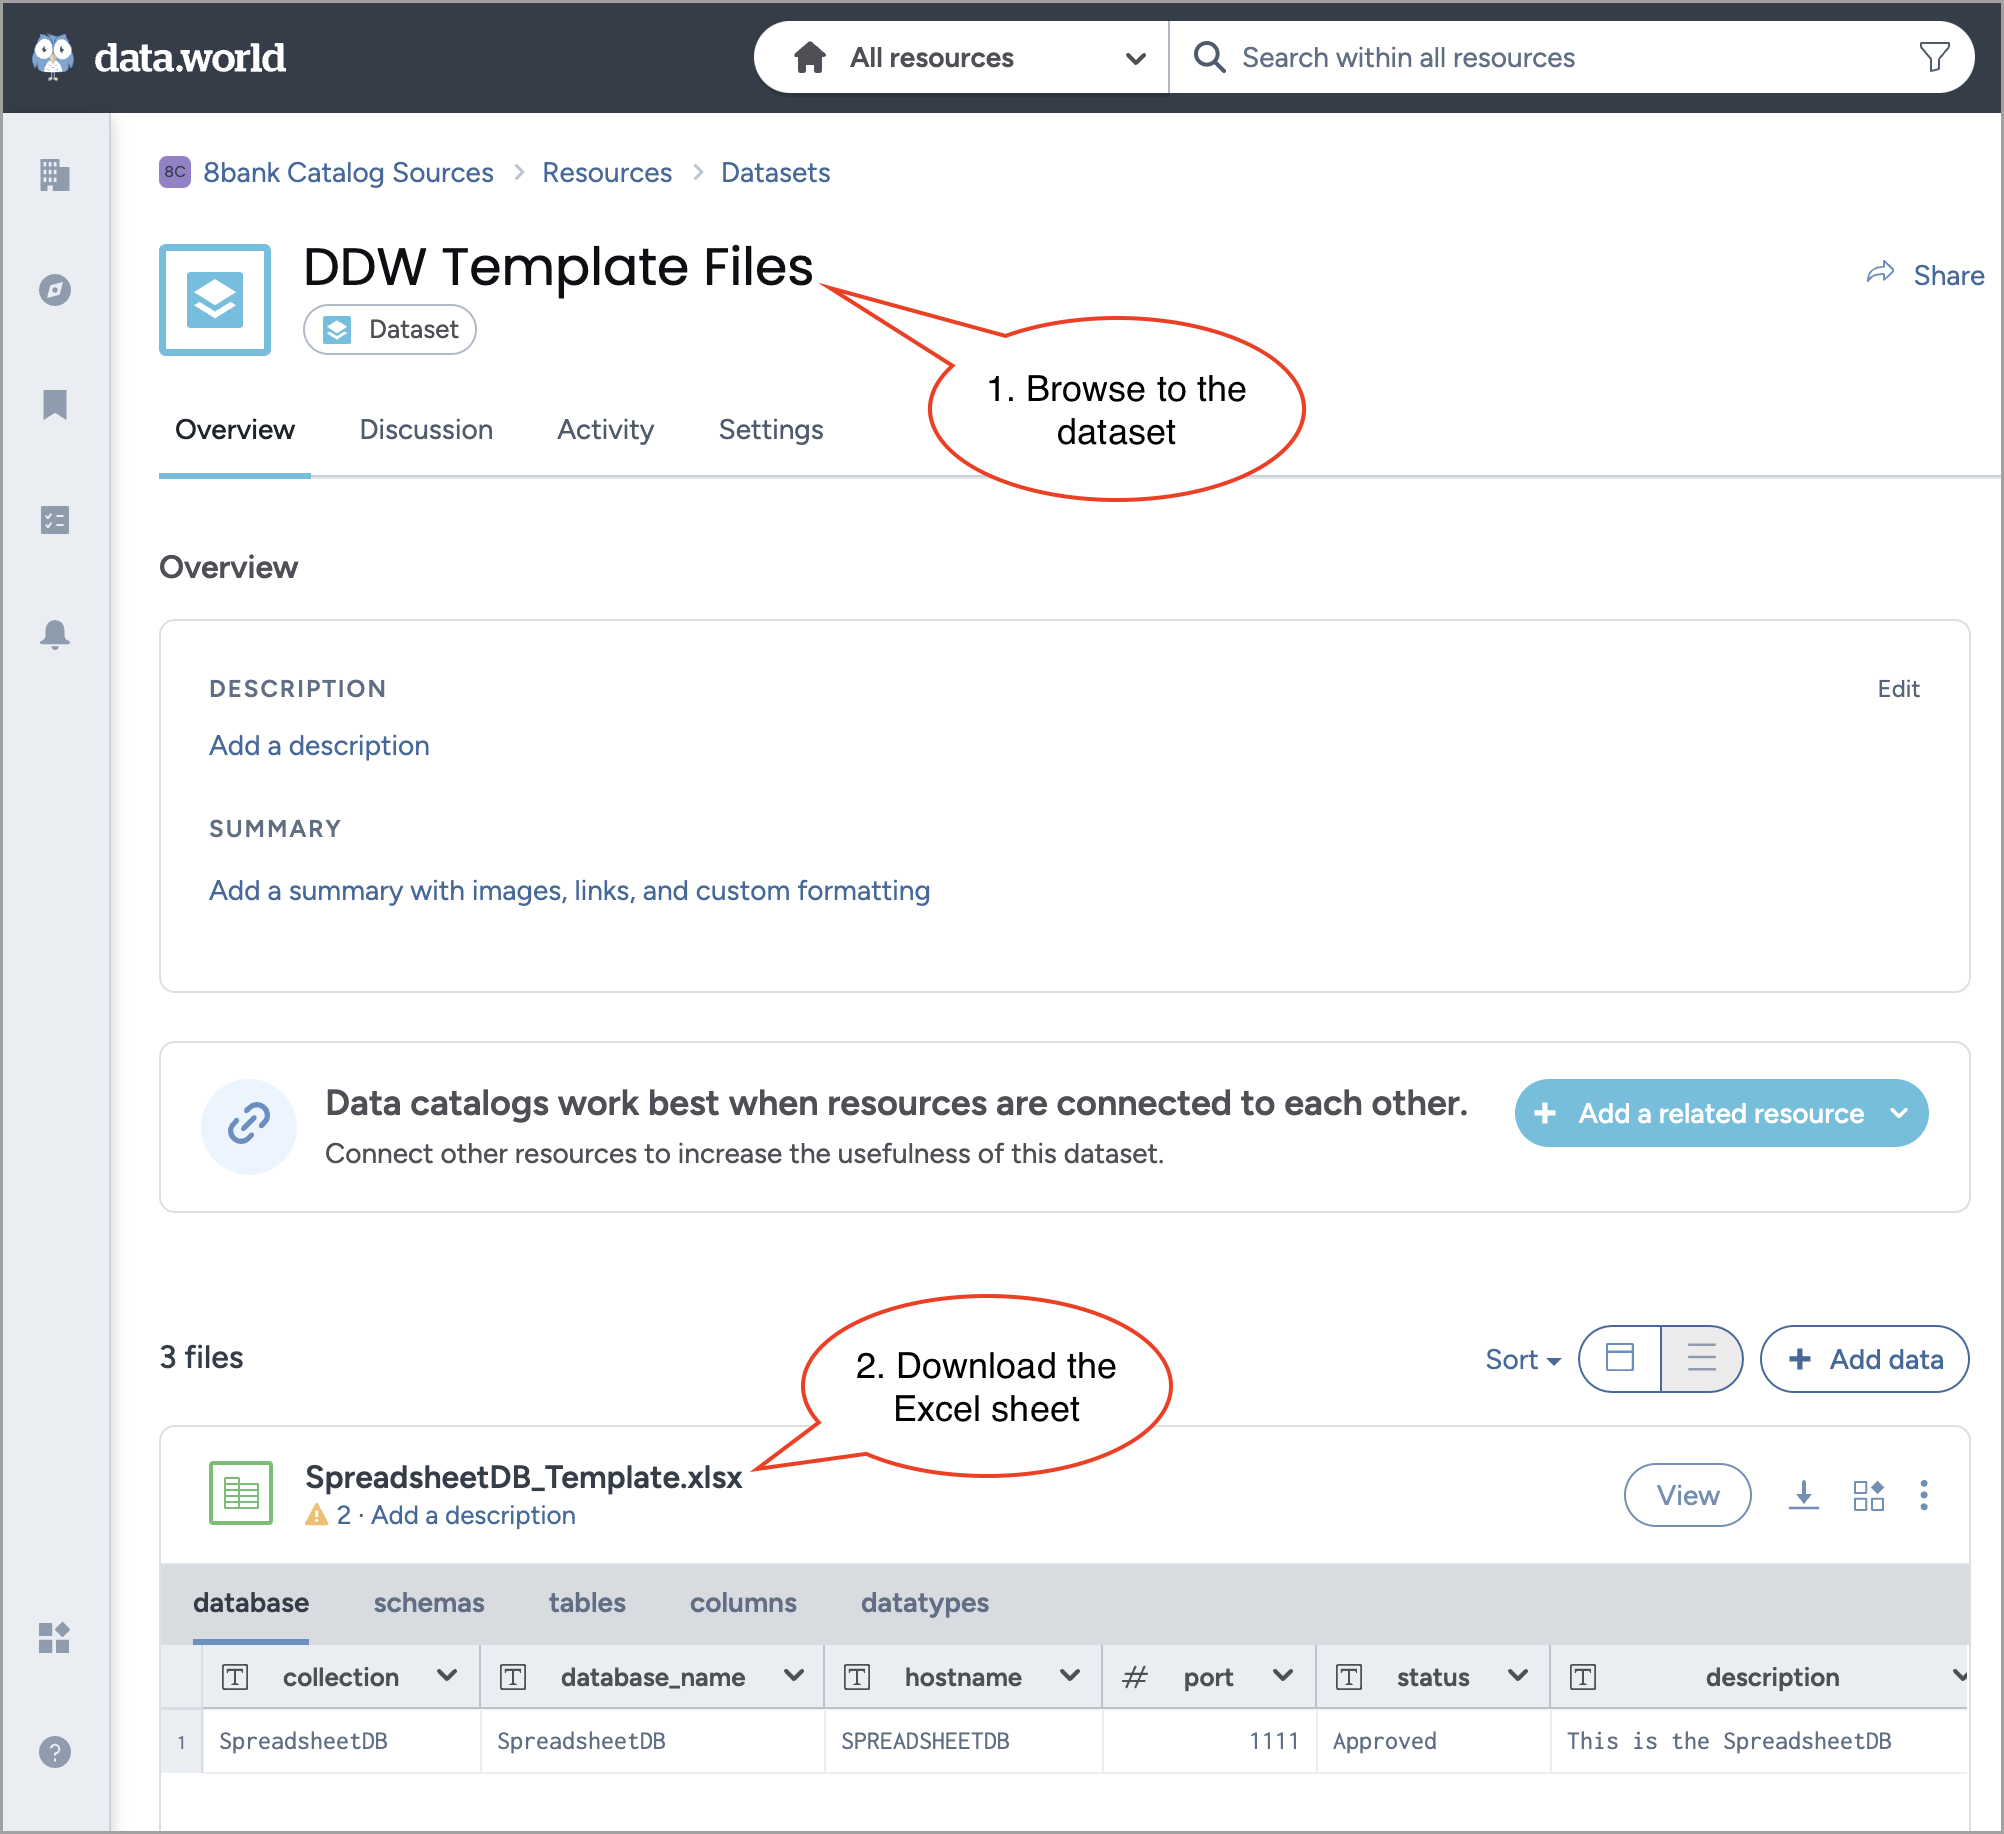
In the Catalog Sources organization, from the Workbench experience, browse to the DDW Template Files (ddw-template-files) dataset.
Download the SpreadsheetDB_Template.xlsx spreadsheet template file.
STEP 2: Update the spreadsheet file
Important
Each Excel spreadsheet corresponds to a single database. If you have multiple databases, each requires its own separate file. To manage several databases, you need to create separate Excel files for each.
Open the template using an Excel spreadsheet editor.
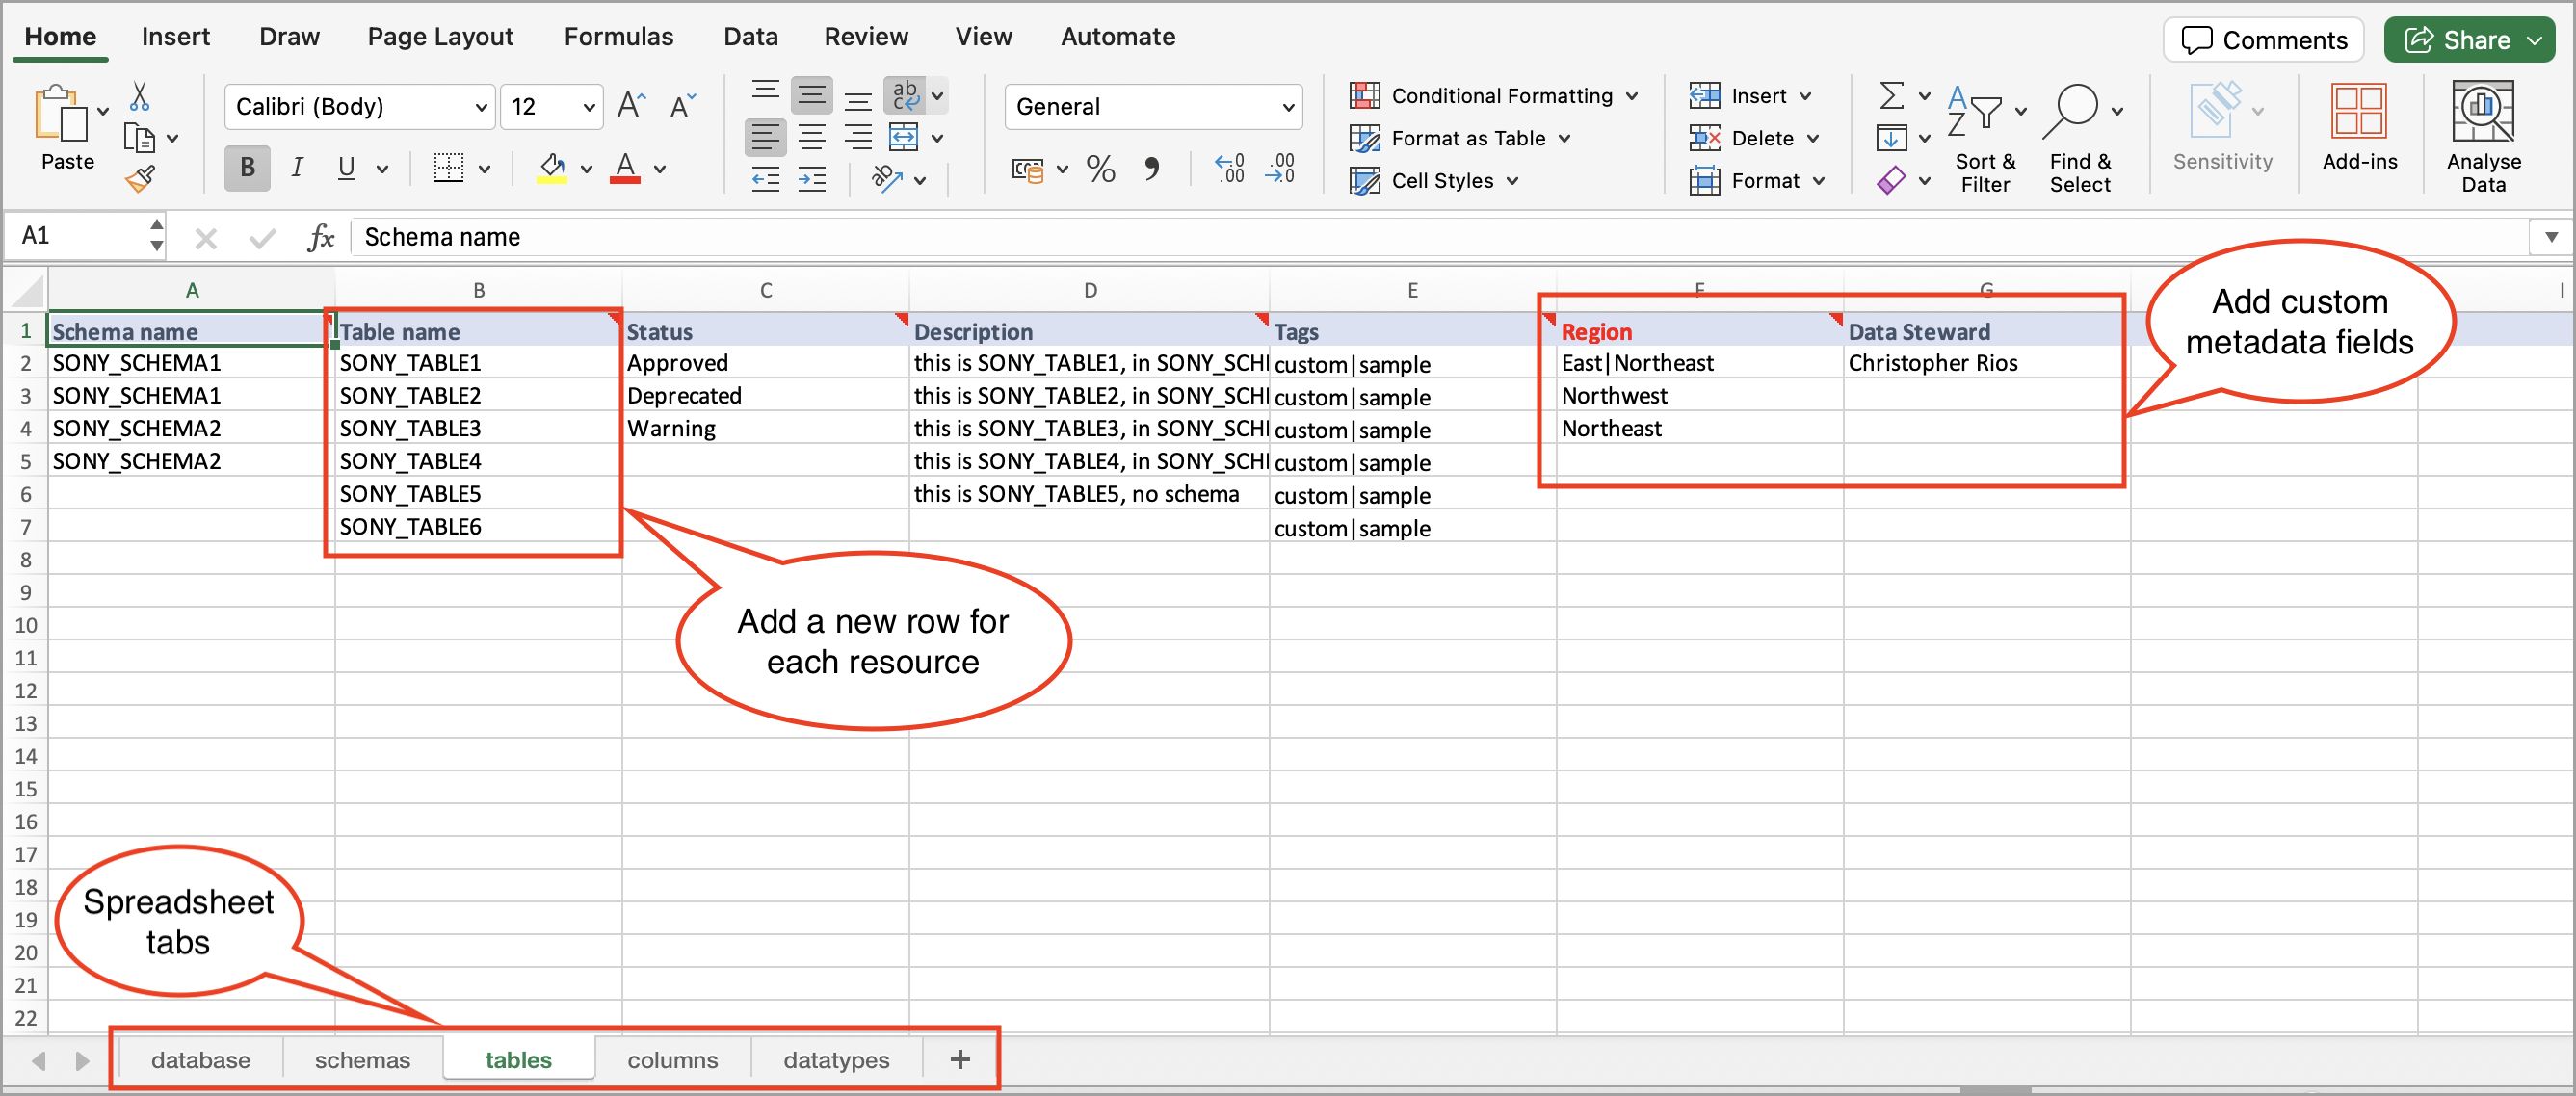
At the bottom of the template, you will see several tabs (sheets). Each tab includes specific metadata fields that you need to complete.
Tabs like Database, Schemas, Tables, and Columns are for creating new resources. The Datatypes tab is only a reference and doesn’t result in creating a resources.
Table 2.Tab name
Purpose
Database
Specify the database and the collection it belongs to.
Schemas
Define schemas to organize and structure database objects.
Tables
Set up the structure for new tables.
Columns
Configure the columns for the tables being created.
Datatypes
Specify a list of valid datatypes.
Let us start editing spreadsheet. For each tab, you will see several predefined column header fields.
Each row within a tab corresponds to a single resource being defined. To create several resources, add a new row for each resource in the appropriate tab.
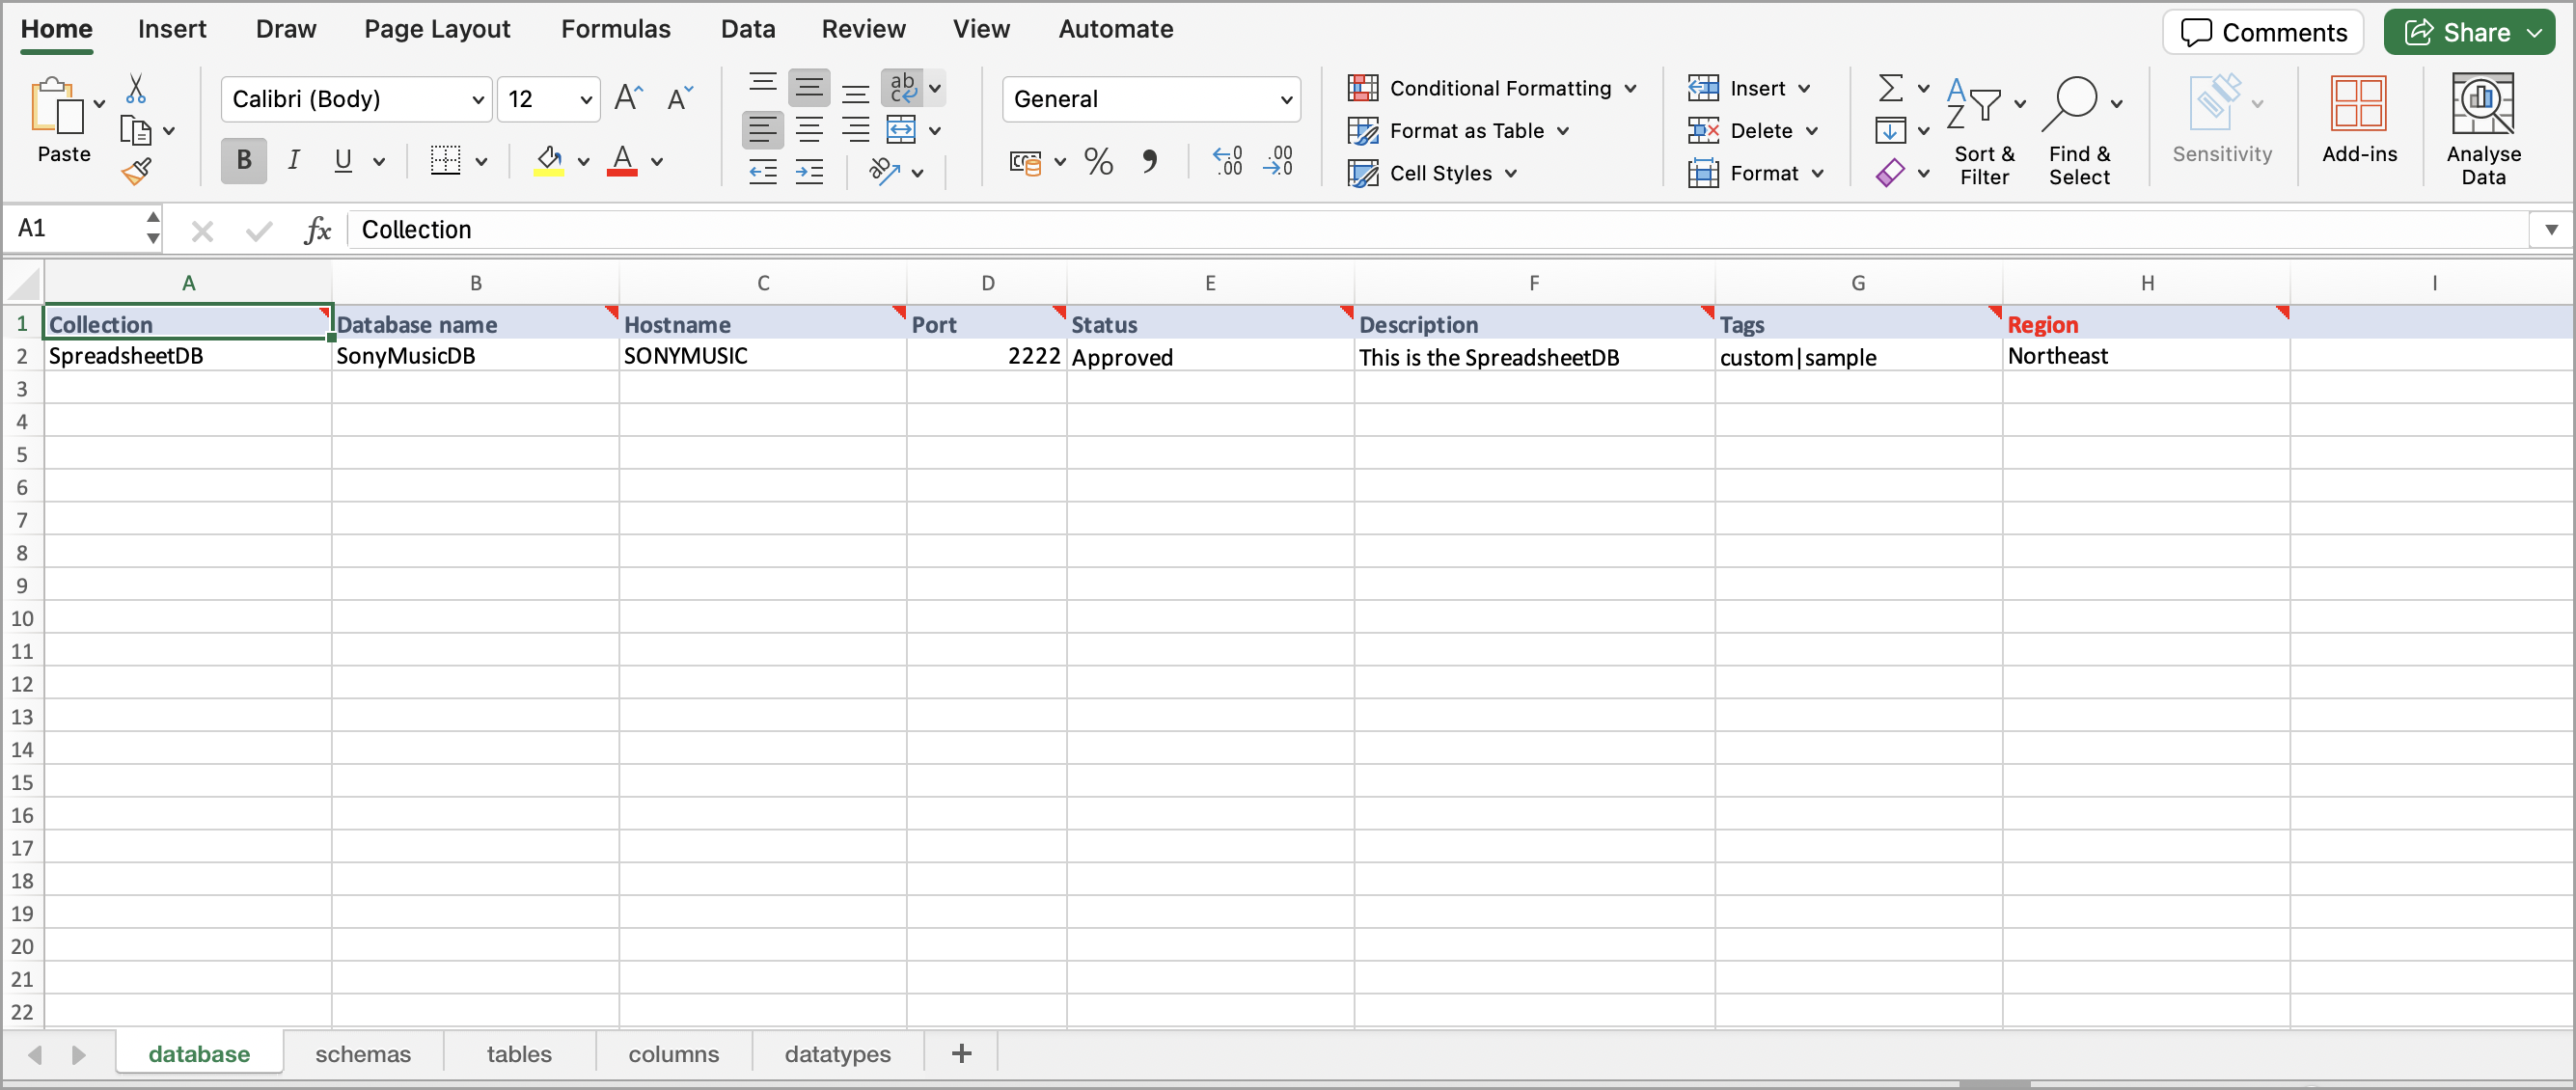
For the Database tab, you can define only one collection per row, as it represents a single database and its collection. We strongly recommend not adding multiple rows in the Database tab, as it is designed to define one database per template. Avoid creating additional rows or nested levels in this tab.
You can add additional custom metadata fields by creating new column headers in the spreadsheet. The header names must exactly match the metadata field names in your catalog (for example, Region, Data Steward, etc). Ensure all custom metadata fields you add are published.
Make the following changes in the Database tab.
Table 3.Field name
Description
Required
Collection
Name of the collection. This will become the name of the collection created in your catalog.
Yes
Database name
Name of the database associated with this collection.
Yes
Hostname
Host location of the database.
Optional
Port
Port number for the database connection.
Optional
Status
Validation status of the database. This should match with the statuses in your catalog. For example, Approved, Pending.
Optional
Description
Brief description of the database.
Optional
Tags
Short labels assigned to this database. Use the | symbol to separate multiple tags. For example, custom|sample.
Optional
Custom metadata
This column represents your custom metadata field. The column header must match the title of the field exactly. Separate multiple values for multi-select fields with a | symbol.
Optional
Make the following changes in the Schemas tab.
Table 4.Field name
Description
Required
Schema name
Name of the schema.
Optional. Leave blank if the database should not have a schema.
Status
Validation status of the schema. This should match with the statuses in your catalog. For example, Approved, Pending.
Optional
Description
Brief description of the schema.
Optional
Tags
Short labels assigned to the schema. Use the | symbol to separate multiple tags. For example, custom|sample.
Optional
Custom metadata
This column represents your custom metadata field. The column header must match the title of the field exactly. Separate multiple values for multi-select fields with a | symbol.
Optional
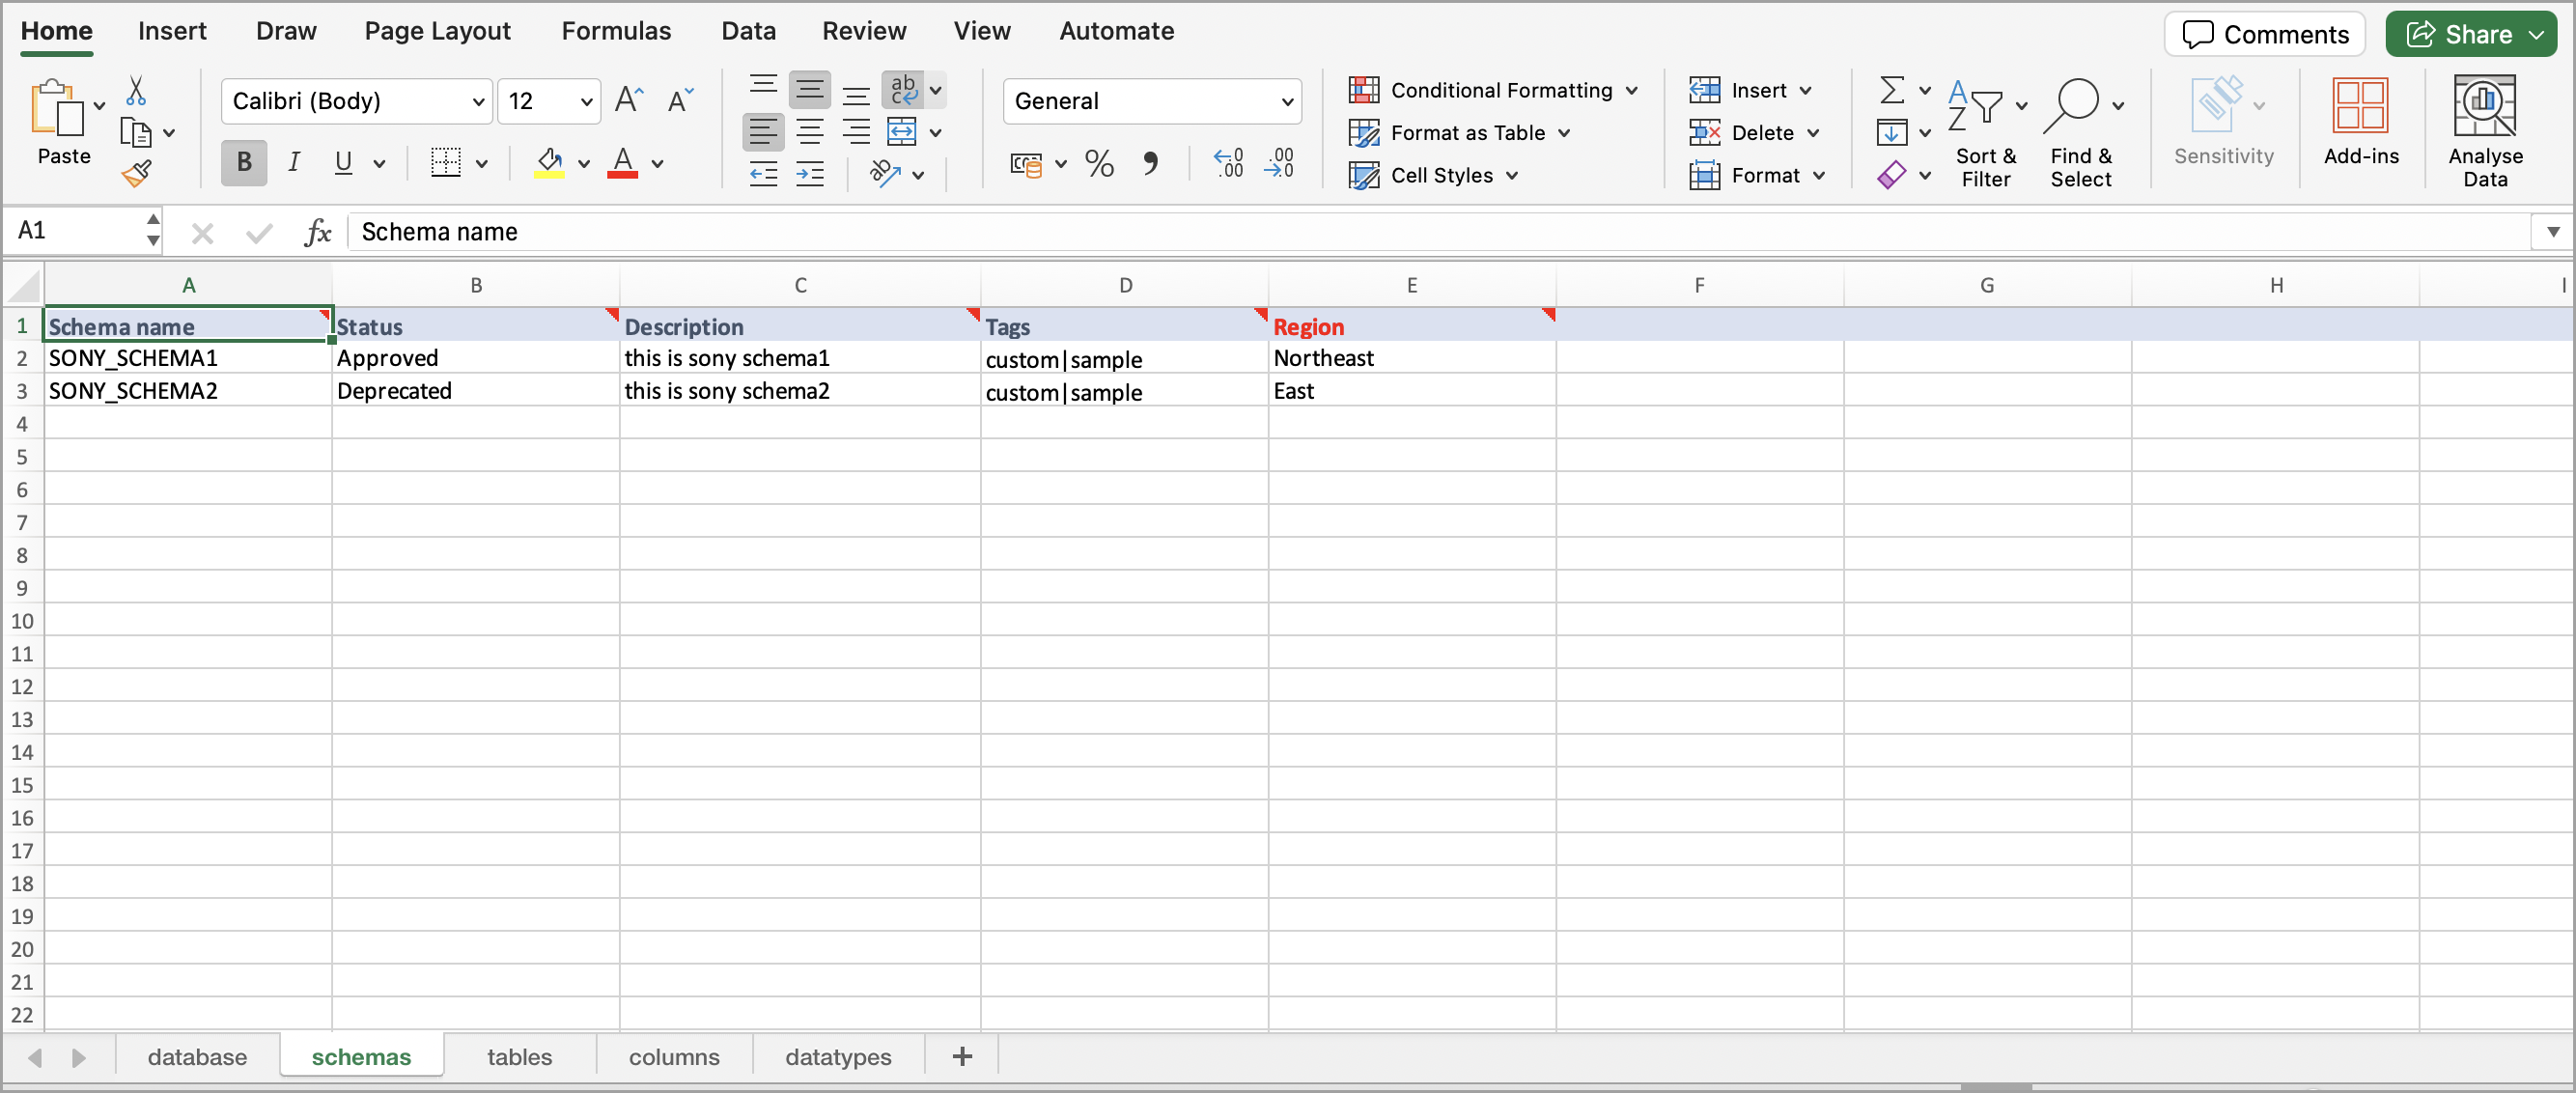
Make the following changes in the Tables tab.
Table 5.Field name
Description
Required
Schema name
Name of the schema associated with the table.
Optional. Leave blank if the database should not have a schema.
Table name
Name of the table.
Yes
Status
Validation status of the table. This should match with the statuses in your catalog. For example, Approved, Pending.
Optional
Description
Brief description of the table.
Optional
Tags
Short labels assigned to the table. Use the | symbol to separate multiple tags. For example, custom|sample.
Optional
Custom metadata
This column represents your custom metadata field. The column header must match the title of the field exactly. Separate multiple values for multi-select fields with a | symbol.
Optional
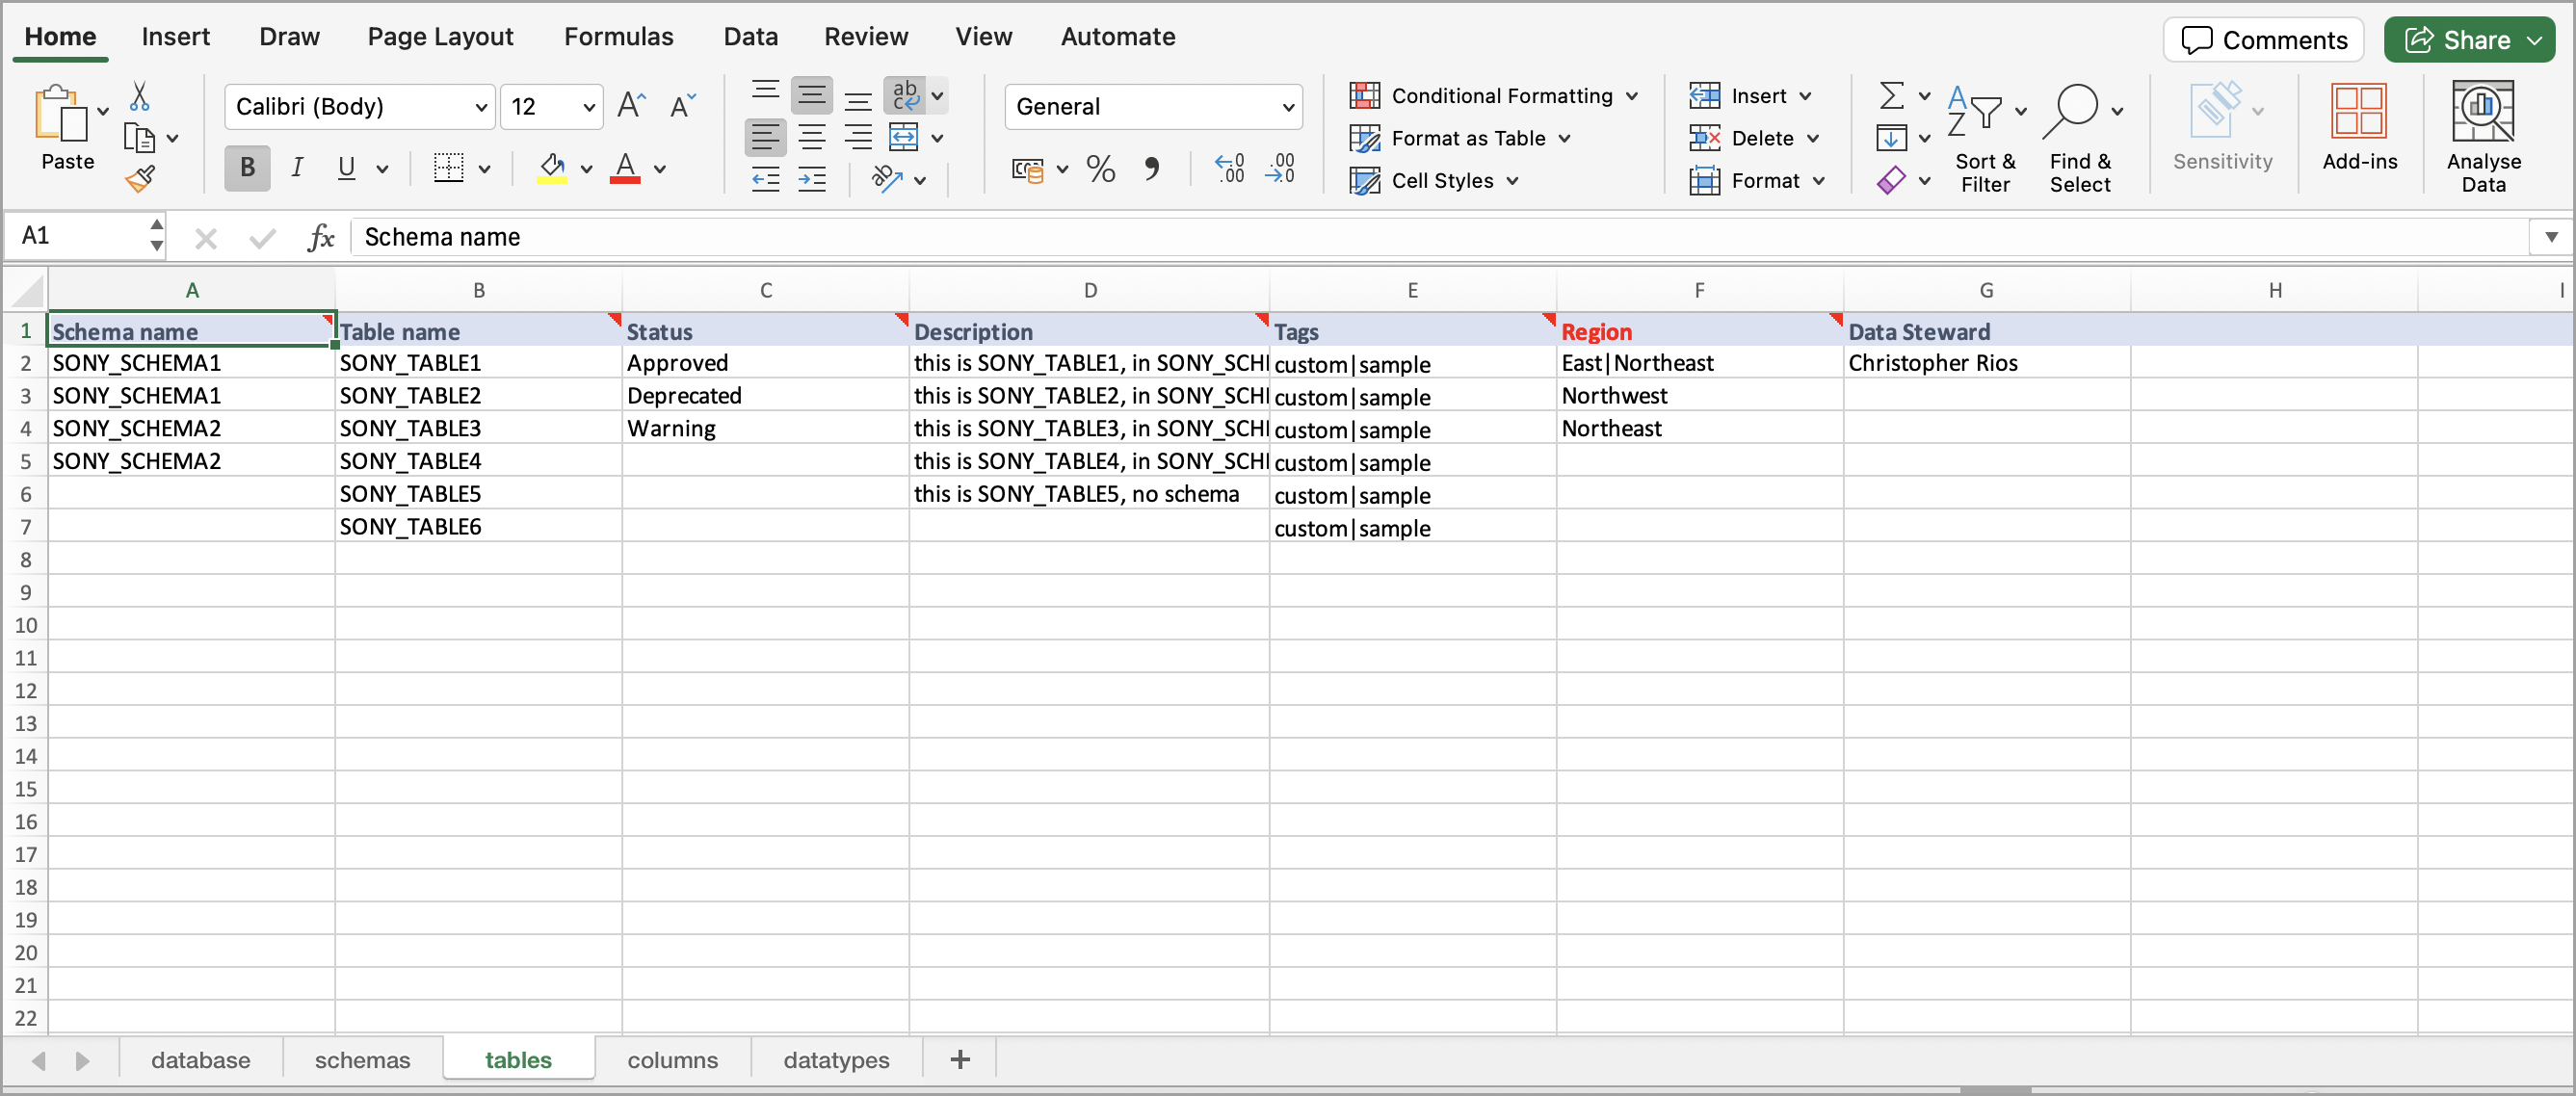
Make the following changes in the Columns tab.
Table 6.Field name
Description
Required
Schema name
Name of the associated schema.
Optional. Leave blank if the database should not have a schema.
Table name
Name of the associated table.
Yes
Column name
Name of the column.
Yes
Column index
Index value of the column.
Yes
Data type
A format and data type of the column. Refer to the Datatypes tab for valid values.
Yes
Status
Validation status of the column. This should match with the statuses in your catalog. For example, Approved, Pending.
Optional
Description
Brief description of the column.
Optional
Tags
Short labels assigned to the column. Use the | symbol to separate multiple tags. For example, custom|sample.
Optional
Custom metadata
This column represents your custom metadata field. The column header must match the title of the field exactly. Separate multiple values for multi-select fields with a | symbol.
Optional
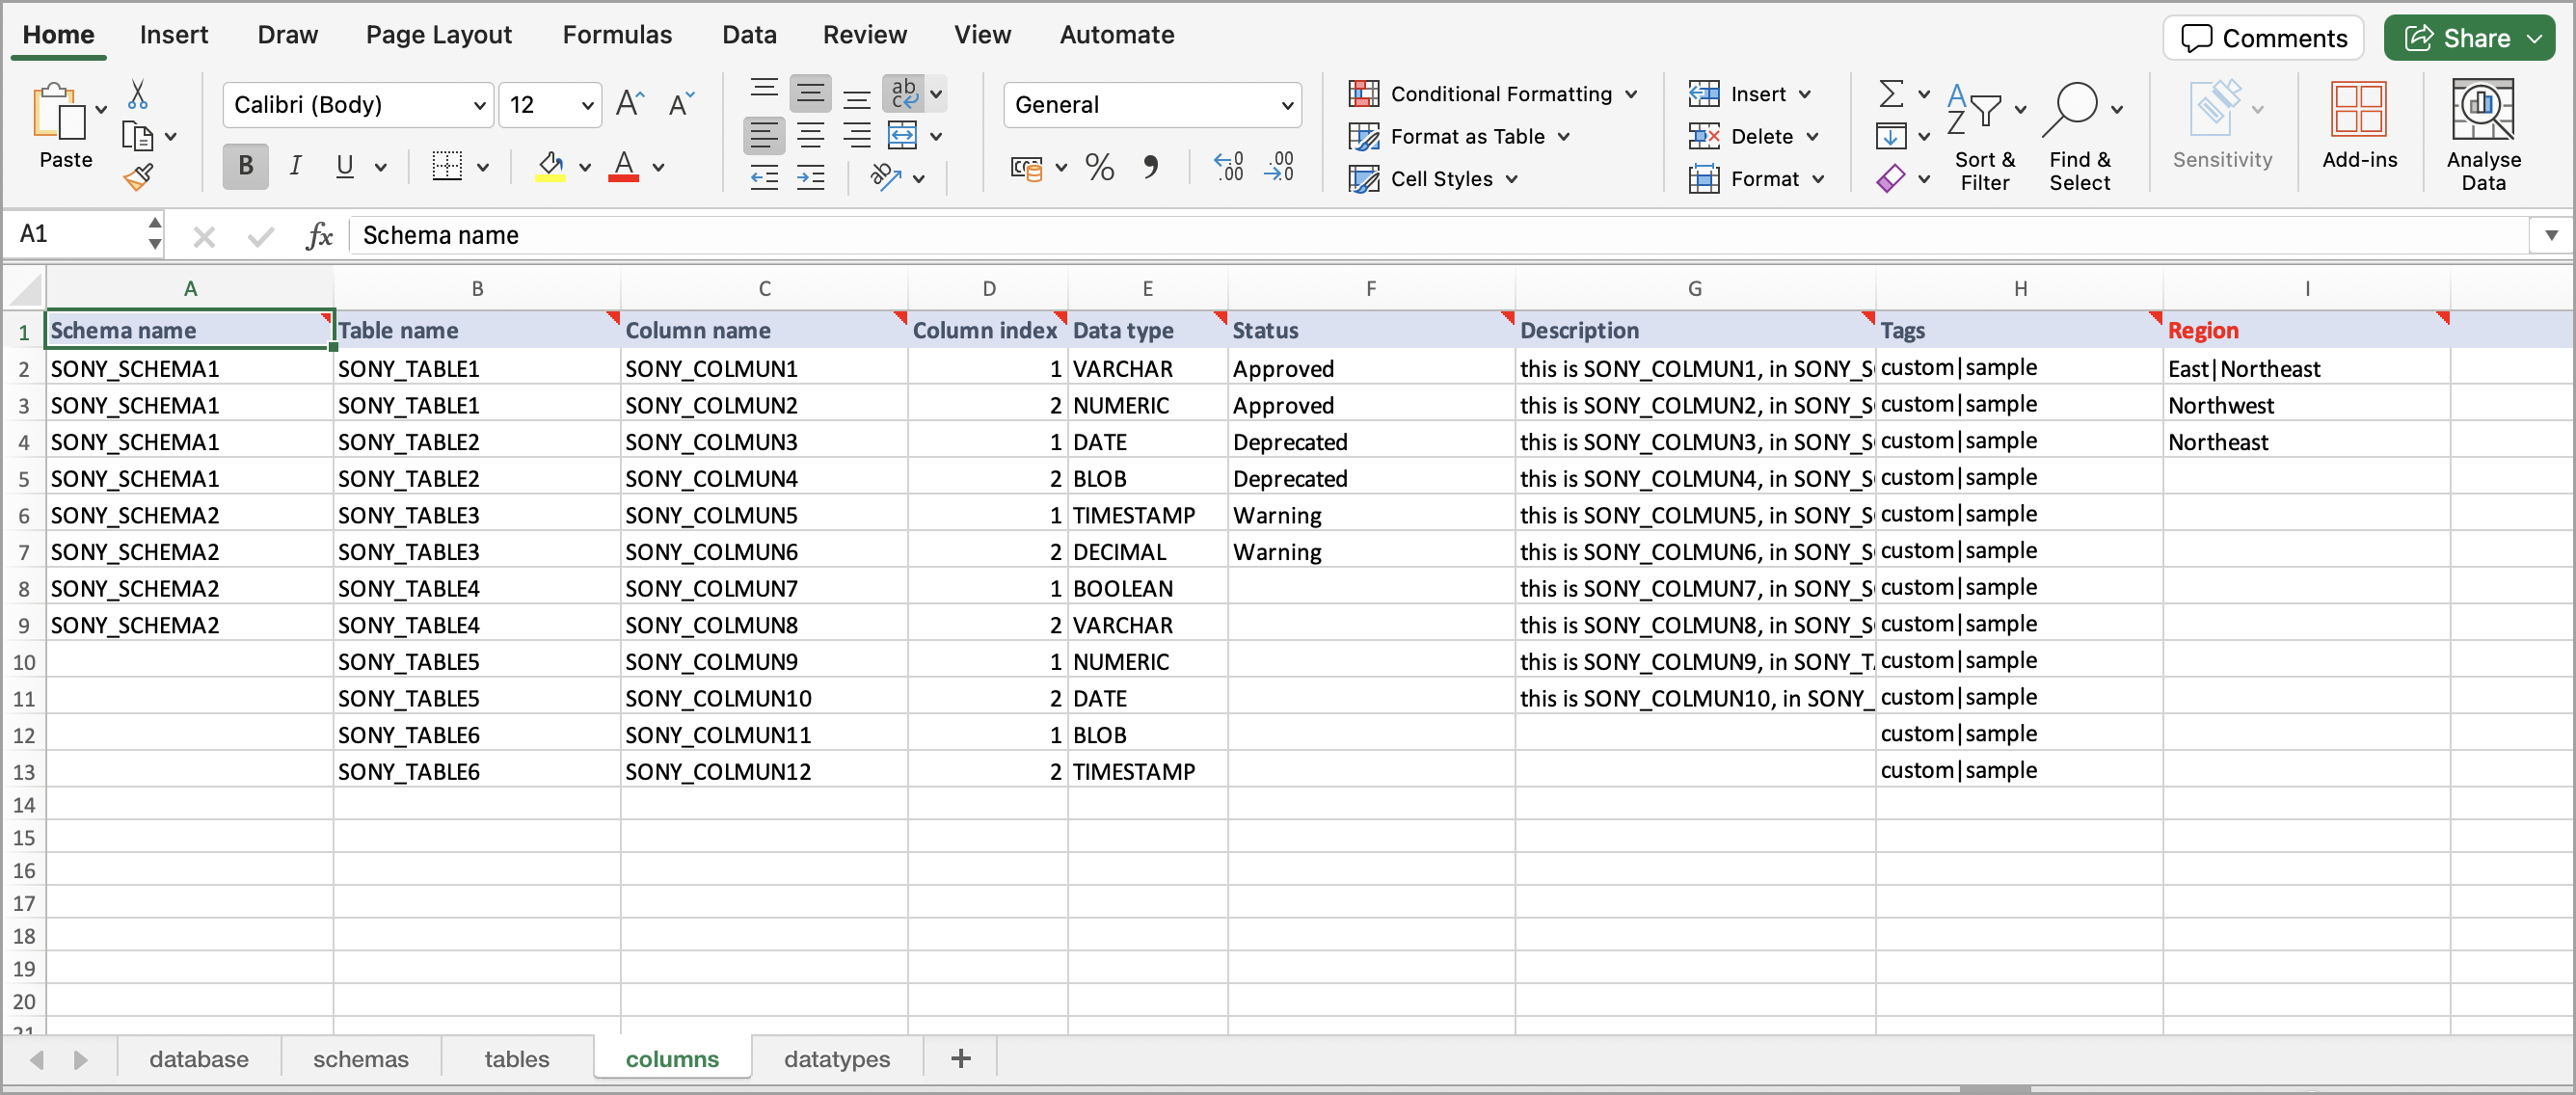
Make the following changes in the Datatypes tab.
Table 7.Field name
Description
Valid Datatypes
A list of valid datatypes.
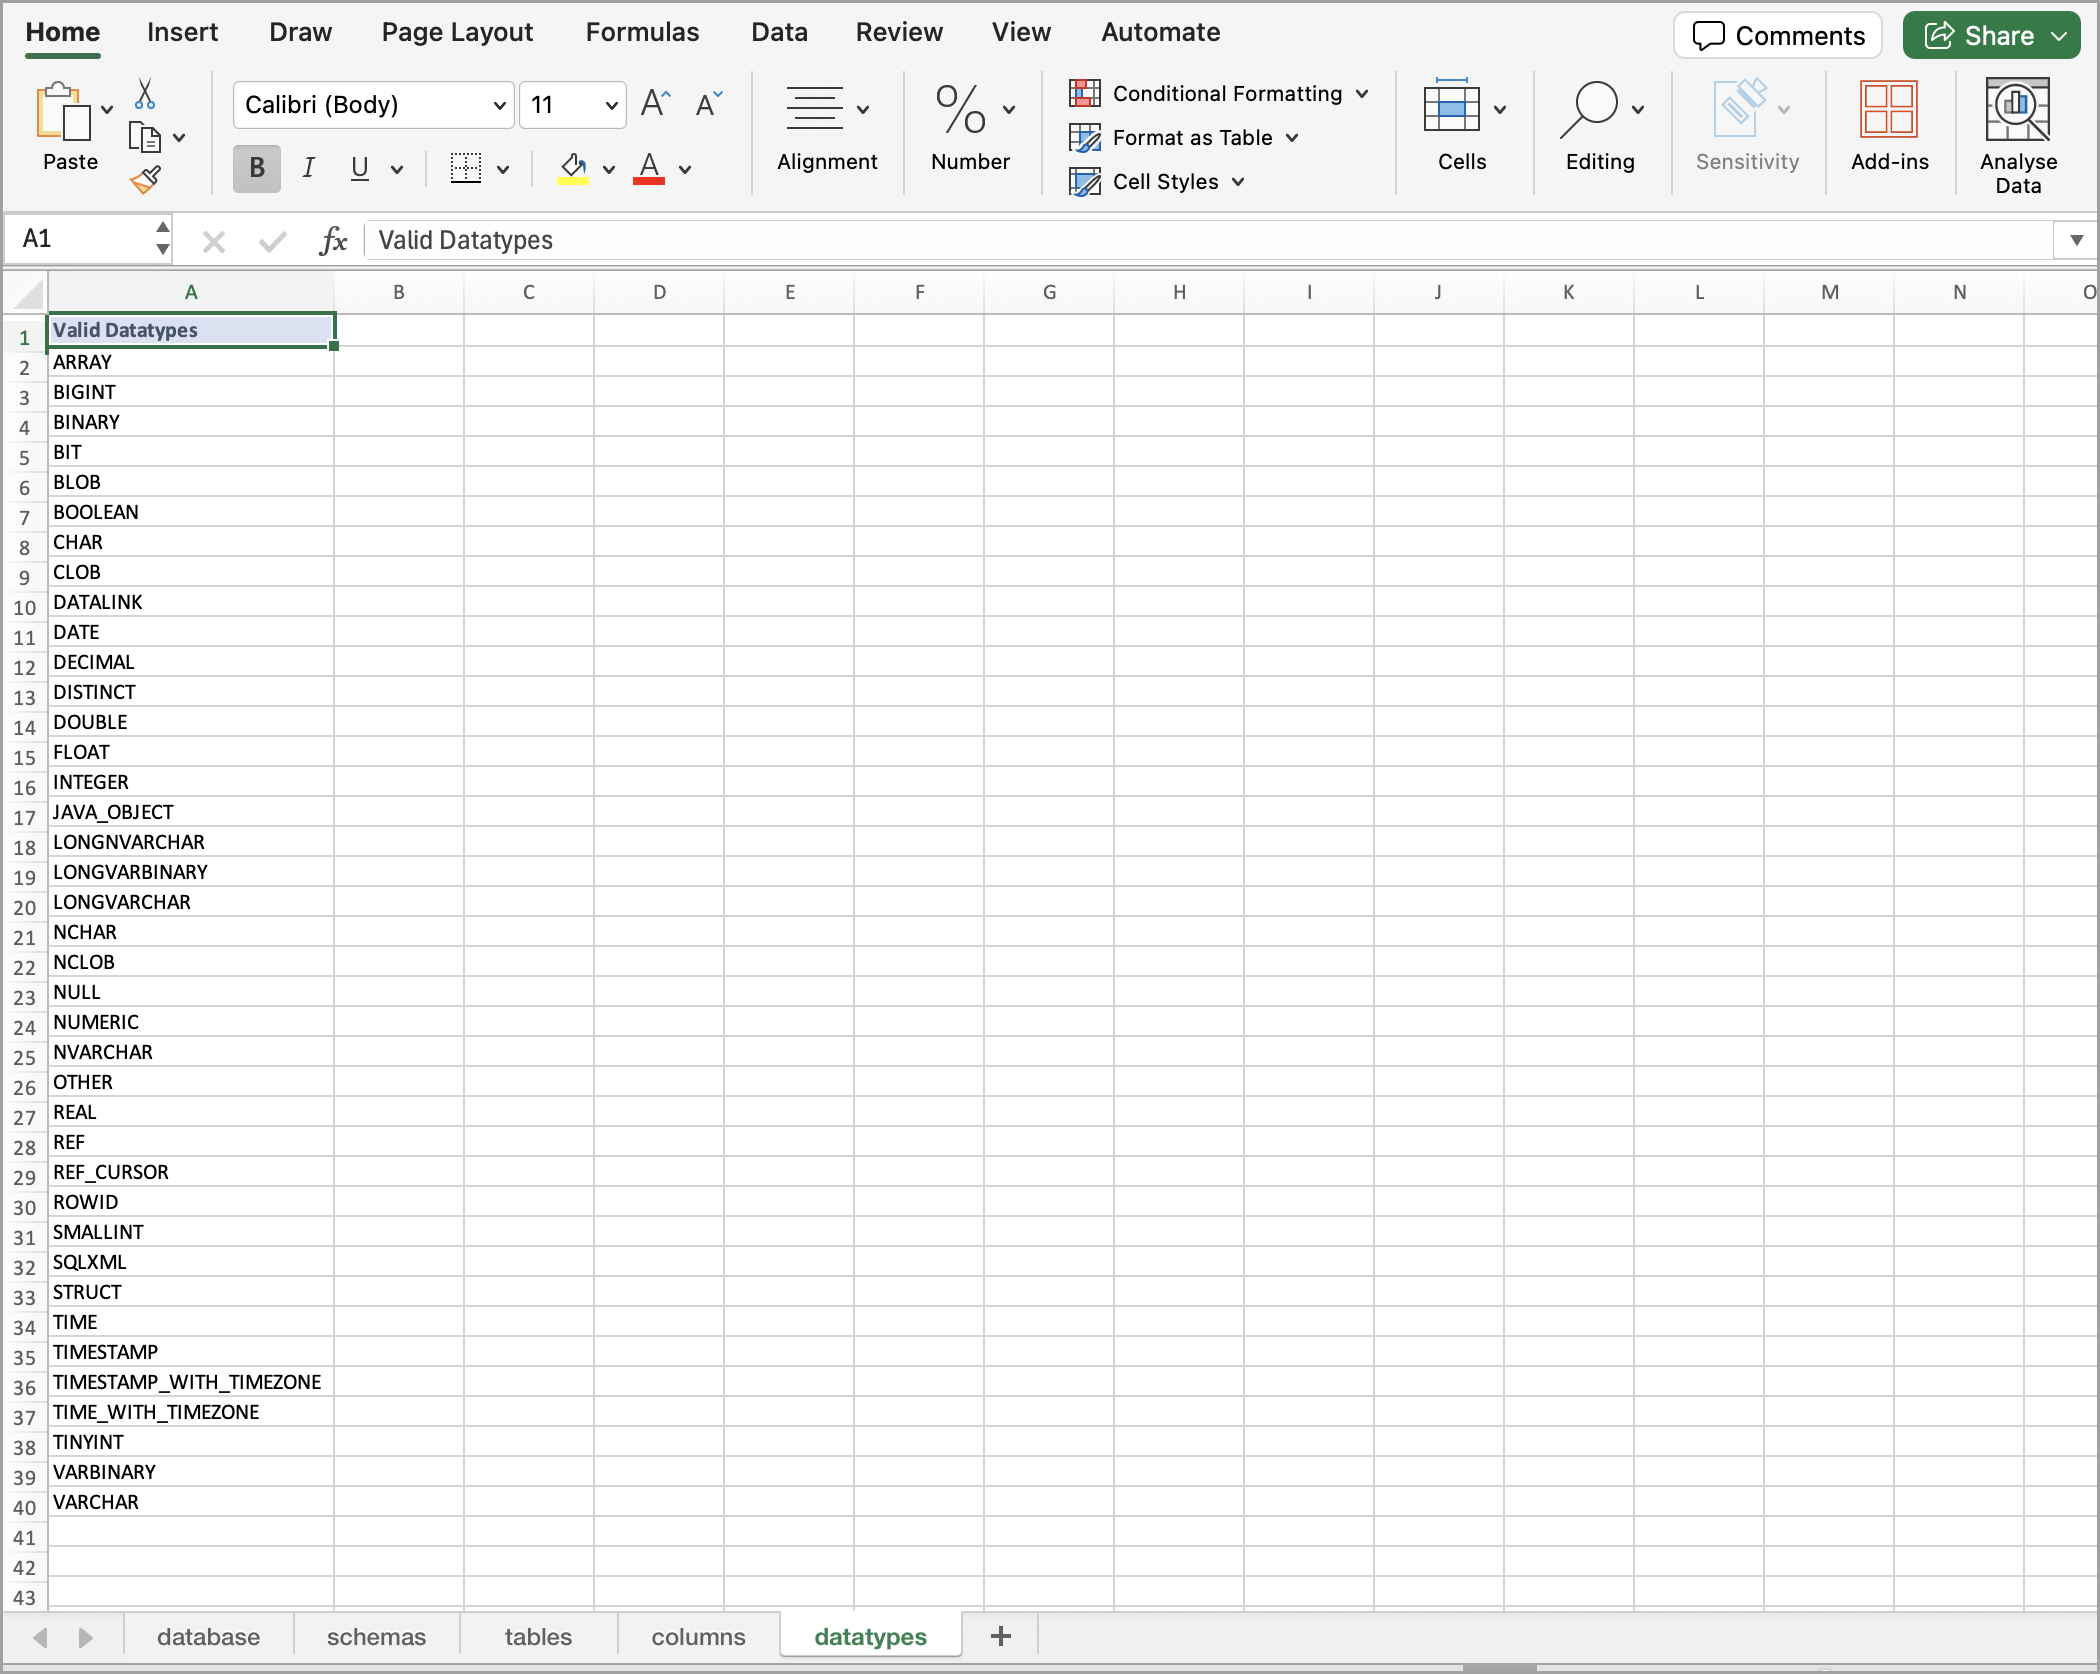
Save your Excel file with any name you prefer.
STEP 3: Upload the spreadsheet file to the dataset
Note
Perform this task in the Catalog Sources organization.
In the Catalog Sources organization, browse to the DDW Spreadsheet DB Sandbox dataset.
Add the Excel file with your configuration to the dataset.
Important
If you delete the spreadsheet file from the dataset, it will result in the removal of the created resources in your Catalog Sandbox organization. To avoid this, do not delete the file if you wish to keep the database resources.
STEP 4: Sync the spreadsheet file with your catalog
Note
Perform this task in the Catalog Sources organization.
In the Catalog Sources organization, from the Workbench experience, browse to the DDW Catalog Spreadsheet DB project.
Click Launch workspace.
In the Connected datasets section, locate the DDW Sandbox Catalog dataset for the Catalog Sandbox organization.
In the dataset, locate the Sandbox Spreadsheet Db Catalog.ttl file, and click the Sync now button.
View the results
Note
Perform this task in the Catalog Sandbox organization.
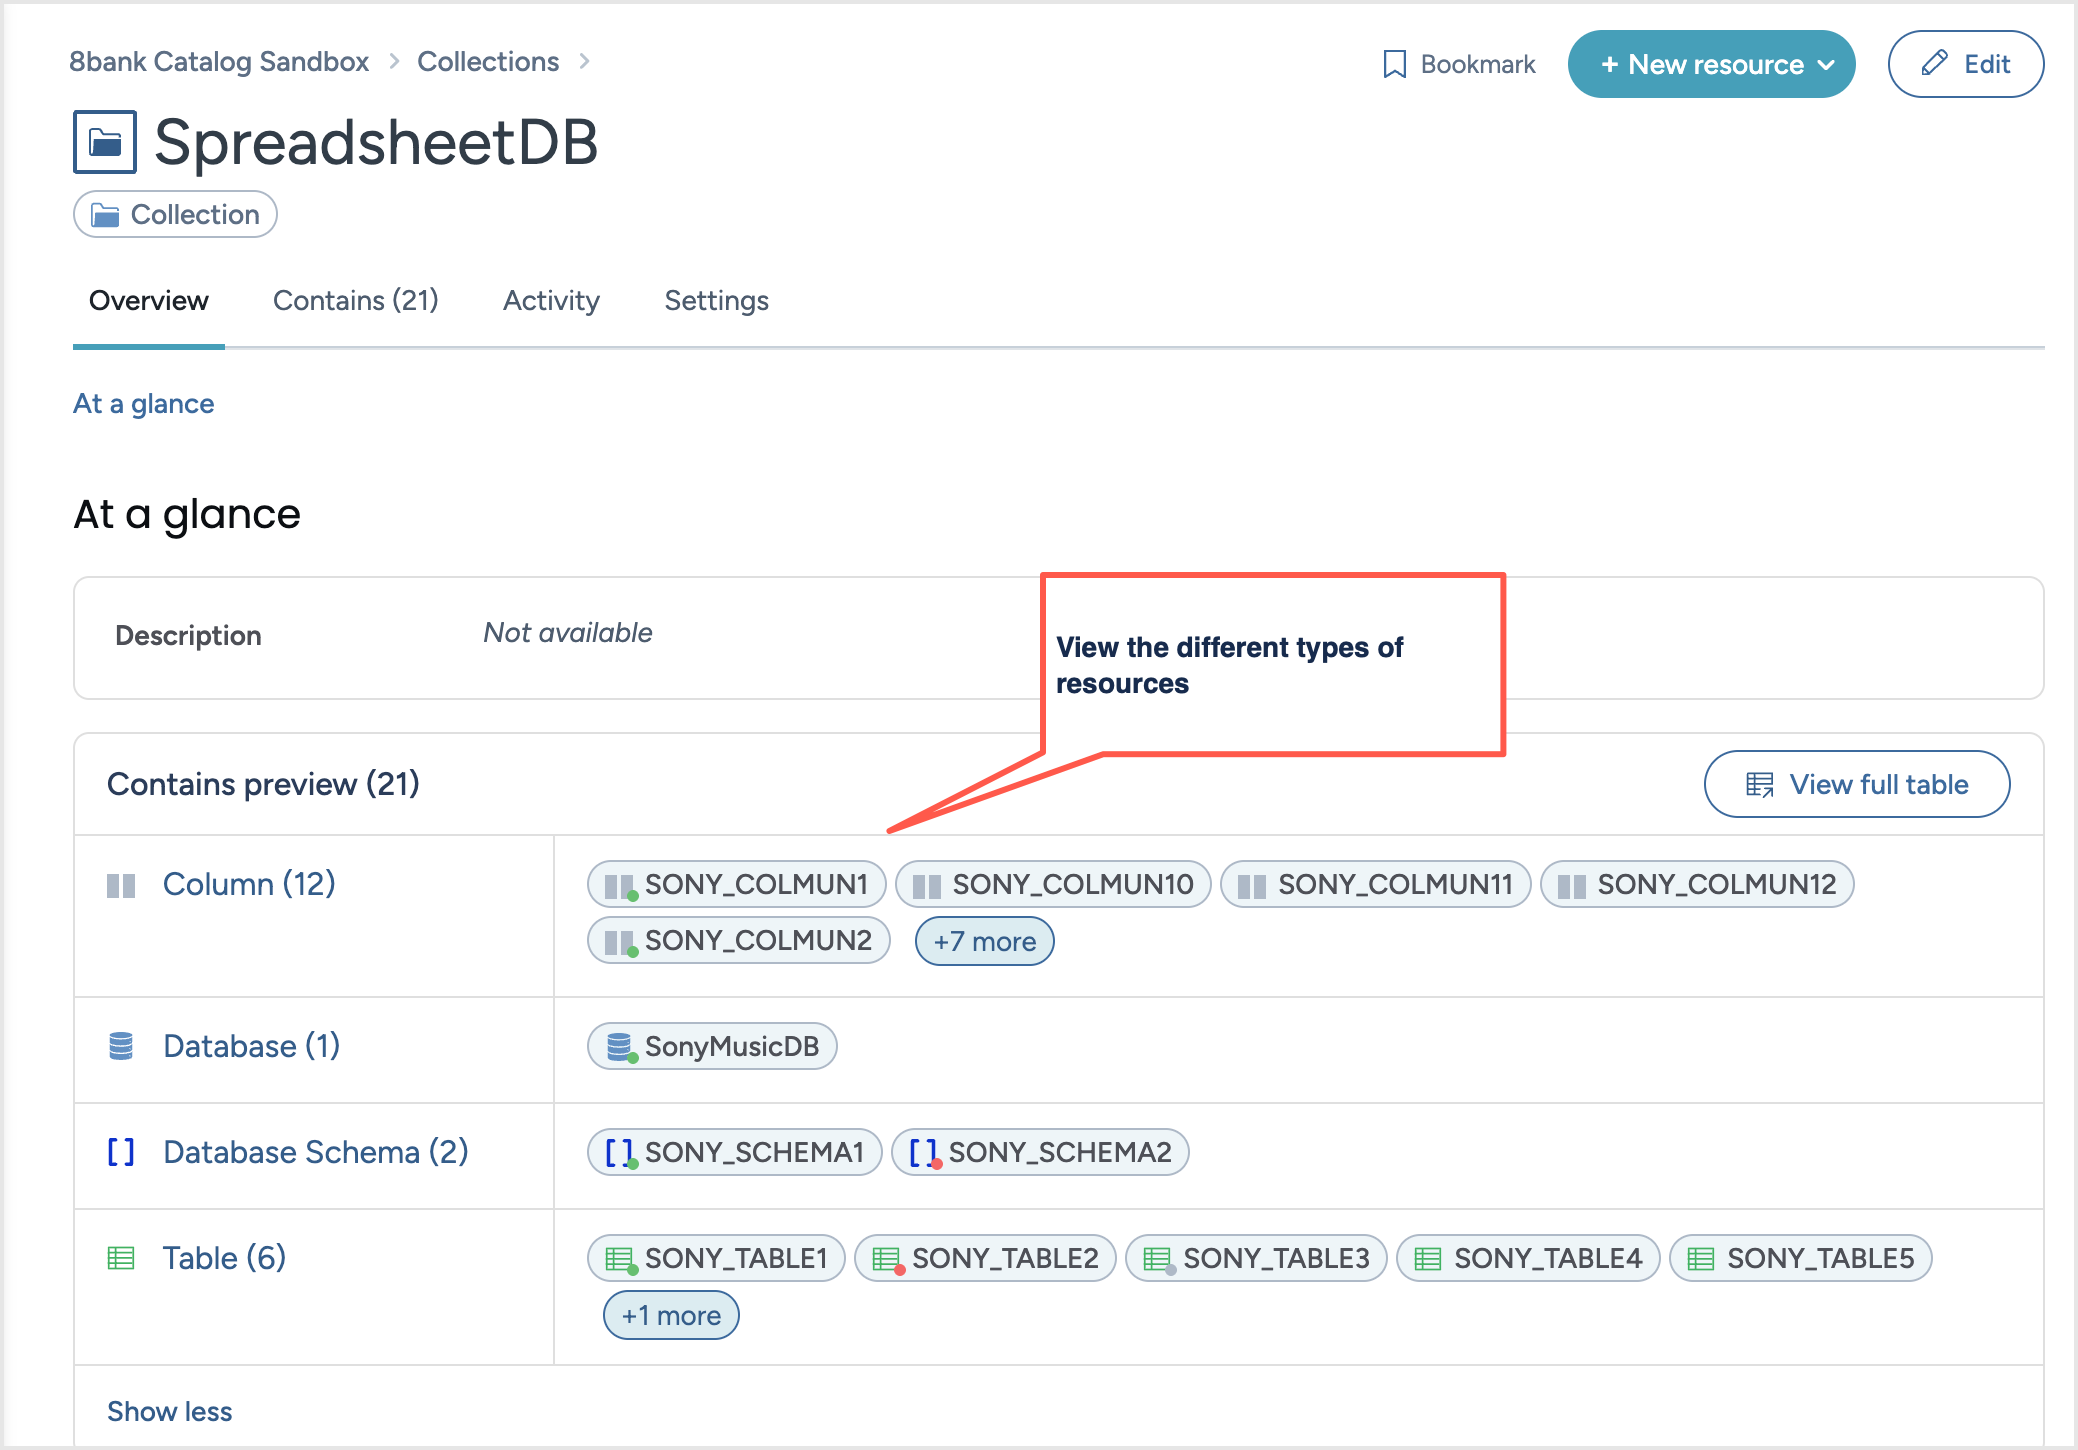
In the Catalog Sandbox organization, browse to the collection you just created. The name of the collection will match the one you specified in the spreadsheet.
On the collection page, browse to the Contains tab. Here, you will see all the resources you created using the spreadsheet, organized into tabs such as Columns, Database schemas, Databases, and Tables. Click the name of the resource to open its detailed page.
