Pre-requisite tasks for the automation
These tasks are required only if you plan to use ServiceNow to process approved access requests. Before configuring the automation, you must first establish a connection to your ServiceNow instance.
How the integration with ServiceNow works?
Processes performed in ServiceNow: When an access request to a resource in data.world is approved, a corresponding ticket is automatically created in ServiceNow. In most cases, a user who has provision access to the data source will take that ticket, grant the access, and then close the ticket.
Data transferred from data.world to ServiceNow: The integration transfers essential information related to the access request from data.world to ServiceNow. This typically includes details such as the requester’s identity and a link to the specific resource in data.world for which access is requested. This data is stored in ServiceNow’s tables designated for handling such requests, often within the Incident or Service Request tables, depending on your organization’s configuration.
Frequency of data transfer: The ticket creation from data.world to ServiceNow occurs in real-time. As soon as an access request is approved in data.world, the integration triggers the creation of a corresponding ticket in ServiceNow without delay.
Setting up ServiceNow Connection
Creating an OAuth application endpoint in ServiceNow
To create an OAuth application endpoint in ServiceNow:
In your ServiceNow instance, browse to All > System OAuth > Application Registry.
On the Application Registries page, Click New.
On the What kind of OAuth application? page click Create an OAuth API endpoint for external clients.
On the Application Registries - New Record page, in the Name field provide a unique name for your configuration. Click Submit.
Note down the Client ID and Client Secret information. You will use this information while configuring the connection in data.world.
Configuring the connection in data.world
To set up the connection:
In the Catalog experience, go to Admin page > Connection manager section.
In the Connection manager section, click the Add connection button.
In the Add an organization-level connection window, select ServiceNow.
In the Add a new ServiceNow connection window, set the following:
Display name: Provide a name for the connection.
Server: Provide the Service now URL. For example, 8Bank.service-now.com
Connection username: Provide the ServiceNow username for the connection. This should be the account you want recorded as the creator of tickets in ServiceNow.
Connection password: Provide the password for the username you are using to connect to your ServiceNow instance.
Client ID: Provide the client ID for your account you noted from ServiceNow.
Client Secret: Provide the client secret you noted from ServiceNow.
Once done, click the Configure button.
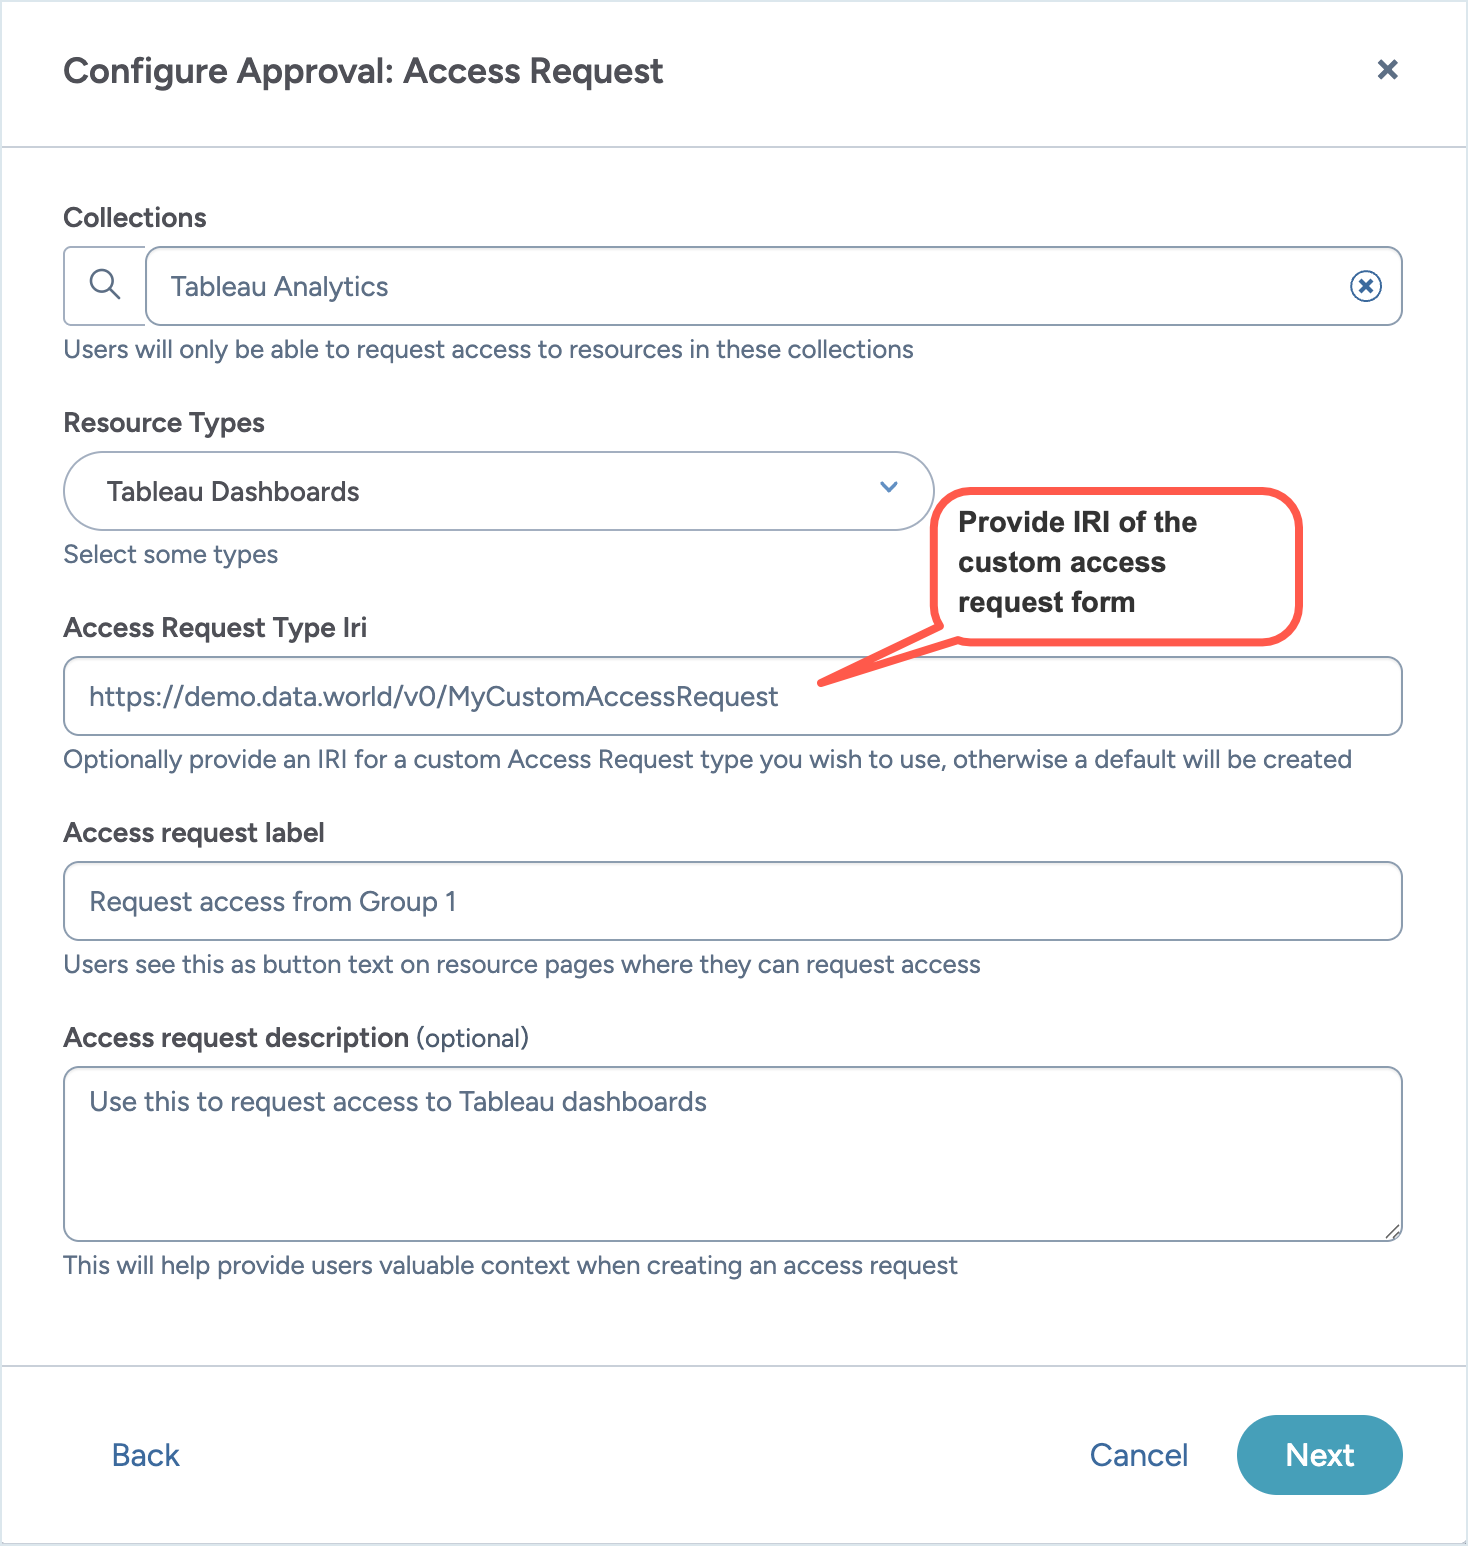
Configuring custom access request forms in data.world (optional)
You can create a custom resource type in the Catalog Toolkit (CTK) that includes all fields required in your custom access request form. Provide the IRI of this custom resource type in the e Access Request Type IRI configuration field in data.world.
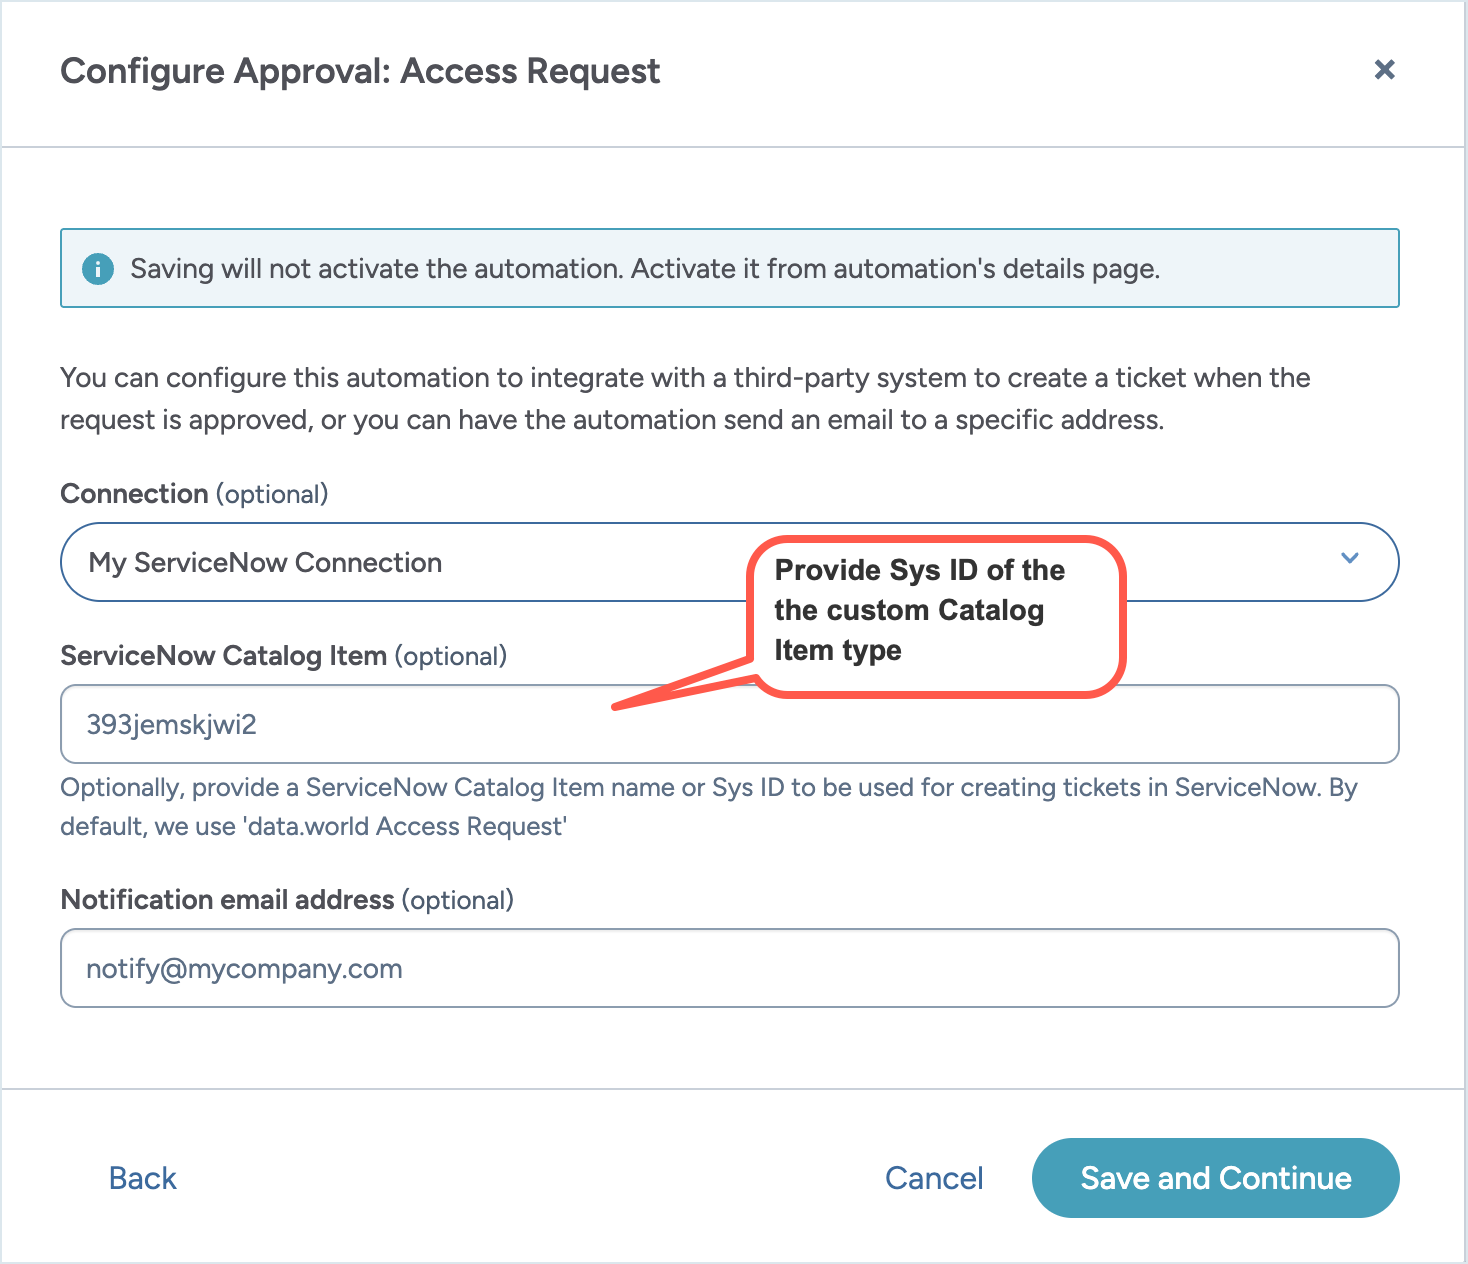
Configuring custom Catalog Item type in ServiceNow (optional)
By default, the automation uses the data.world Access Request Catalog Item Type for access requests. Optionally, you can configure a custom ServiceNow Catalog Item Type to align with your organization’s processes. For details about Service Catalog items, refer to the ServiceNow documentation.
Once configured, provide the sys_id of the custom Catalog Item Type in the ServiceNow Catalog Item field within data.world’s automation configuration.
Managing information sent to ServiceNow with the access request
data.world automatically includes standard information with each ServiceNow access request. You do not need to configure these fields in data.world, but you must configure the corresponding variables in ServiceNow.
You can also send additional custom information by configuring matching custom fields in both systems. Each custom field in data.world must have a corresponding variable in ServiceNow with the exact same name.
Configuring variables for default information sent by data.world
Standard information sent with an access request
Variable | Description |
|---|---|
access_resource_url | Direct link back to the access request in data.world. |
requester_name | Name of the person requesting access. |
requester_email | Email address of the requester. |
resource_url | Direct link to the requested resource in data.world. |
resource_name | Name or title of the resource. |
resource_type | Type of resource (e.g., Table, Column, Dataset) |
resource_hierarchy | Full containment hierarchy (e.g., Database: CustomerDB → Schema: Sales → Table: Orders) |
resource_collection | Collections that include the resource (comma-separated). |
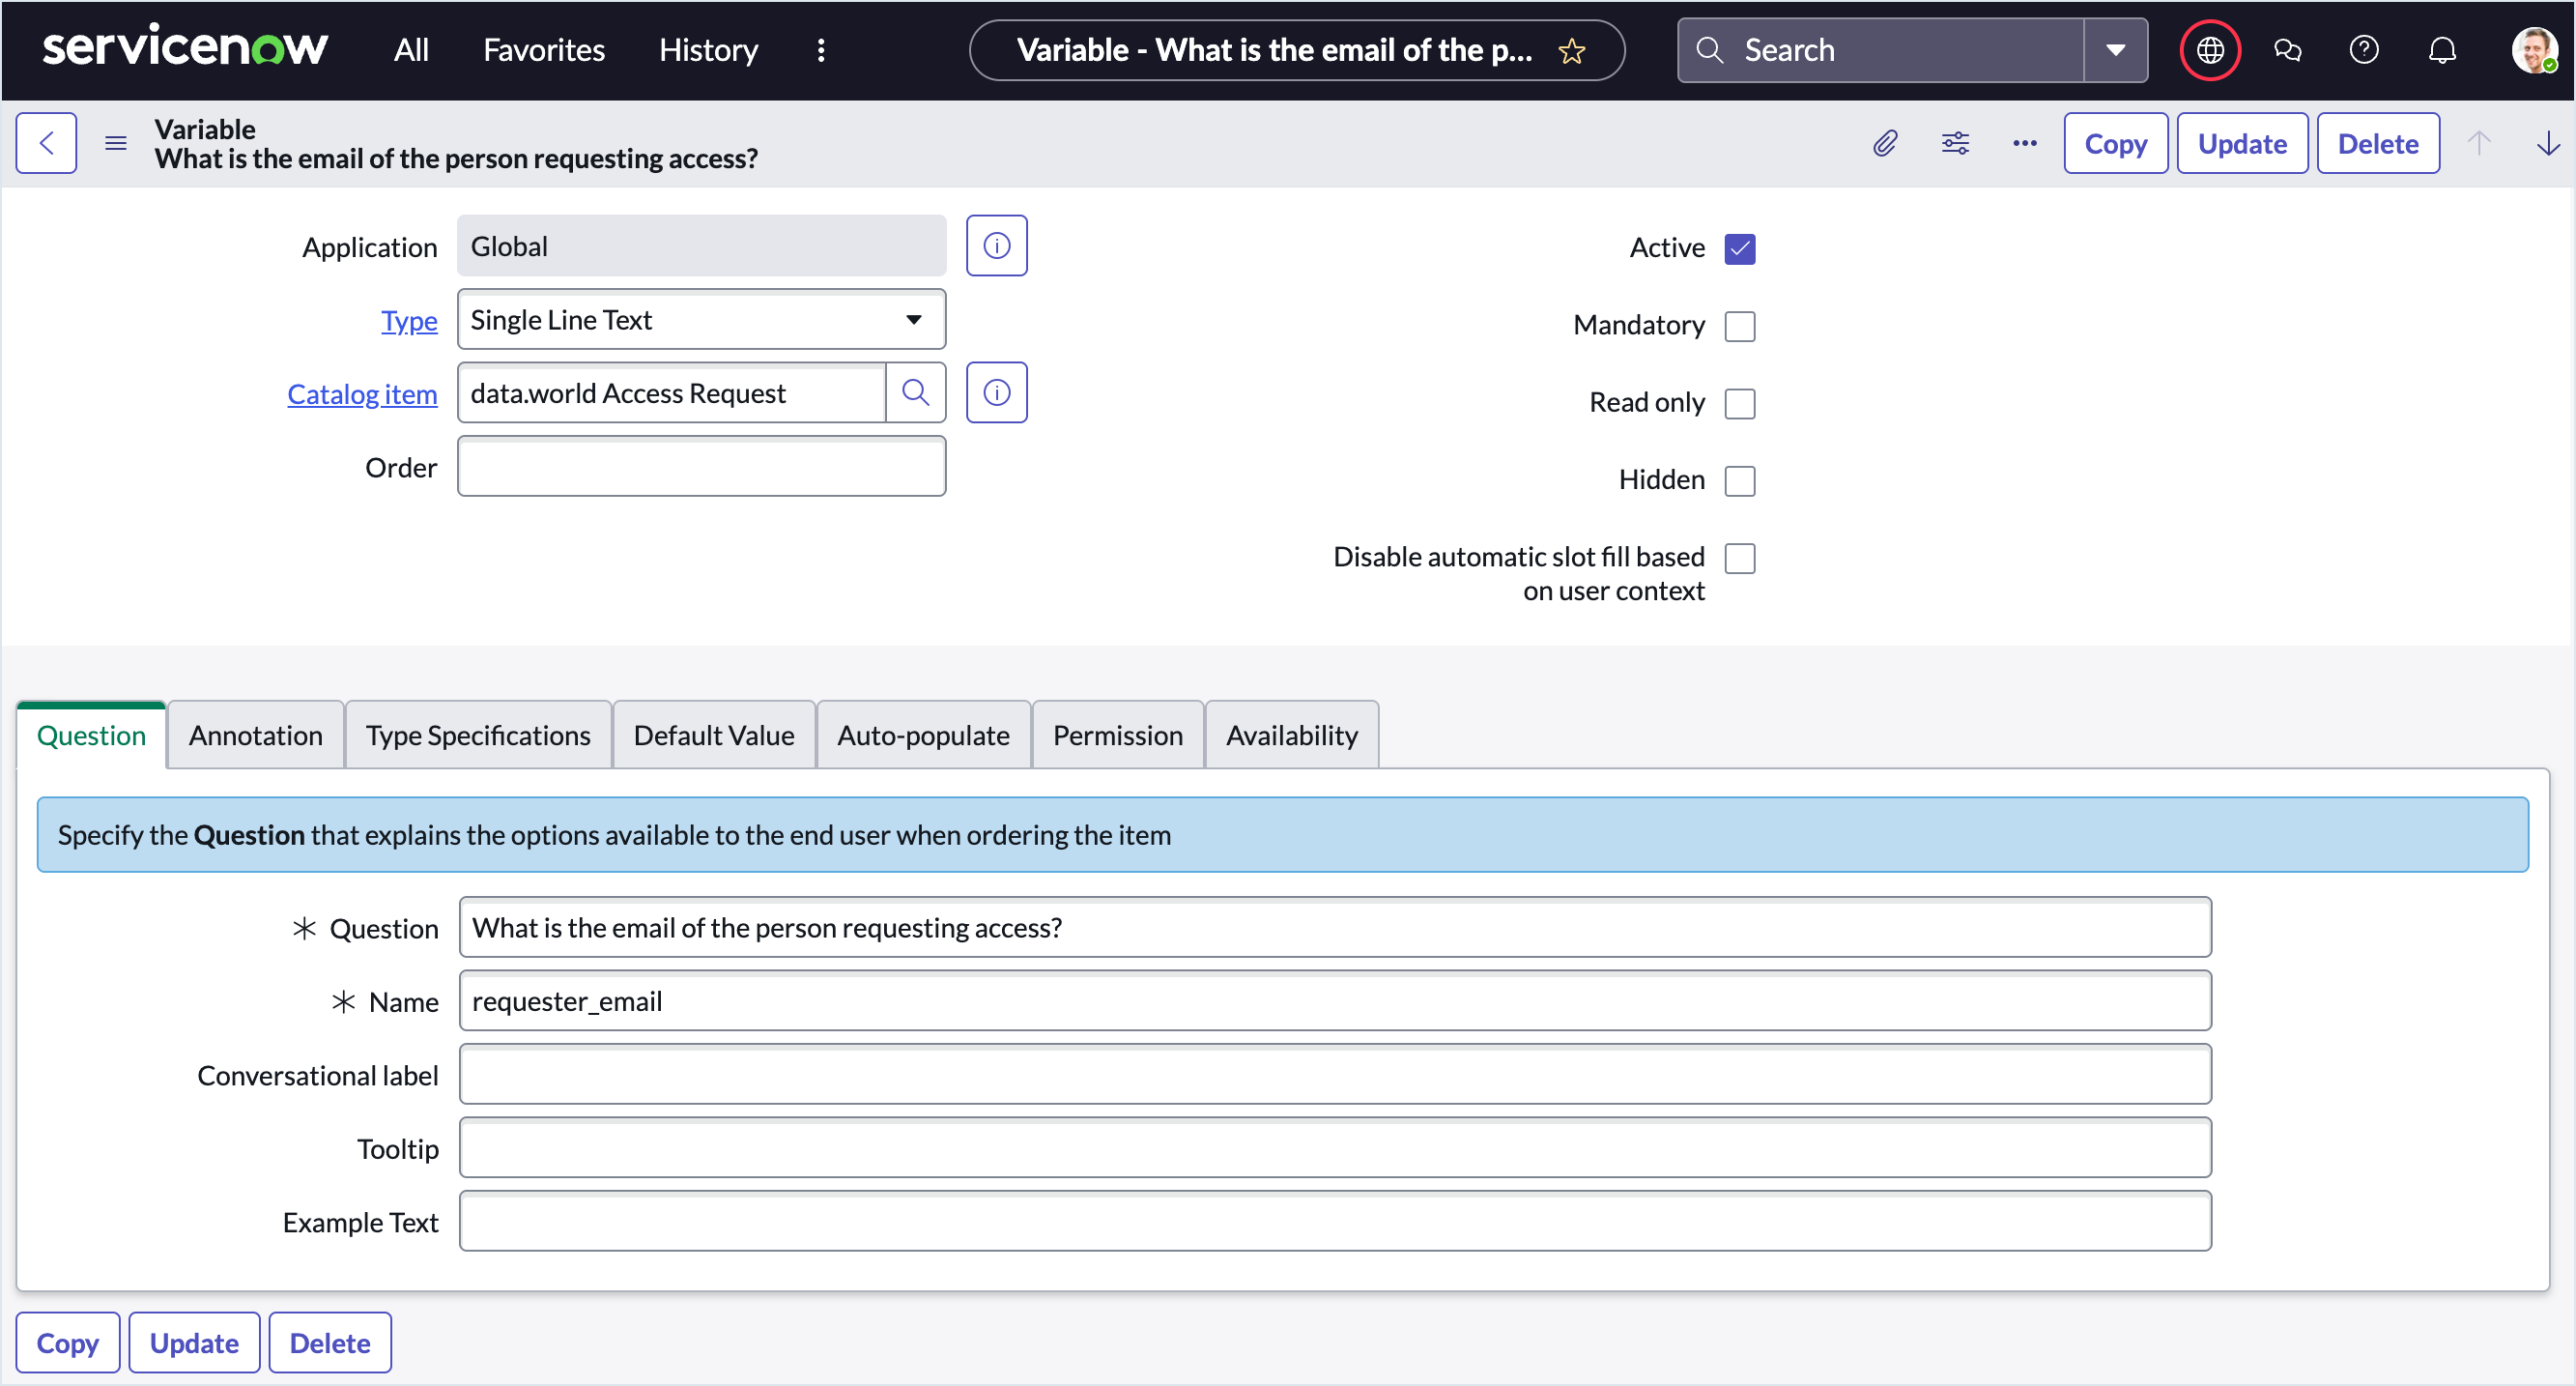
To create variables in ServiceNow:
In your ServiceNow instance, browse to Service Catalog > Catalog Items.
Open your data.world access request catalog item for editing. If you are using a custom catalog item, open that.
For each default variable configured in data.world, create a matching variable in ServiceNow.
Important
Variable names are case sensitive and must match exactly between systems.
For each variable in data.world, create a matching variable in ServiceNow. Set the variable name to match EXACTLY what you configured in data.world Example: If data.world sends requester_email, ServiceNow variable must be named requester_email.
Save the catalog item.
Configuring custom variables in ServiceNow (optional)
Plan and define the custom variables you want to include with access requests. These provide additional context to help ServiceNow administrators process approvals efficiently. For details, see the ServiceNow documentation.
To create custom variables in ServiceNow:
In your ServiceNow instance, browse to Service Catalog > Catalog Items.
Open your data.world access request catalog item for editing. If you are using a custom catalog item, open that.
Create a custom variable in ServiceNow.
Important
Variable names are case sensitive and must match exactly between systems.
Add a new variable to your catalog item.
Set the variable name to match EXACTLY what you will be configuring in data.world. For example, if ServiceNow sends charge_code variable, the exact same name should be used in data.world.
Configure the variable properties.
Save the catalog item.
Configuring custom variables in Catalog ToolKit in data.world
Depending on your business needs, custom variables can be configured on:
A field used in the resource type where automation is applied, or
A field included in a custom access request form.
When data.world sends information to ServiceNow, these custom variables are transmitted along with the default variables.
To configure the custom variable:
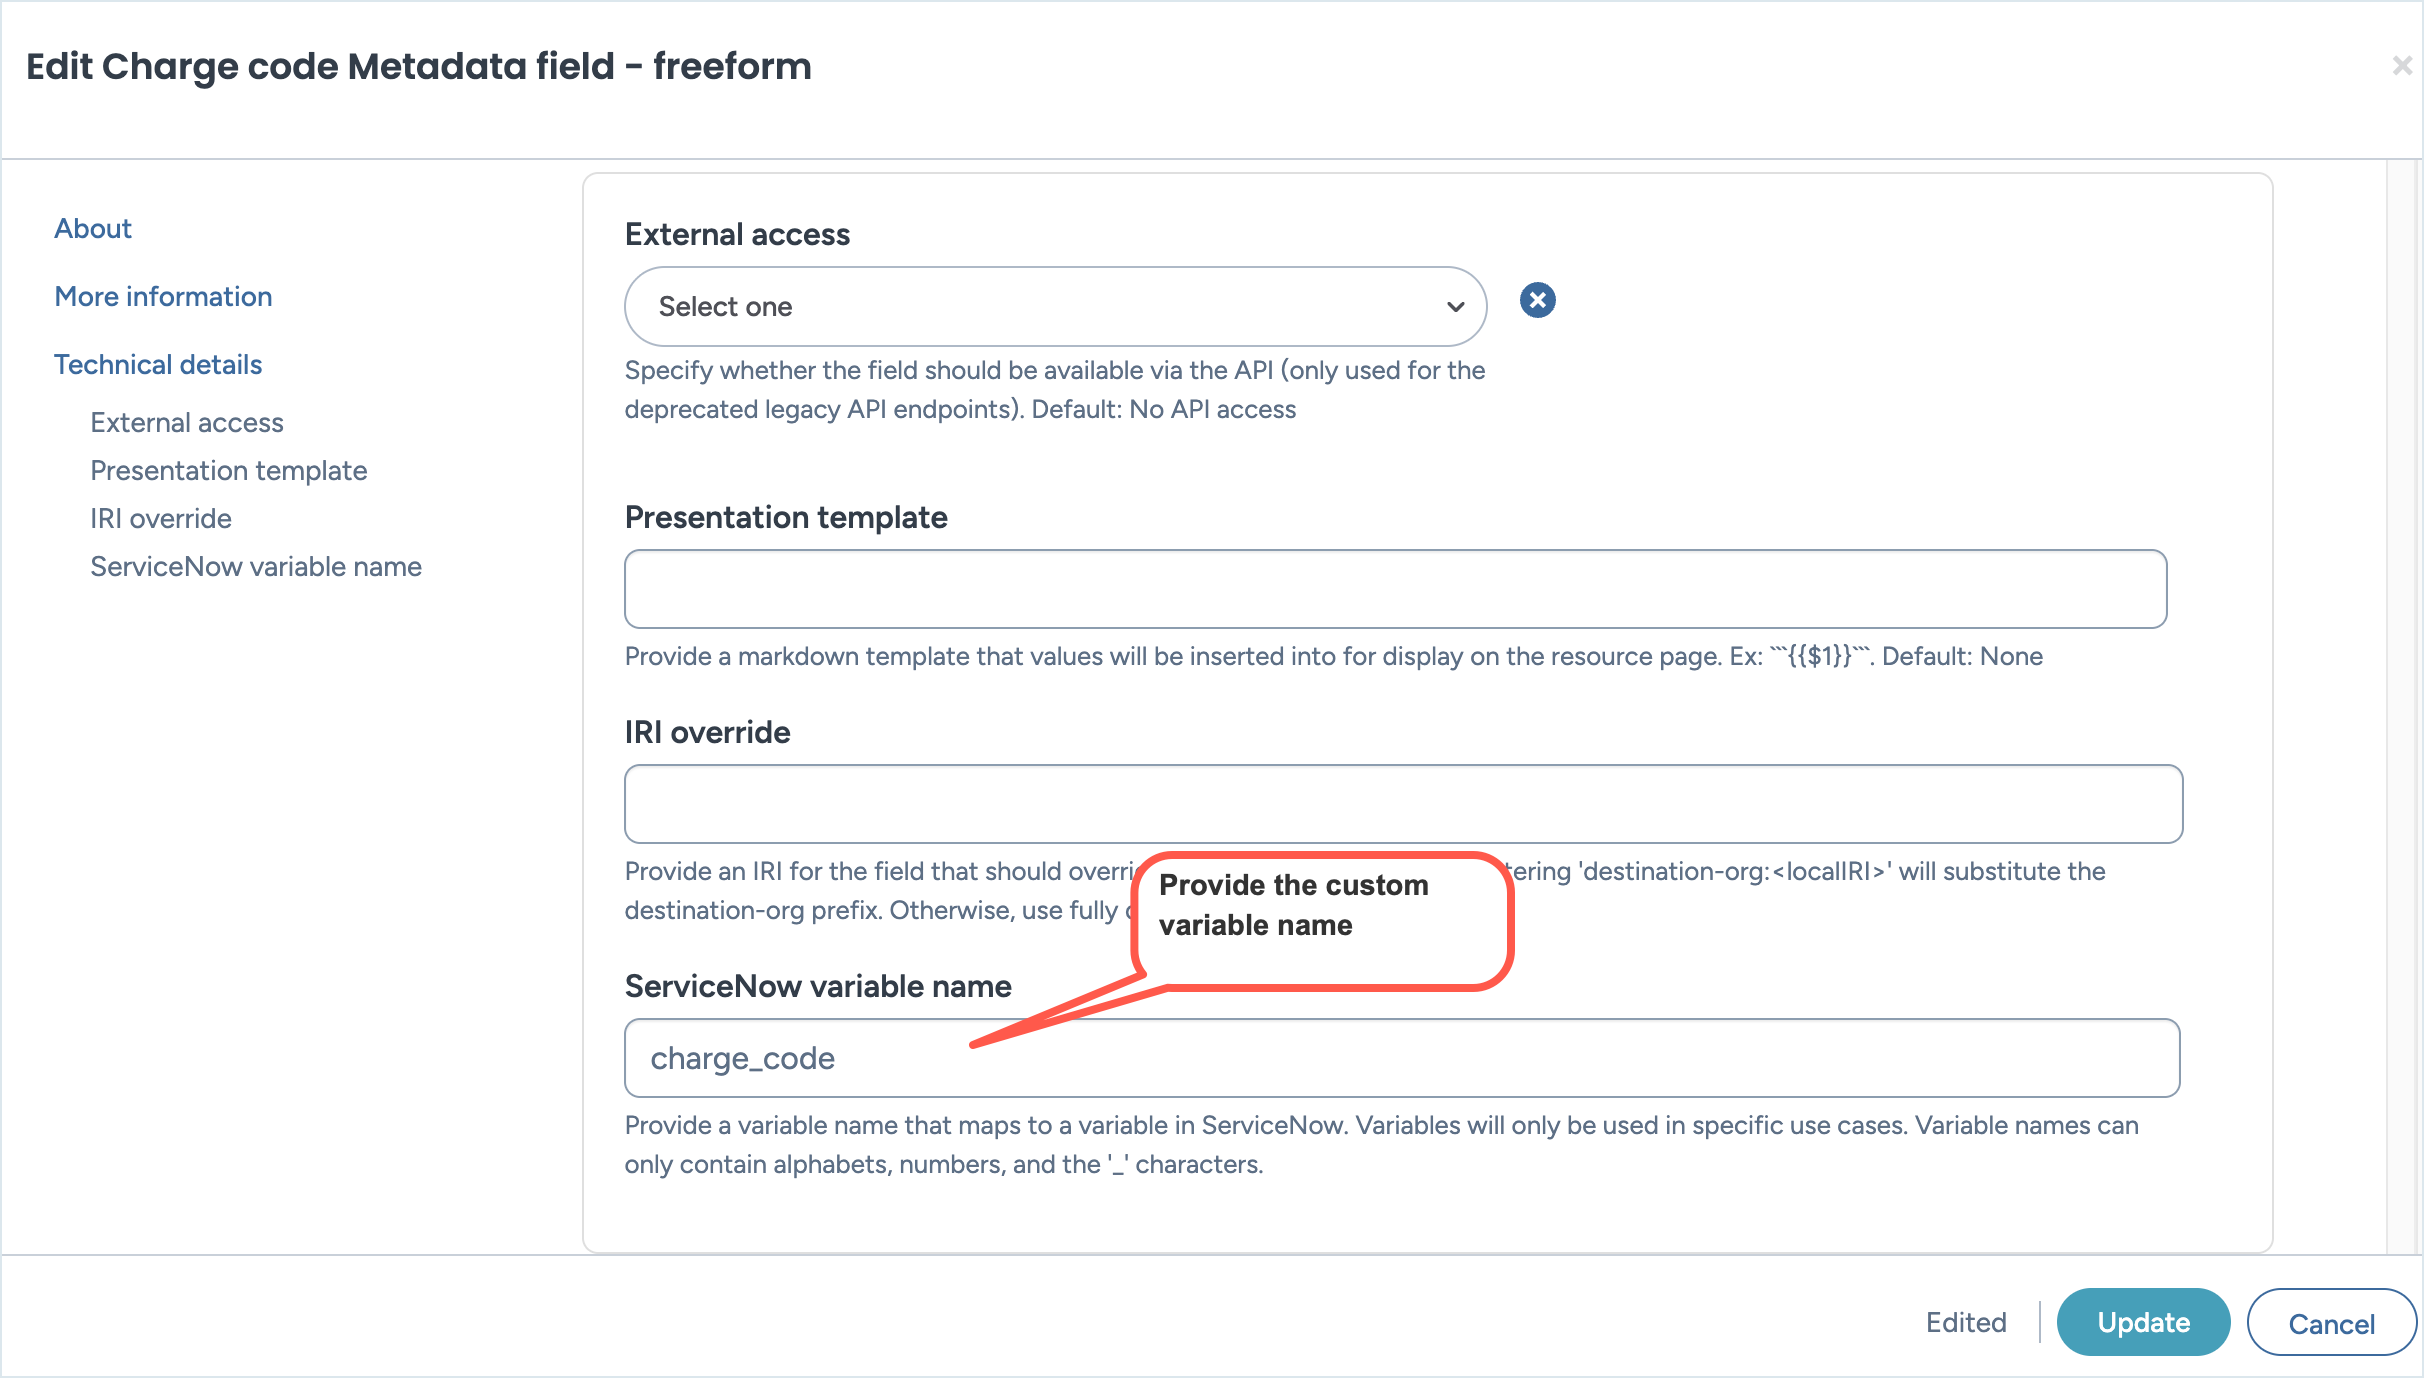
In the Catalog Configuration Organization in Catalog ToolKit, locate the field you want to send to ServiceNow (e.g., Charge Code).
Click Edit to open its properties.
In the Technical Details section, in the ServiceNow variable name field, add the custom variable configured in ServiceNow. For example, charge_code.
Important
Variable names are case sensitive and must match exactly between systems.
When users fills in custom fields in data.world that are associated with custom variables in ServiceNow, (for example, in the Charge Code field in data.world user adds the value CC-12345), ServiceNow receives that information along with the default variables that are sent by data.world to ServiceNow ( for example, charge_code: CC-12345).