Running the Oracle collector in Cloud
Configuring the cloud collector for Oracle
To configure the cloud collector for Oracle:
In the Catalog experience, go to the Admin page > Metadata collectors section.
Click the Add a collector button.

On the Choose metadata collector screen, select the correct metadata source. Click Next.
On the Choose where the collector will run screen, in the Cloud section, select data.world. Click Next.

On the Configure a cloud Oracle Collector screen, set the following:
On the next screen, set the following properties and click Next.
Table 2.Field name
Description
Required
Server
The hostname of the database server to connect to.
Yes
Server port
The port of the database server (if not the default).
No
Database
The name of the database to connect to. You can add multiple databases by clicking the Add item button.
Note: If you don't specify this property, the collector will harvest metadata from all databases. You can then use the optional exclude database parameter to exclude specific databases.
No
Username
The username to use to make the JDBC connection.
Yes
Password
Specify this option to provide the password for the database on the command line.
Yes
Schemas to collect
Select from one of the following options: Collect all schema, Specify which schema to collect
Yes
Collect all schema
Catalog all schemas to which the user has access.
Specify which schema to collect
The name of the database schema to catalog.
Exclude Schema
Specify the name or regular expression of the database schema to be excluded. Applicable only if Collect all schema option is selected.
No
Excluded database
When the database parameter is not provided, the collector harvests metadata from all databases. If you want the collector run to not harvest specific databases, use the Excluded database parameter and specify one or more regular expressions to indicate databases not to be cataloged.
Note: This parameter is ignored if the database parameter is specified. If you wish to use the exclude database parameter, you must not set the database parameter.
No
On the next screen, set the following optional properties and click Next.
Important
If you are using Catalog Toolkit, make sure you select the relevant module for data profiling to use this feature.
Table 3.Field name
Description
Required?
Disable Lineage collection
Skip harvesting of intra-database lineage metadata.
No
Disable Extended Metadata collection
Skip harvesting of extended metadata for resource types such as database, schema, table, columns functions, stored procedures, user defined types, synonyms. Basic metadata for these resource types will still be harvested.
No
Database is an Oracle SID
Indicates that the database is actually an Oracle SID.
No
Oracle JDBC connection timezone
Specify whether the default timezone of JVM should be used as the Oracle JDBC connection timezone.
No
Enable column statistics collection
To enable harvesting of column statistics (i.e., data profiling).
Note: Activating the profiling feature may extend the running time of the collector. This is because the collector needs to read the table data to be able to gather metadata for profiling.
No
Target sample size for column statistics
To control the number of rows sampled for computation of column statistics and string-value histograms. For example, to sample 1000 rows, set the parameter as: --target-sample-size=1000. Default is 100000.
Note: Only applies if Enable column statistics collection is turned on.
No
Enable Sample String Values collection
To enable harvesting of sample values and histograms for columns containing string data.
Note: Only applies if Enable column statistics collection is turned on.
No
Exclude system functions
Specify to exclude system functions.
No
Database Linked External Host Mapping
If your Oracle database contains objects with SQL definitions that reference another Oracle server, specify the host name and database value for the database hosts for each database link. If the default port value is not used, specify the hostname using hostname/dbname:port. The Preparing to run the collector topic provides instructions about gathering this information.
No
Server Environment
If your provided server name is localhost, use this to give a friendly name to the environment in which your database server runs to help differentiate it from other environments.
No
Database ID
A unique identifier for this database - will be used to generate the ID for the database (this is optional, you only need to provide this if the database name used for the connection is not sufficiently unique to completely identify the database)
No
Use Oracle Autonomous Database
Specify whether to connect to an Autonomous Database. Make sure to complete the prerequisites for using this option.
When using this option, provide the service name as the value for the Database parameter and for the server parameter, provide the host name. For example, the values will be Database: g0807_kostest_high.adb.oraclecloud.com and Server: adb.us-chicago-1.oraclecloud.com
Note: When this option is specified, the Database is an Oracle SID, the Oracle JDBC connection timezone and the Database Linked External Host Mapping options are ignored.
No
Oracle Autonomous Database Connection String
Specify the connection string for an Autonomous Database
The connection string should be in the format: jdbc:oracle:thin:@<host>:<port>/<service_name> or jdbc:oracle:thin:@(address=(protocol=tcps)(port=<port>) (host:<host>))(connect_data=(service_name=<service_name>))(security=(ssl_server_dn_match=yes))).
NOTE: The collector connects to the Oracle Cloud instance using the value in the Oracle Autonomous Database Connection String field. However, the server, port, and database parameters are still required—they are used for IRI coining and to uniquely identify the database resources within your catalog.
JDBC Properties
JDBC driver properties to pass through to driver connection, as name=value. Use the parameter multiple times for multiple properties. For example, --jdbc-property property1=value1 --jdbc-property property2=value2
No
JDBC properties to be set if using Oracle Autonomous Database in Mutual TLS (mTLS) mode. Make sure to complete the prerequisites for using this option.
OPTION 1:
Path to the truststore.jks file.
For example:
Name: javax.net.ssl.trustStore
Value: /usr/src/dwcc-config/lib/truststore.jks
Yes
(if using Oracle Autonomous Database)
Password of the wallet.
For example:
Name: javax.net.ssl.trustStorePassword
Password: WALLET_PASSWORD
Yes
(if using Oracle Autonomous Database)
Path to the keystore.jks file.
For example:
Name: javax.net.ssl.keyStore
Value: /usr/src/dwcc-config/lib/keystore.jks
Yes
(if using Oracle Autonomous Database)
Password of the wallet.
For example:
Name: javax.net.ssl.keyStorePassword
Value: WALLET_PASSWORD
Yes
(if using Oracle Autonomous Database)
JDBC properties to be set if using Oracle Autonomous Database in Mutual TLS (mTLS) mode. Make sure to complete the prerequisites for using this option.
OPTION 2:
Path to the wallet folder
For example:
Name: oracle.net.ldap.ssl.walletLocation
Value: /usr/src/dwcc-config/lib/
Yes
(if using Oracle Autonomous Database)
Password of the wallet.
For example:
Name: oracle.net.ldap.ssl.walletPassword
Value: WALLET_PASSWORD
Yes
(if using Oracle Autonomous Database)
JDBC properties to be set if using Oracle Autonomous Database in Mutual TLS (mTLS) mode. Make sure to complete the prerequisites for using this option.
OPTION 3:
Path to the wallet folder.
For example:
Name: oracle.net.wallet_location
Value: "(SOURCE=(METHOD=FILE)(METHOD_DATA=(DIRECTORY=/usr/src/dwcc-config/lib/)))" (quotes are required
Yes
(if using Oracle Autonomous Database)
Password of the wallet.
For example:
Name: oracle.net.wallet_password
Value: WALLET_PASSWORD
Yes
(if using Oracle Autonomous Database)
SQL parsing timeout
Specify the timeout in seconds for SQL parsing during lineage collection. The default is 60.
No
Enable Sample Data
Specify whether to collect sample data for tables and views. When enabled, a small sample of rows is packaged as a Parquet file and attached to each table resource.
No
Sample Size for Sample Data
Specify the number of rows to sample per table for sample data preview. The default is 10.
No
On the next screen, set the following properties if you want to set up Sensitive data classification and click Next.
On the next screen, provide the Collector configuration name and an optional Configuration description, and set the run schedule. You can also set the schedule at a later point.
Click Save and View to go the collector details page.
Testing collector configuration
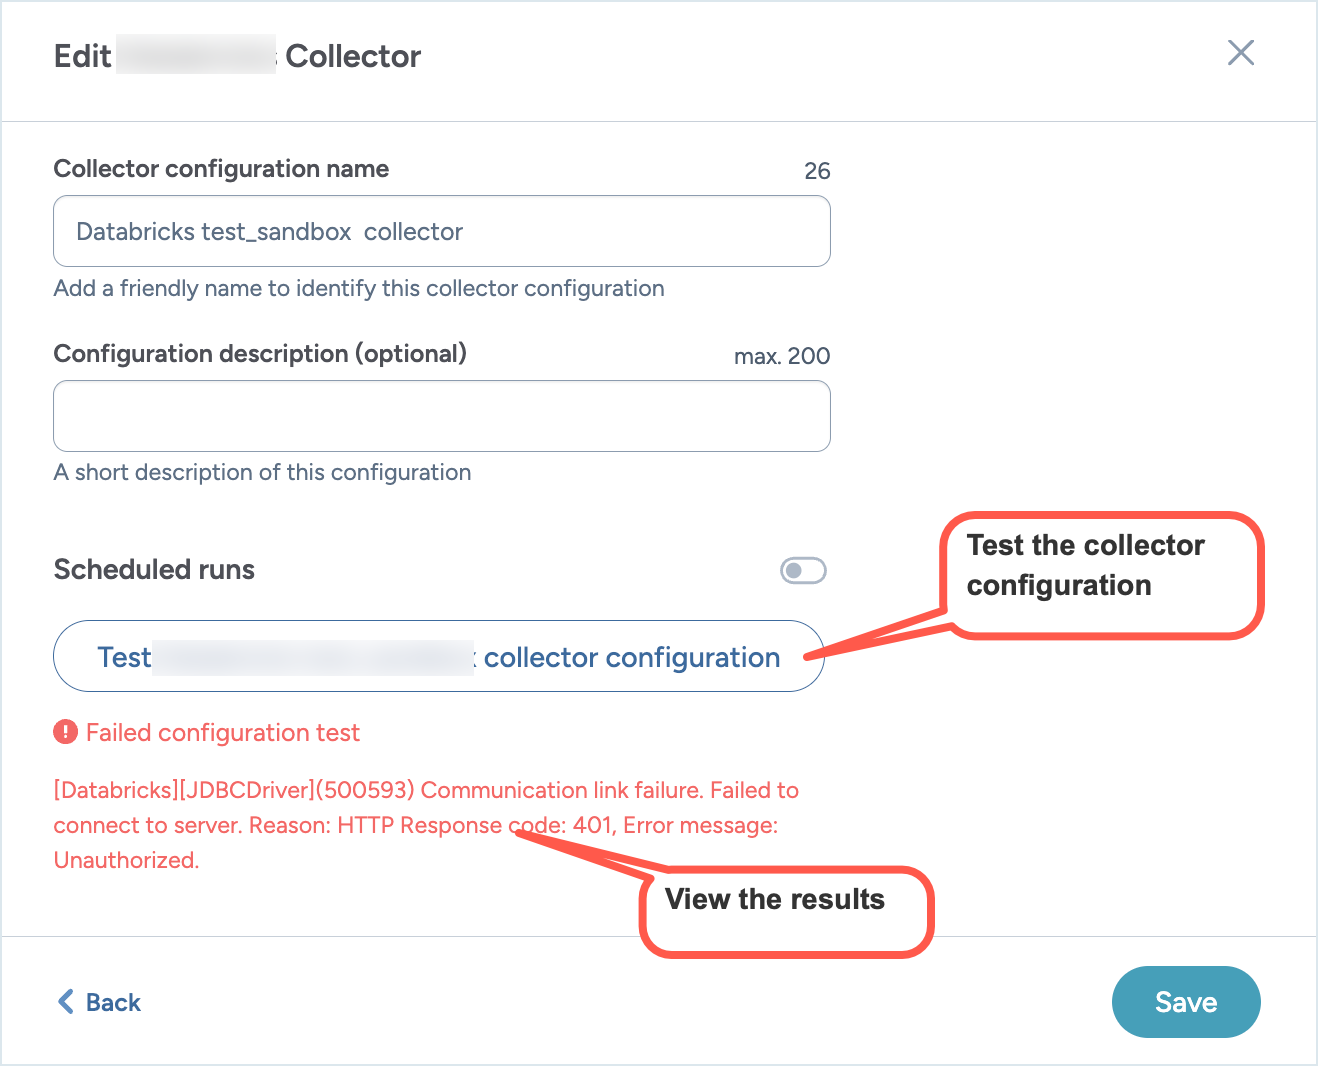
Test your cloud collector configurations before saving or running them to make sure your connection details are valid and the collector can access the source system.
Use this feature after you have finished entering all configuration fields — such as the server address, authentication credentials, databases, and schemas — to quickly confirm:
The system can connect to the database.
Credentials are valid.
Required schemas are accessible.
To test a collector configuration:
Before saving, use Test configuration to validate your connection and confirm that the collector can access the database and schemas you have specified.
On the Metadata collectors page, click Add a collector.
While configuring the collector, proceed through the setup steps. On the final screen, where you enter the collector configuration name, click Test [Collector Name] configuration.
To test an existing collector, open the configuration by clicking Edit configuration.
Click Next through the setup screens until you reach the final screen, then click Test [Collector Name] configuration.
When you click the Test button, the system attempts to:
Connect to the database using the credentials you provided.
Authenticate using the specified role.
Check schema access, if specific schemas were listed.
Based on the outcome, the collector shows whether the configuration is valid, partially valid — for example, the connection works but a schema is inaccessible — or invalid — for example, due to bad credentials.
If the test fails, an error message appears to help you troubleshoot the issue. For example, Incorrect username or password was specified.
Scheduling collector runs
Important things to note:
Different collectors can be scheduled to run at the same time, but one collector can only run once a day.
It is recommended that you schedule the runs in off-peak hours.
The collector runs in the timezone in which the scheduler is located. For example, if the scheduler sets the collector runs from PST timezone, the collectors will follow the PST timezone.
Runs may start up to one hour after the scheduled time.
Cloud collectors are designed to automatically run against the latest version of the collector supported by the UI.
To schedule collector runs:
On the Configured collectors page, locate the collector you want to run on a schedule.
Click the Edit configurations button.
Go to the screen where you can set the schedule for the collector and set the following:
Enable the Scheduled runs option.
From the Frequency dropdown, select from Daily, Weekly, or Monthly.
For Weekly and Monthly options, select the day when the collector should run.
Select the time for running the collector.
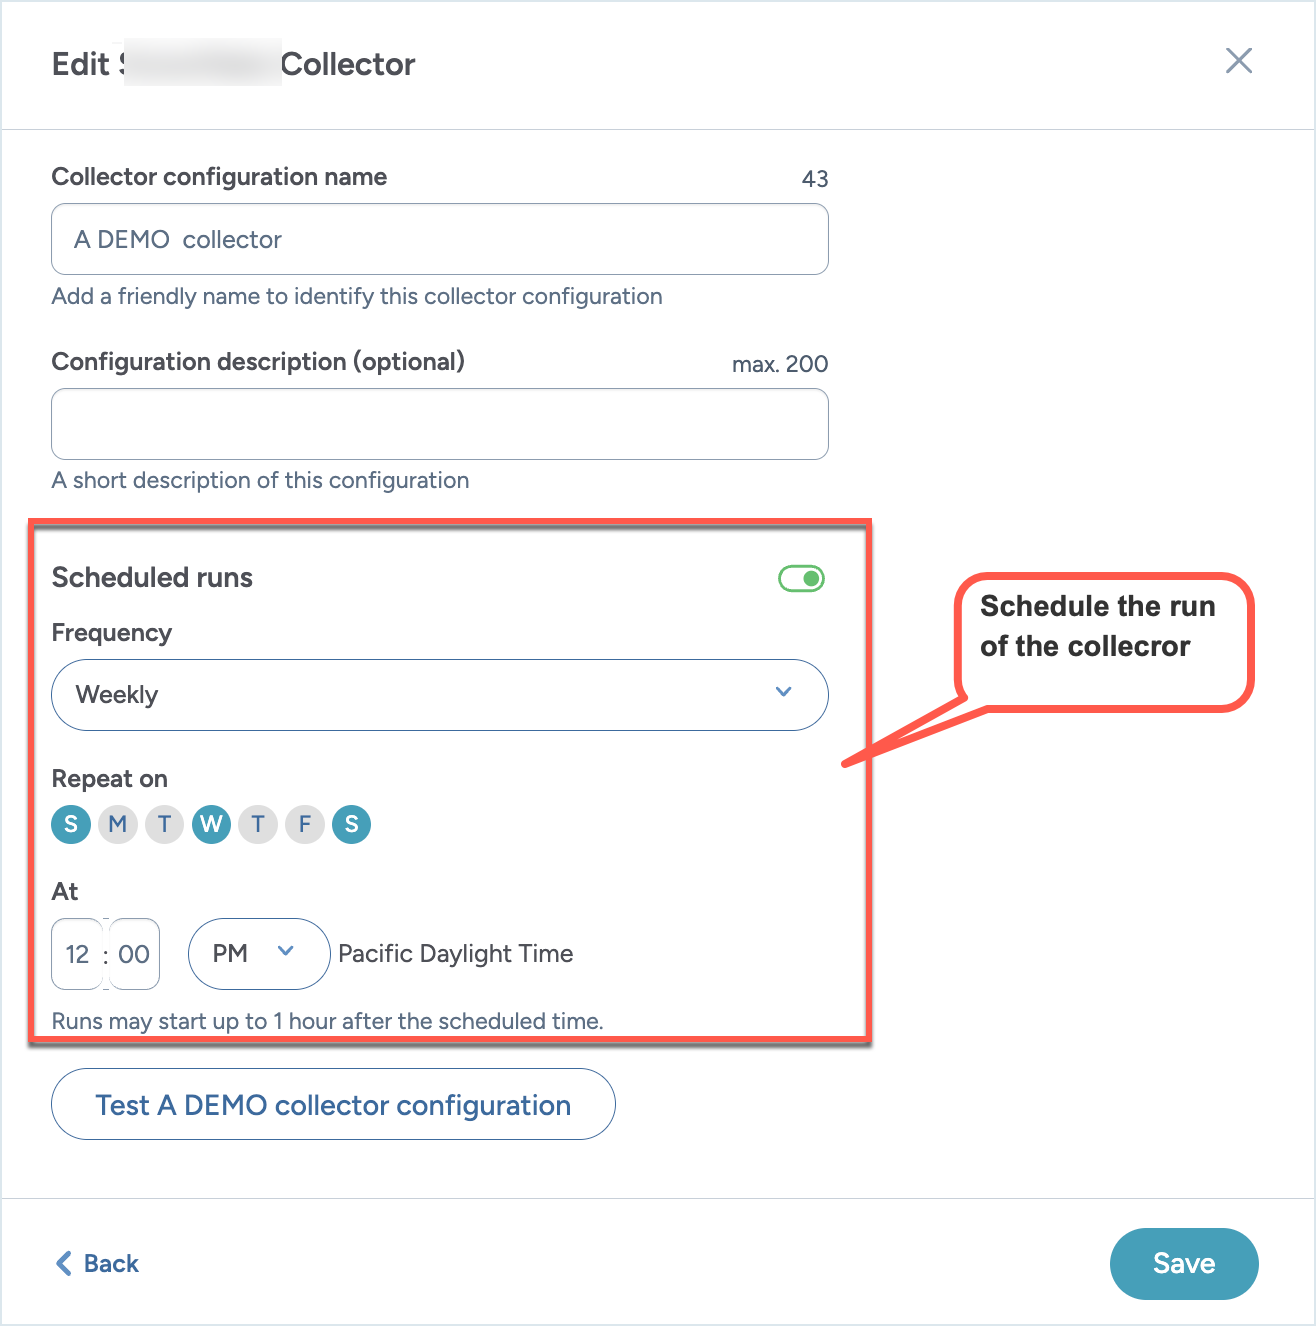
Click Save and view. The schedule and next run date and time are displayed on the collector details page.
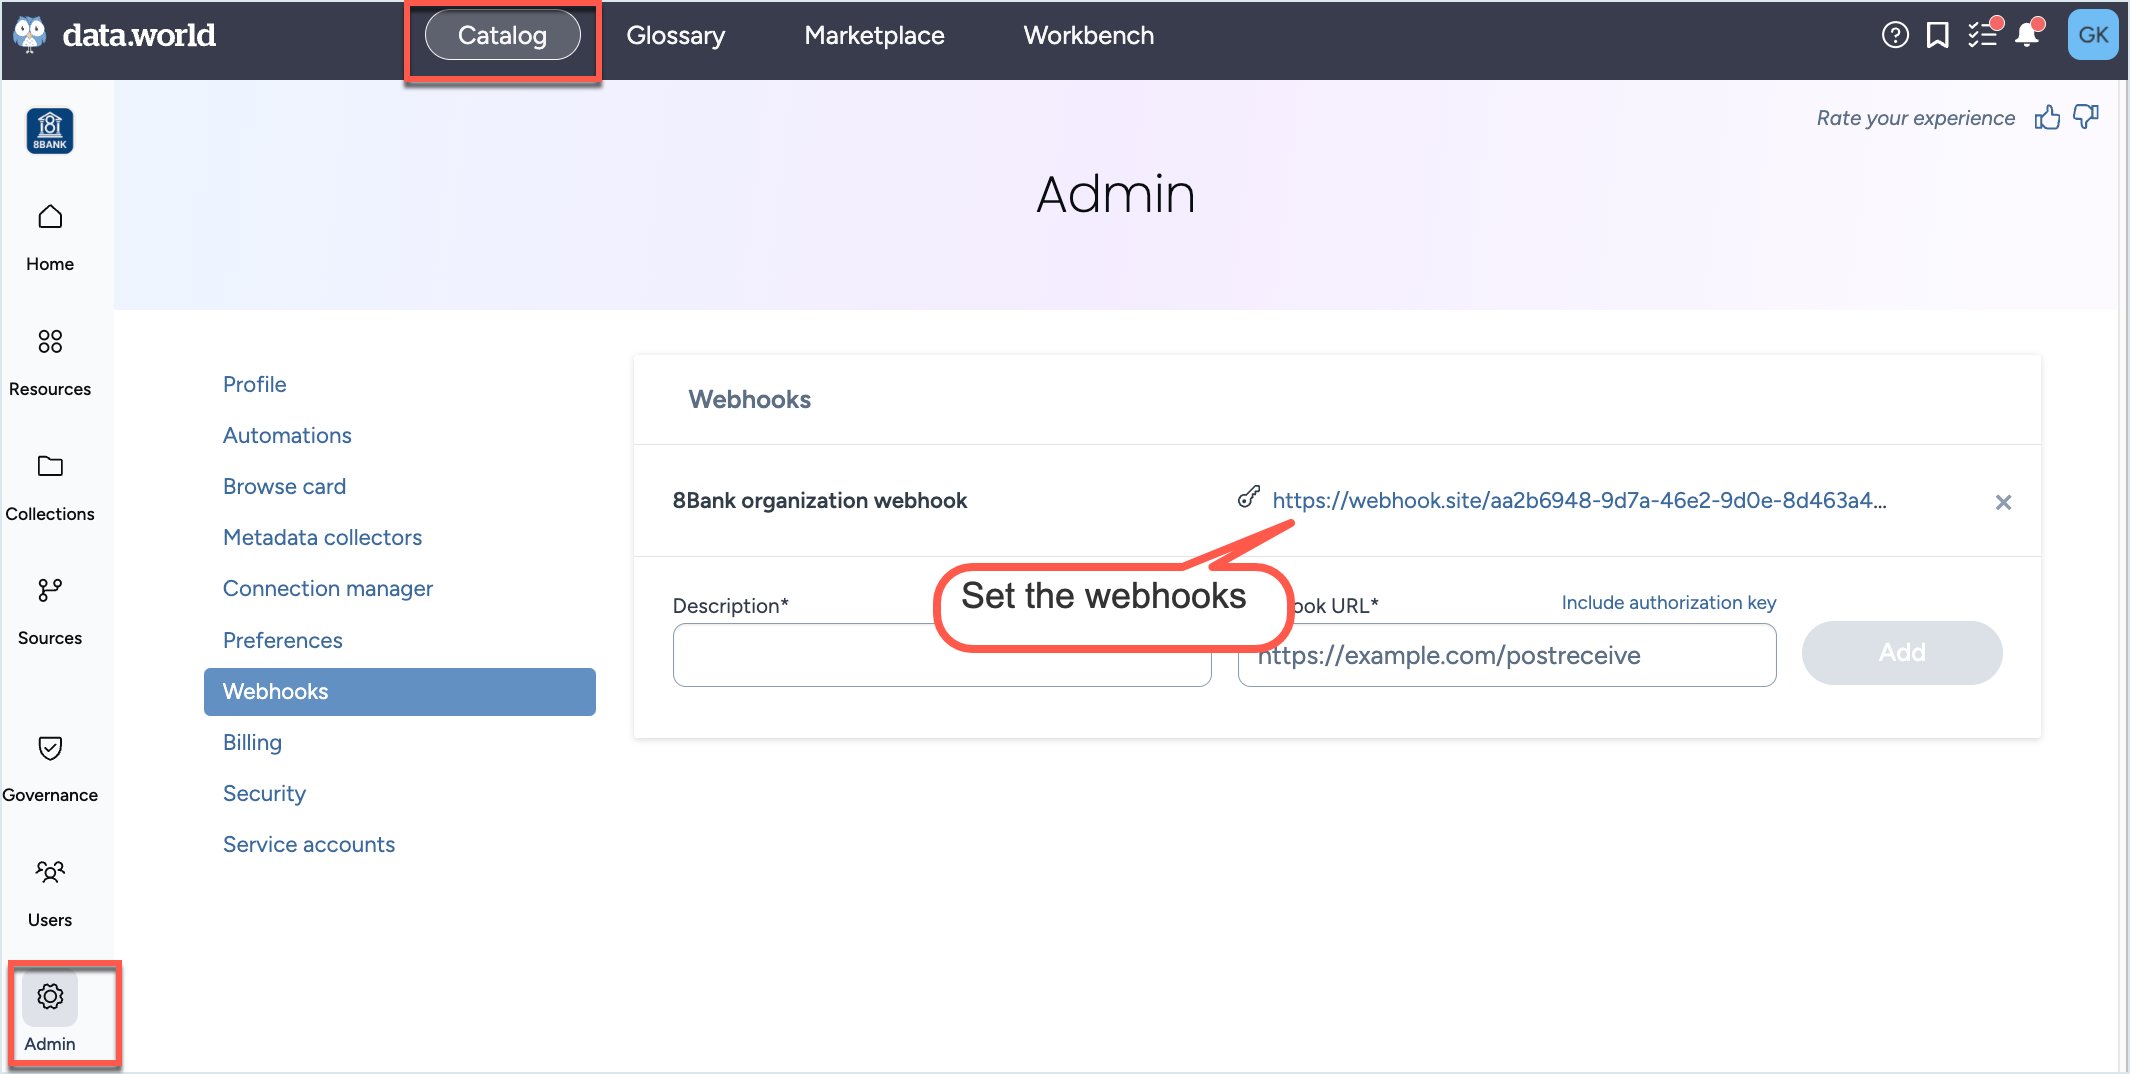
To get notifications about the collector runs, simply setup web hooks at the Organization level from the Catalog experience> Admin page. The Webhooks will automatically start capturing the Status events (Pending, Provisioning, Running, Completed, Error, Cancelled) for the collector runs.
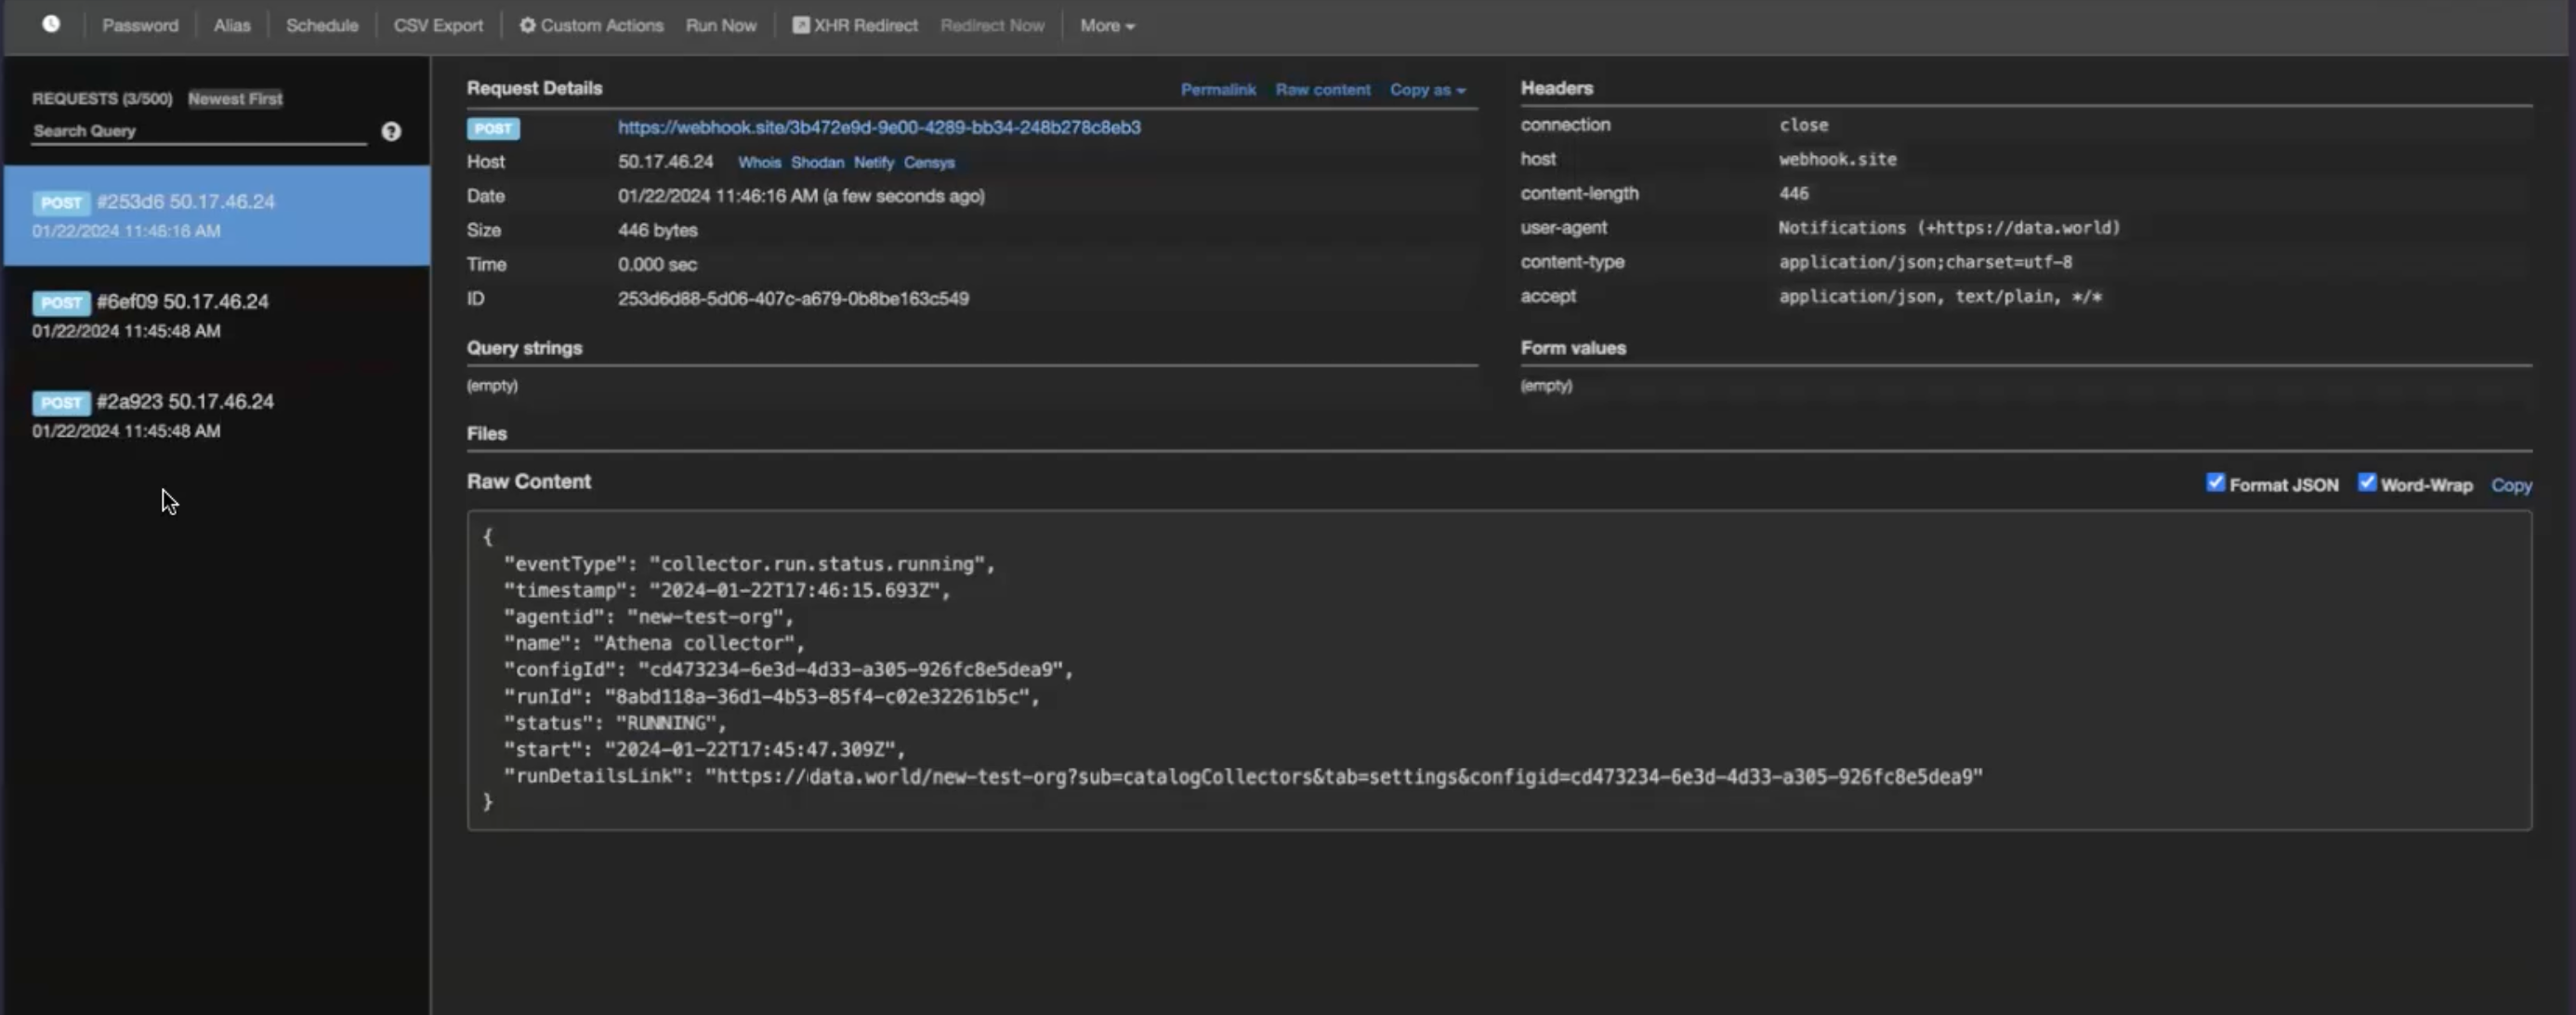
Sample data captured by the webhook.
Running collectors manually
After setting up the collector configuration, it's recommended to manually execute it once to confirm everything is set up correctly. Even for collectors scheduled to run automatically, you can initiate them manually at any time. Cloud collectors are designed to automatically run against the latest version of the collector supported by the UI.
To run the collectors manually:
On the Configured collectors page, locate the collector you want to run.
On the collector configuration details page, click the Run now button. Alternatively, on the Configured collectors page, click the Three dot menu and click Run/Sync now button.
On both pages, the Status field shows the status as Running with information about time elapsed since the run was started.
The collector starts running in the background and you can navigate away from the page at any time. If a collector run errors out, the Status section and the Status field update to an Error state.
After the collector has completed the required pre-configuration steps and starts harvesting the metadata, you get an option to Cancel the harvesting process, if you want. The Status section and the Status field update to Canceled.
After the collector run has completed, the Status section of the collector configuration details page updates to show the successful status. The Last run summary page also updates to show the total number of resource collected and total number of types of resources collected. The Resources collected by type gives granular level information about the number of resources collected for each type of resource.
Browse to the Collection and Dataset specified while running the collector to view the collector output.
To get notifications about the collector runs, simply setup web hooks at the Organization level from the Catalog experience > Admin page. The Webhooks will automatically start capturing the Status events (Pending, Provisioning, Running, Completed, Error, Cancelled) for the collector runs.
Sample data captured by the webhook.
Canceling a collector run
After starting a collector run, you can cancel it if needed.
Important things to note:
Logs generate only after the collector starts up (about 5 minutes). No logs are available if the collector is canceled before this period.
After canceling a run, the collector produces the logs within 5 minutes
To stop a running collector:
Locate the running collector you want to stop. After the collector has completed the required pre-configuration steps and starts harvesting the metadata, you get an option to Cancel it.
On the collector configuration details page, click the Cancel run button. Alternatively, on the Configured collectors page, click the Three dot menu and click Cancel run button.
The collector stops running. On both pages, the Status field shows the status as Canceled with information about time elapsed since the run was canceled.
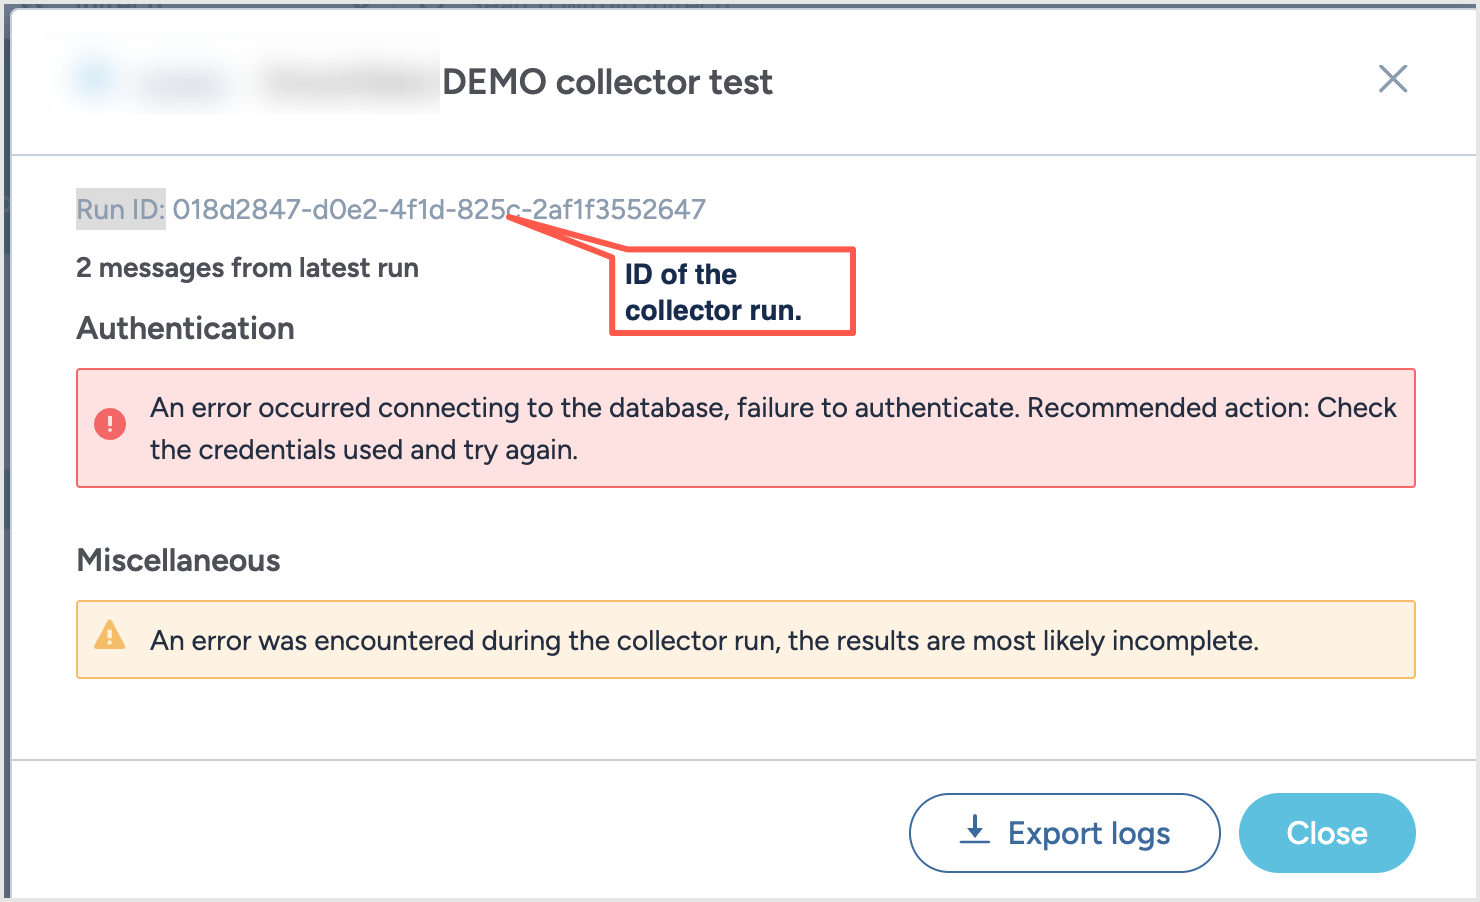
The collector produces a log file in 5 minutes after stop running. To download a logs, click the View debugging info link. A pop-up window opens.
In the pop-up window, click Export logs to download the log file. The window also includes the Run ID of the collector run that failed. While reporting this issue to data.world support team, include this Run ID to help expedite the troubleshooting process.
Copying collector configurations
After you have configured a collector for a source system, you can easily create a copy of the configuration to configure another collector for the same source system but for different parameters.
To copy collector configurations:
On the Configured collectors page, locate the collector configuration you want to copy.
From the Three dot menu, click Duplicate configuration.
In the Edit Collector window, provide a new name for the collector configuration. Optionally, set a schedule. Click Save and view.
You are taken to the copied collector configuration page. Click the Edit Configuration button to adjust the details of the configuration.
Deleting configurations
Important things to note:
Deleting the configuration will not affect the resources that were collected from previous runs.
Any scheduled future runs for the collector are suspended.
To delete a configuration:
On the Configured collectors page, locate the collector configuration you want to delete.
From the Three dot menu, click the Delete configuration button.
Confirm the deletion. The configuration is deleted and removed from the Configured collectors page.