Bulk uploading and editing resources
The bulk upload and edit process for resources can be invoked from three different places in the application - the Resources page in the Catalog experience, the Contains or Settings tab of Collections. However, if you are looking to just bulk edit columns in tables, you can do that per table by using the bulk edit options available on the Table resource pages.
If you are looking to edit only the Glossary of your organization, use the bulk-edit feature available on the Glossary experience.
Caution
The bulk download and upload feature is not intended for downloading the resources from one collection and uploading it to another collection.
If this is the first time you are adding resources to a collection, download the template from the application, follow the instructions in the spreadsheet and upload your resources to the application.
If you are working in a collection that already has resources, download the existing contents as a spreadsheet and make edits to it or add new resources. Once you are done, upload the updated spreadsheet to the application.
Only resource types that are allowed to be created from the UI, will be available as sheets in the spreadsheet. If a metadata attribute is marked as a source of record, then it will not show up as a column. Similarly, if a Resource type is marked as a source of record, it will also not show up as a sheet in the spreadsheet.
Relationships as fields can be edited using the spreadsheet. You must know the IRI of the relationships to add or remove them from the spreadsheet. Resource IRIs are case-sensitive.
The spreadsheet has clear guidelines on how to make edits and set field values. You must follow those instructions carefully to have a smooth experience.
If a collection has subcollections, the exported file from the parent collection will not include contents of the subcollections. You have to go to the subcollection to perform the bulk edit action on that collection.
You cannot use the bulk feature to move resources across collections.
You cannot use the bulk feature to delete resources from collections.
You cannot add or remove tags from resources using the spreadsheet method.
Important
Note that only users with the Edit or Manage access to the specific collection or Edit or Manage access to All catalog resources at the organization level can bulk edit resources in collections. For details about permissions, see Planning user groups and their access levels.
Downloading resources for bulk editing
Important
Make sure you always download the latest spreadsheet from the UI for edits.
To download resources for bulk editing:
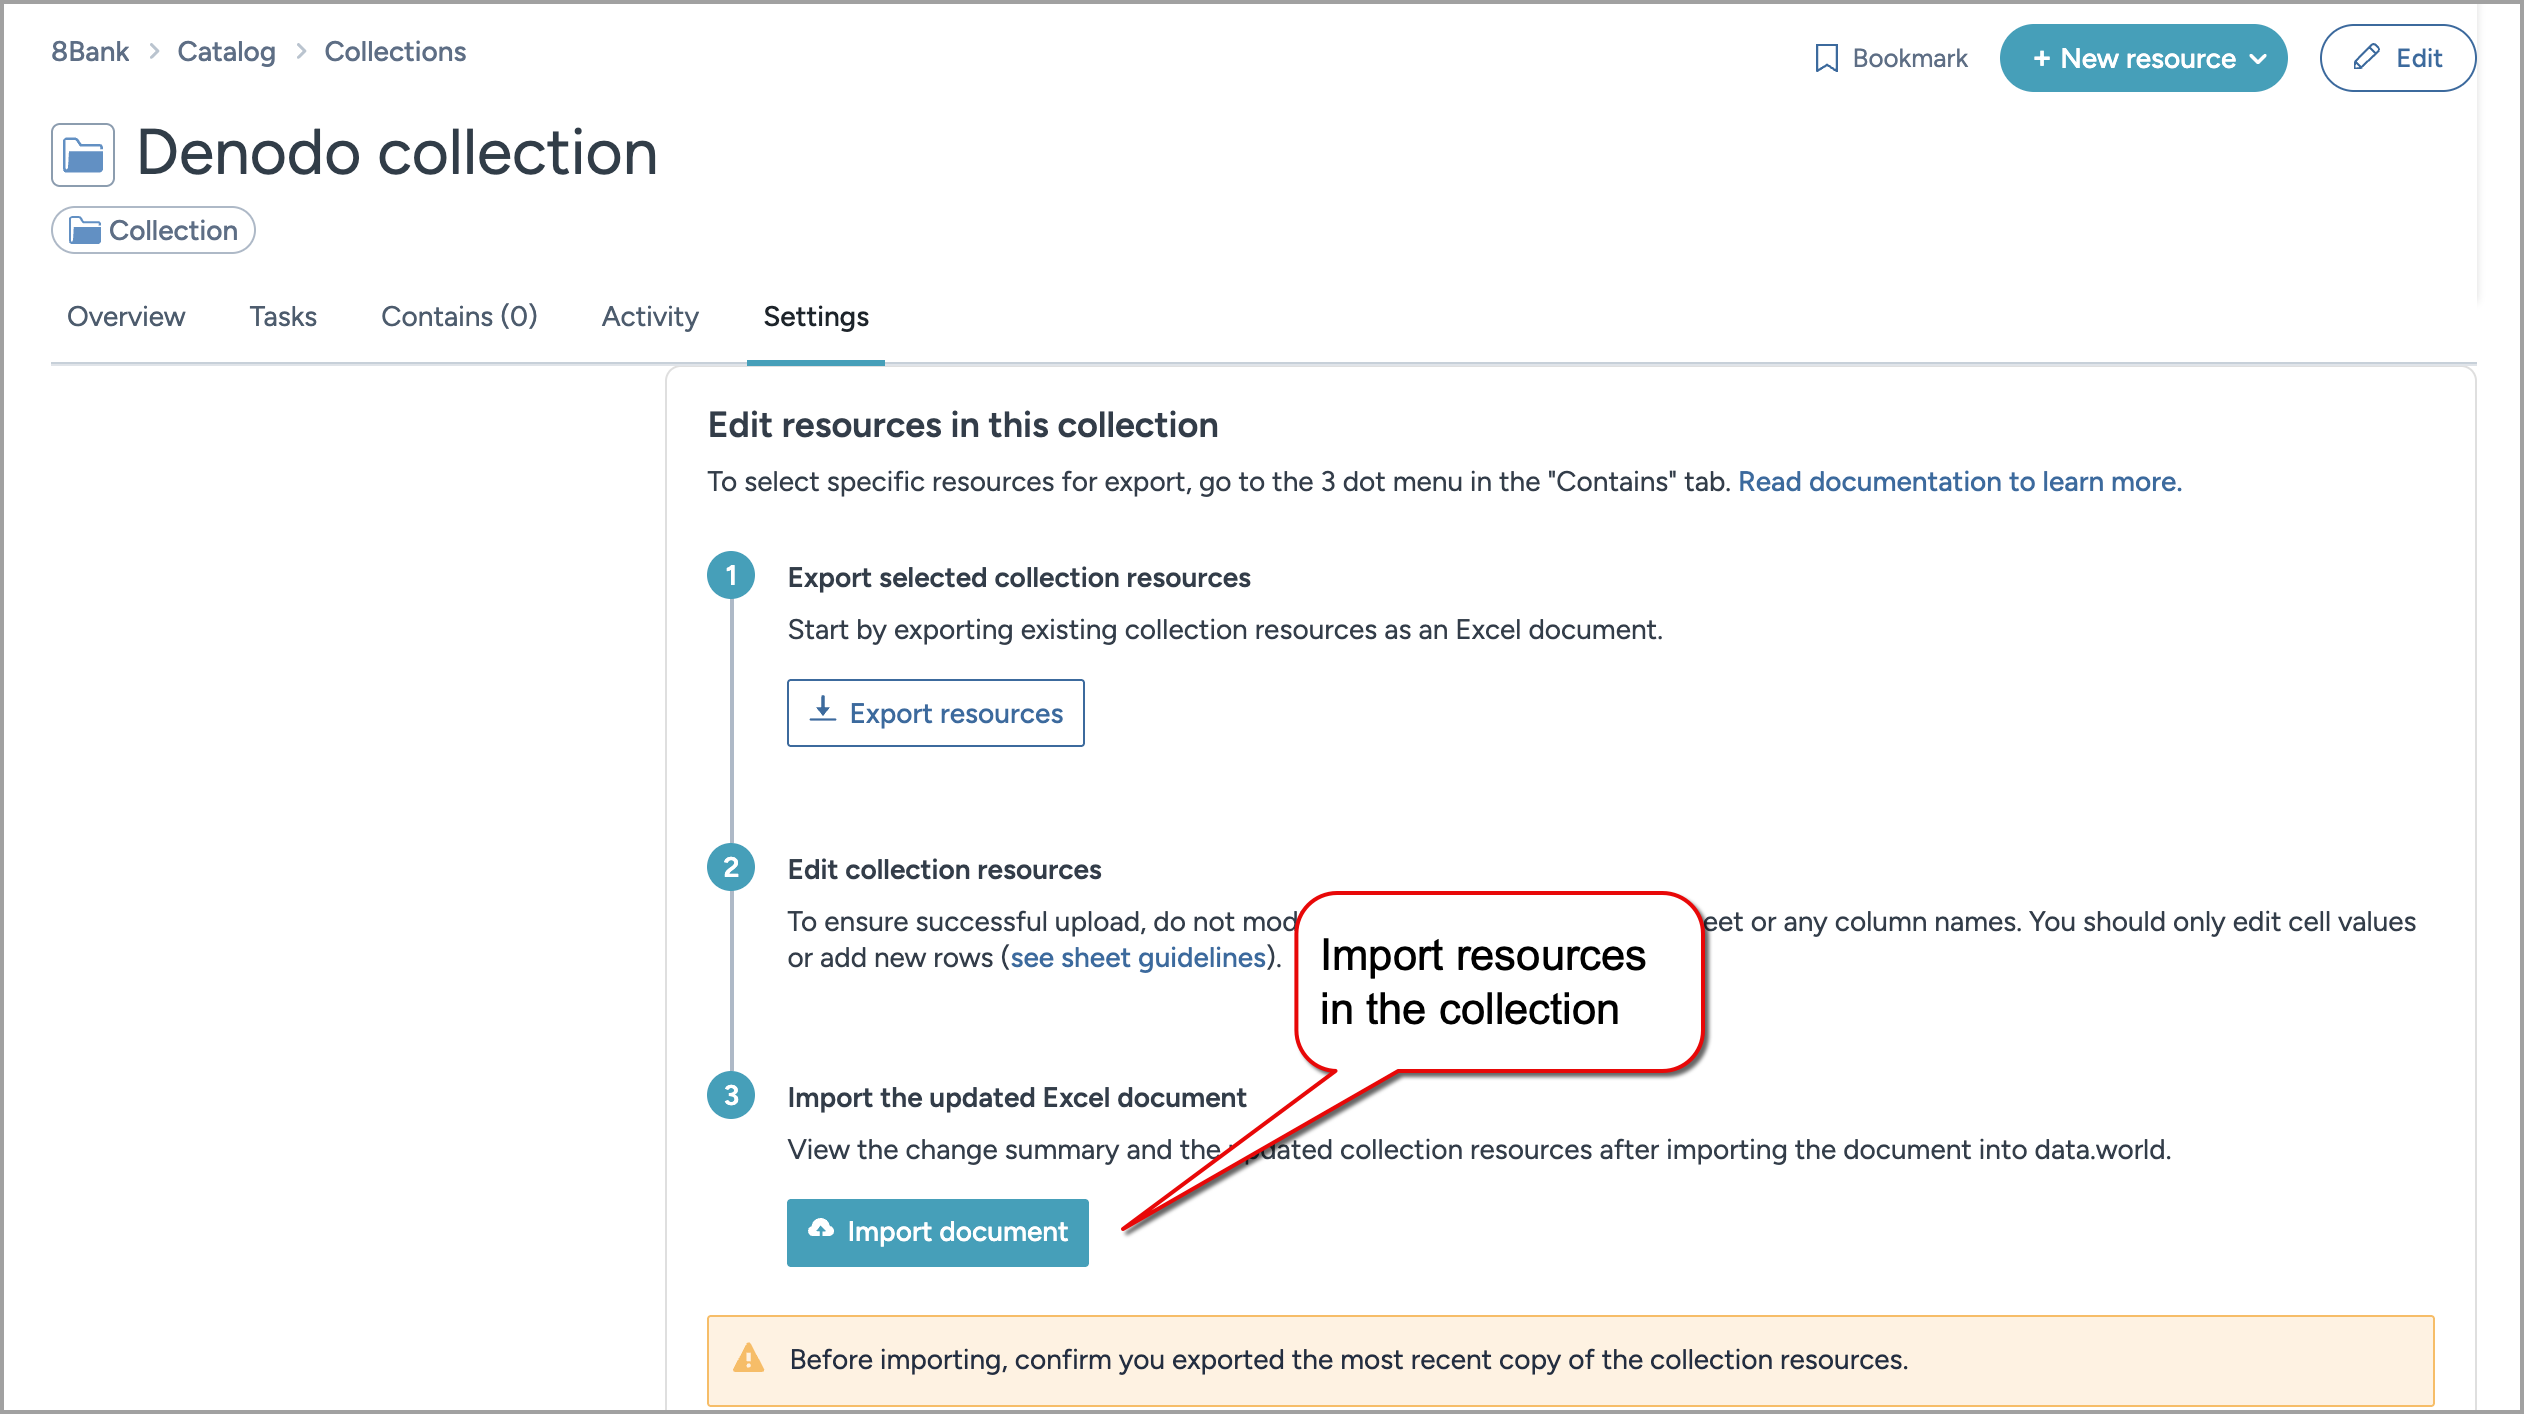
In the Catalog experience, go to the Collections page. Locate the collection where you want to perform the bulk action. On the Settings tab, in the Edit resources in this collection section, click the Export resources button. It downloads a spreadsheet with all the resources in the collection. If the collection is empty, you get a template for creating resources in the collection.
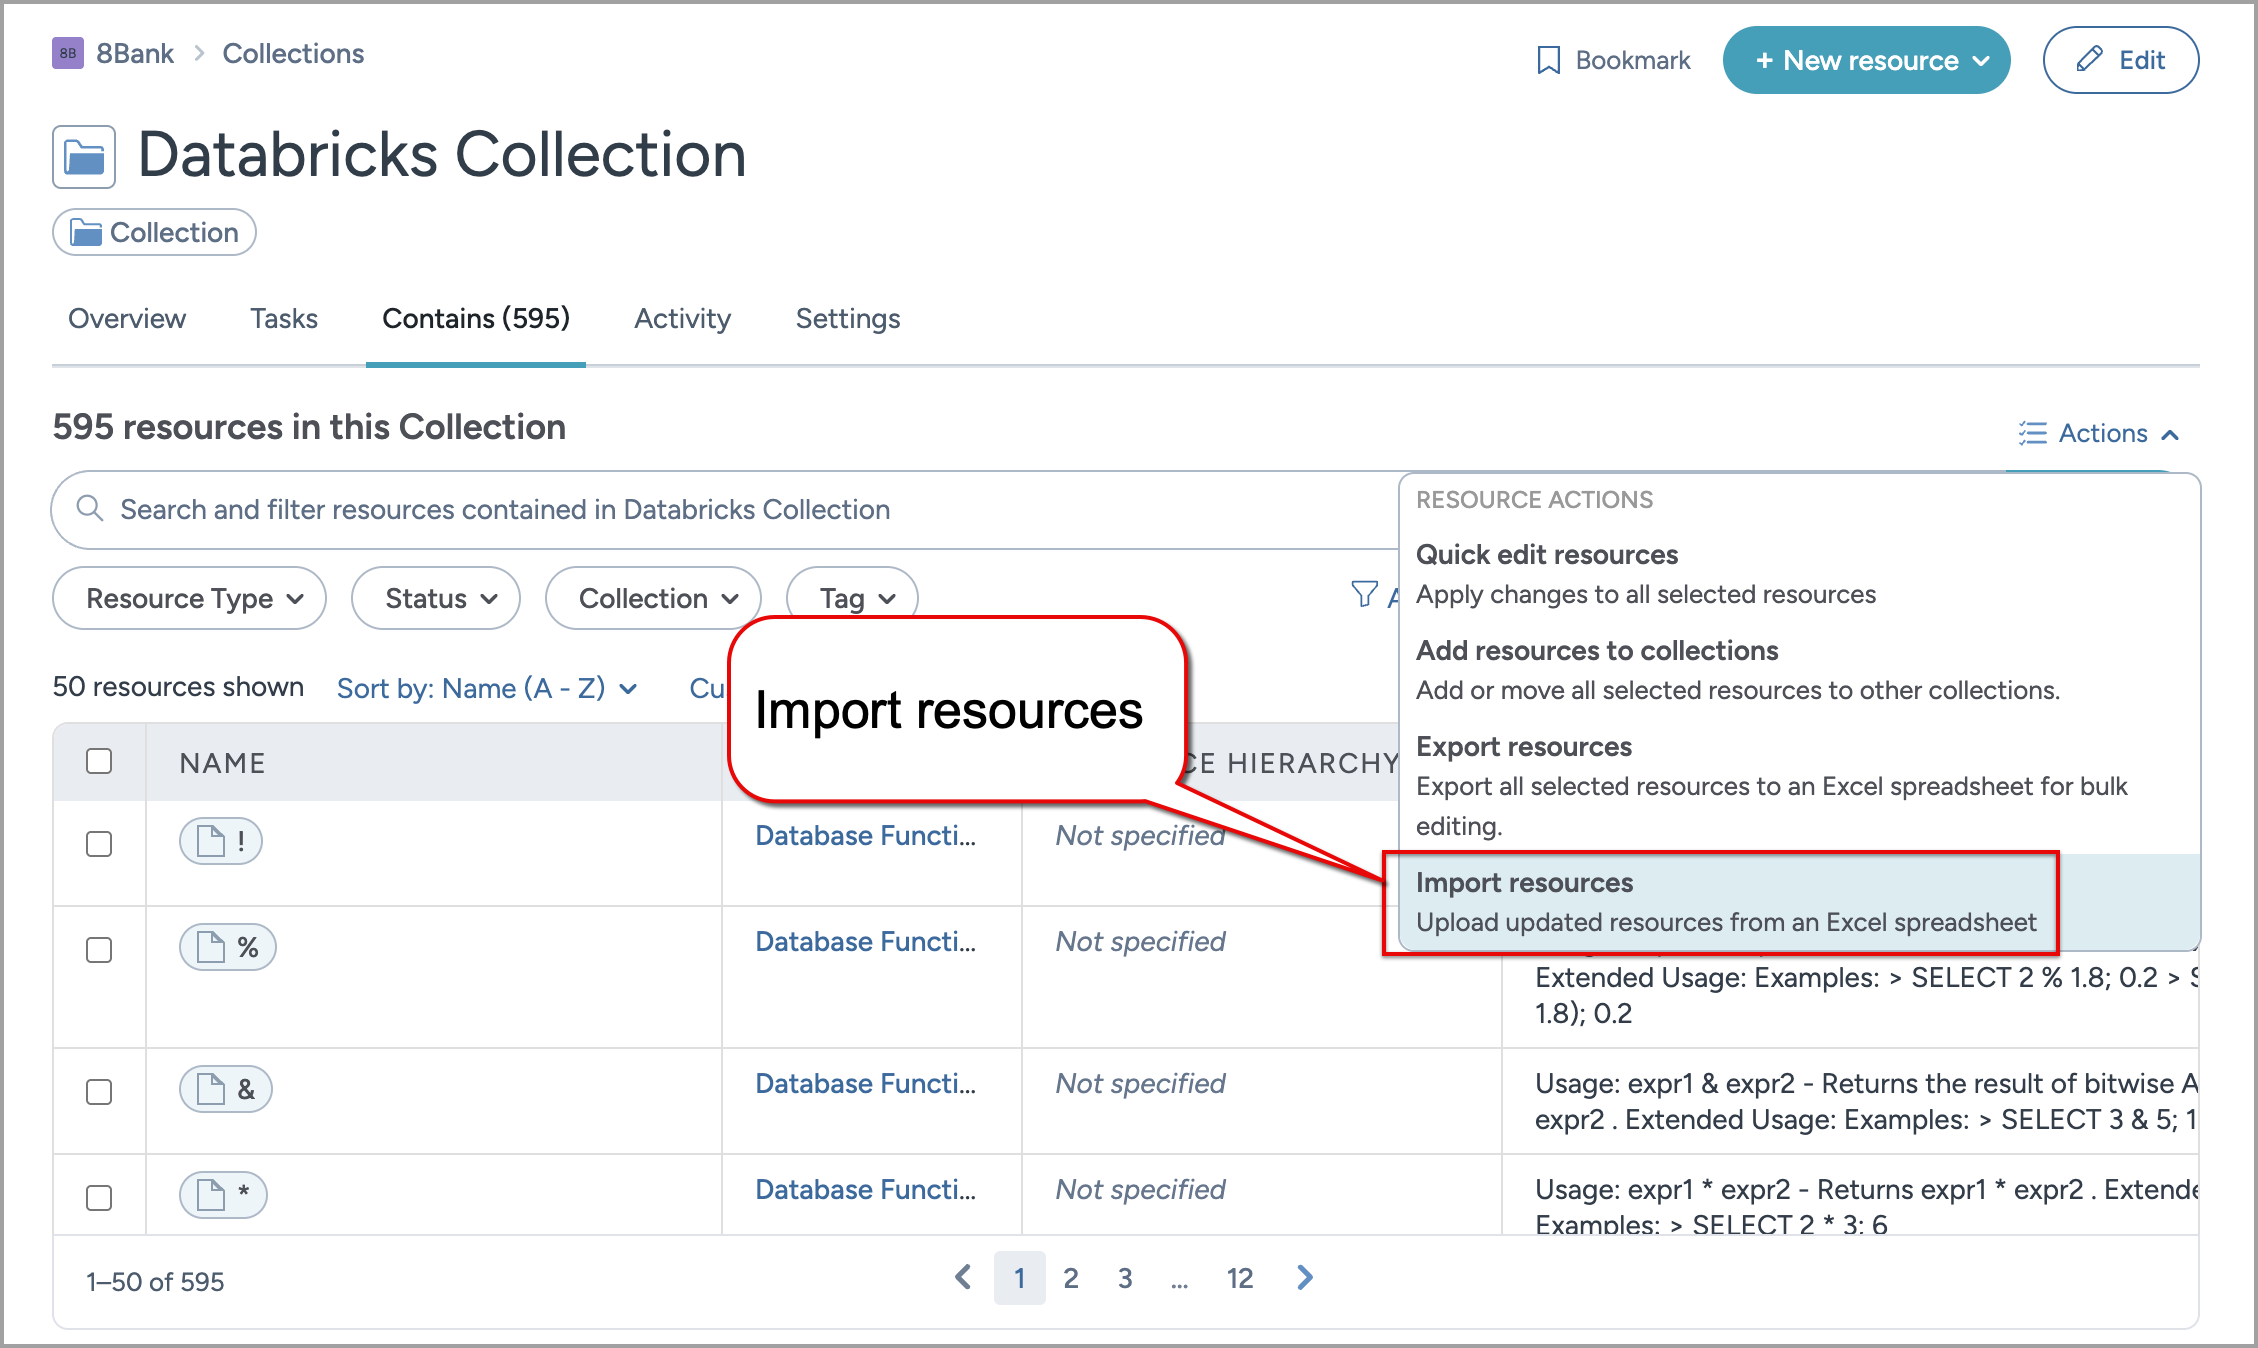
If you want to download only a select list of resources from the collection, go to the Contains tab of the collection. From the Actions menu, select Export resources. On the Select resources page, use filters and search to find and select the resources you want to download. On the Download resources page, click the Download resources button. It downloads a spreadsheet with all the resources you selected.
To download resources at the Organization level, go to the Resources page in Catalog experience, and from the Actions menu, select Export resources.
On the Select resources page, use filters and search to find and select the resources you want to download. On the Download resources page, click the Download resources button. It downloads a spreadsheet with all the resources you selected.
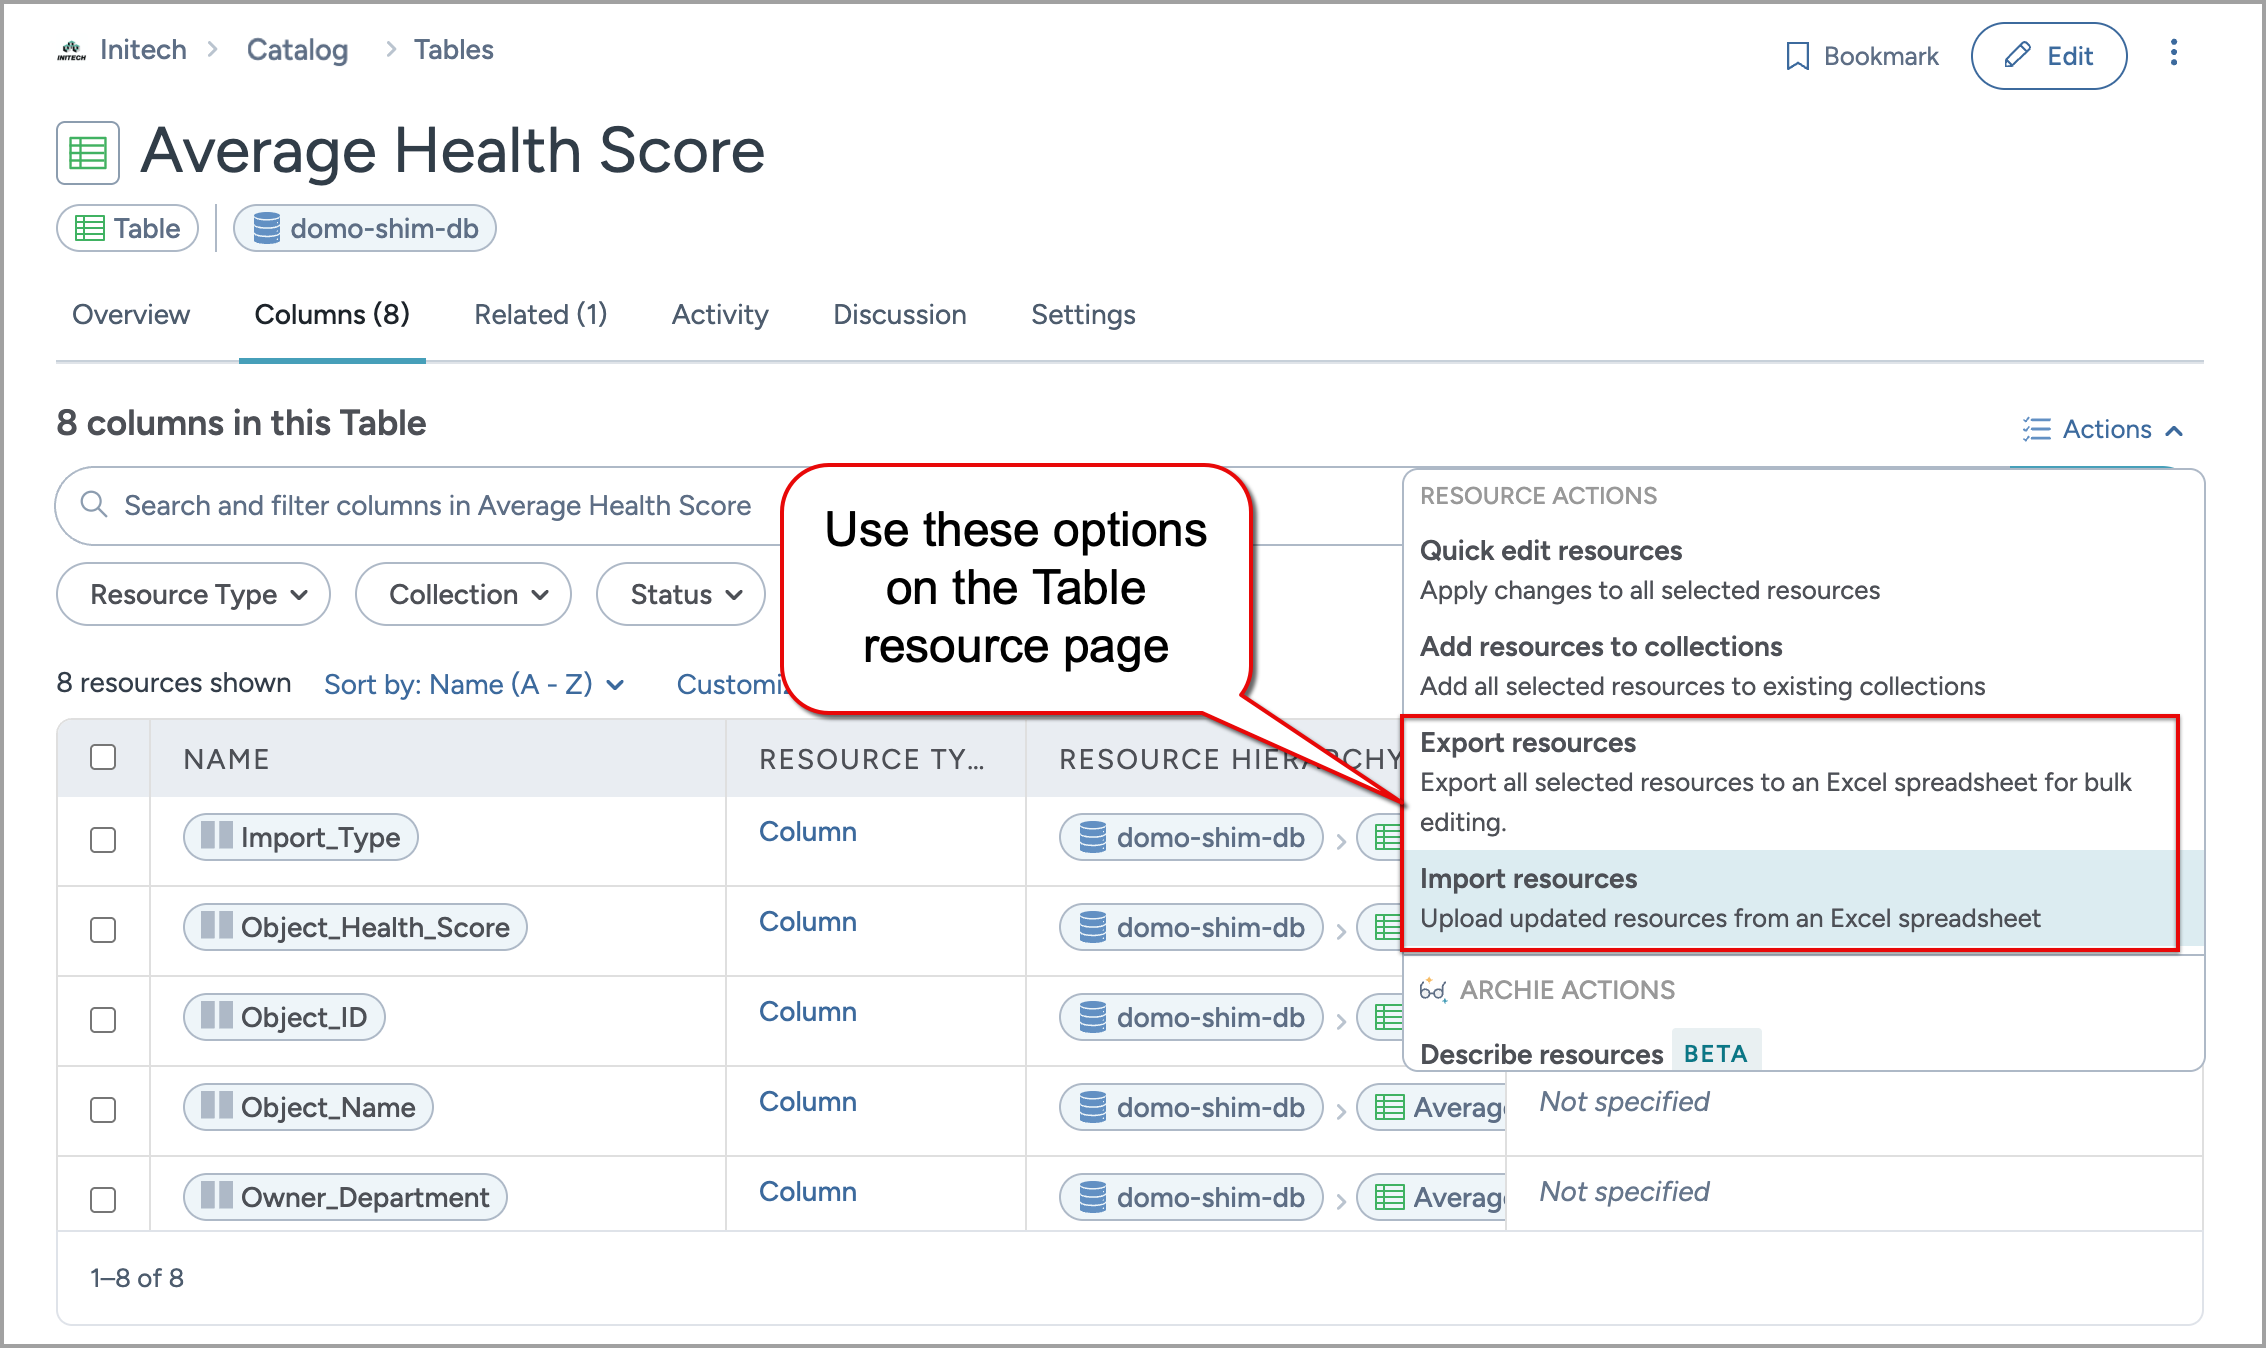
If you are looking to only bulk edit columns in a table, browse to the table in the collection and click the Actions menu and click Export resources.
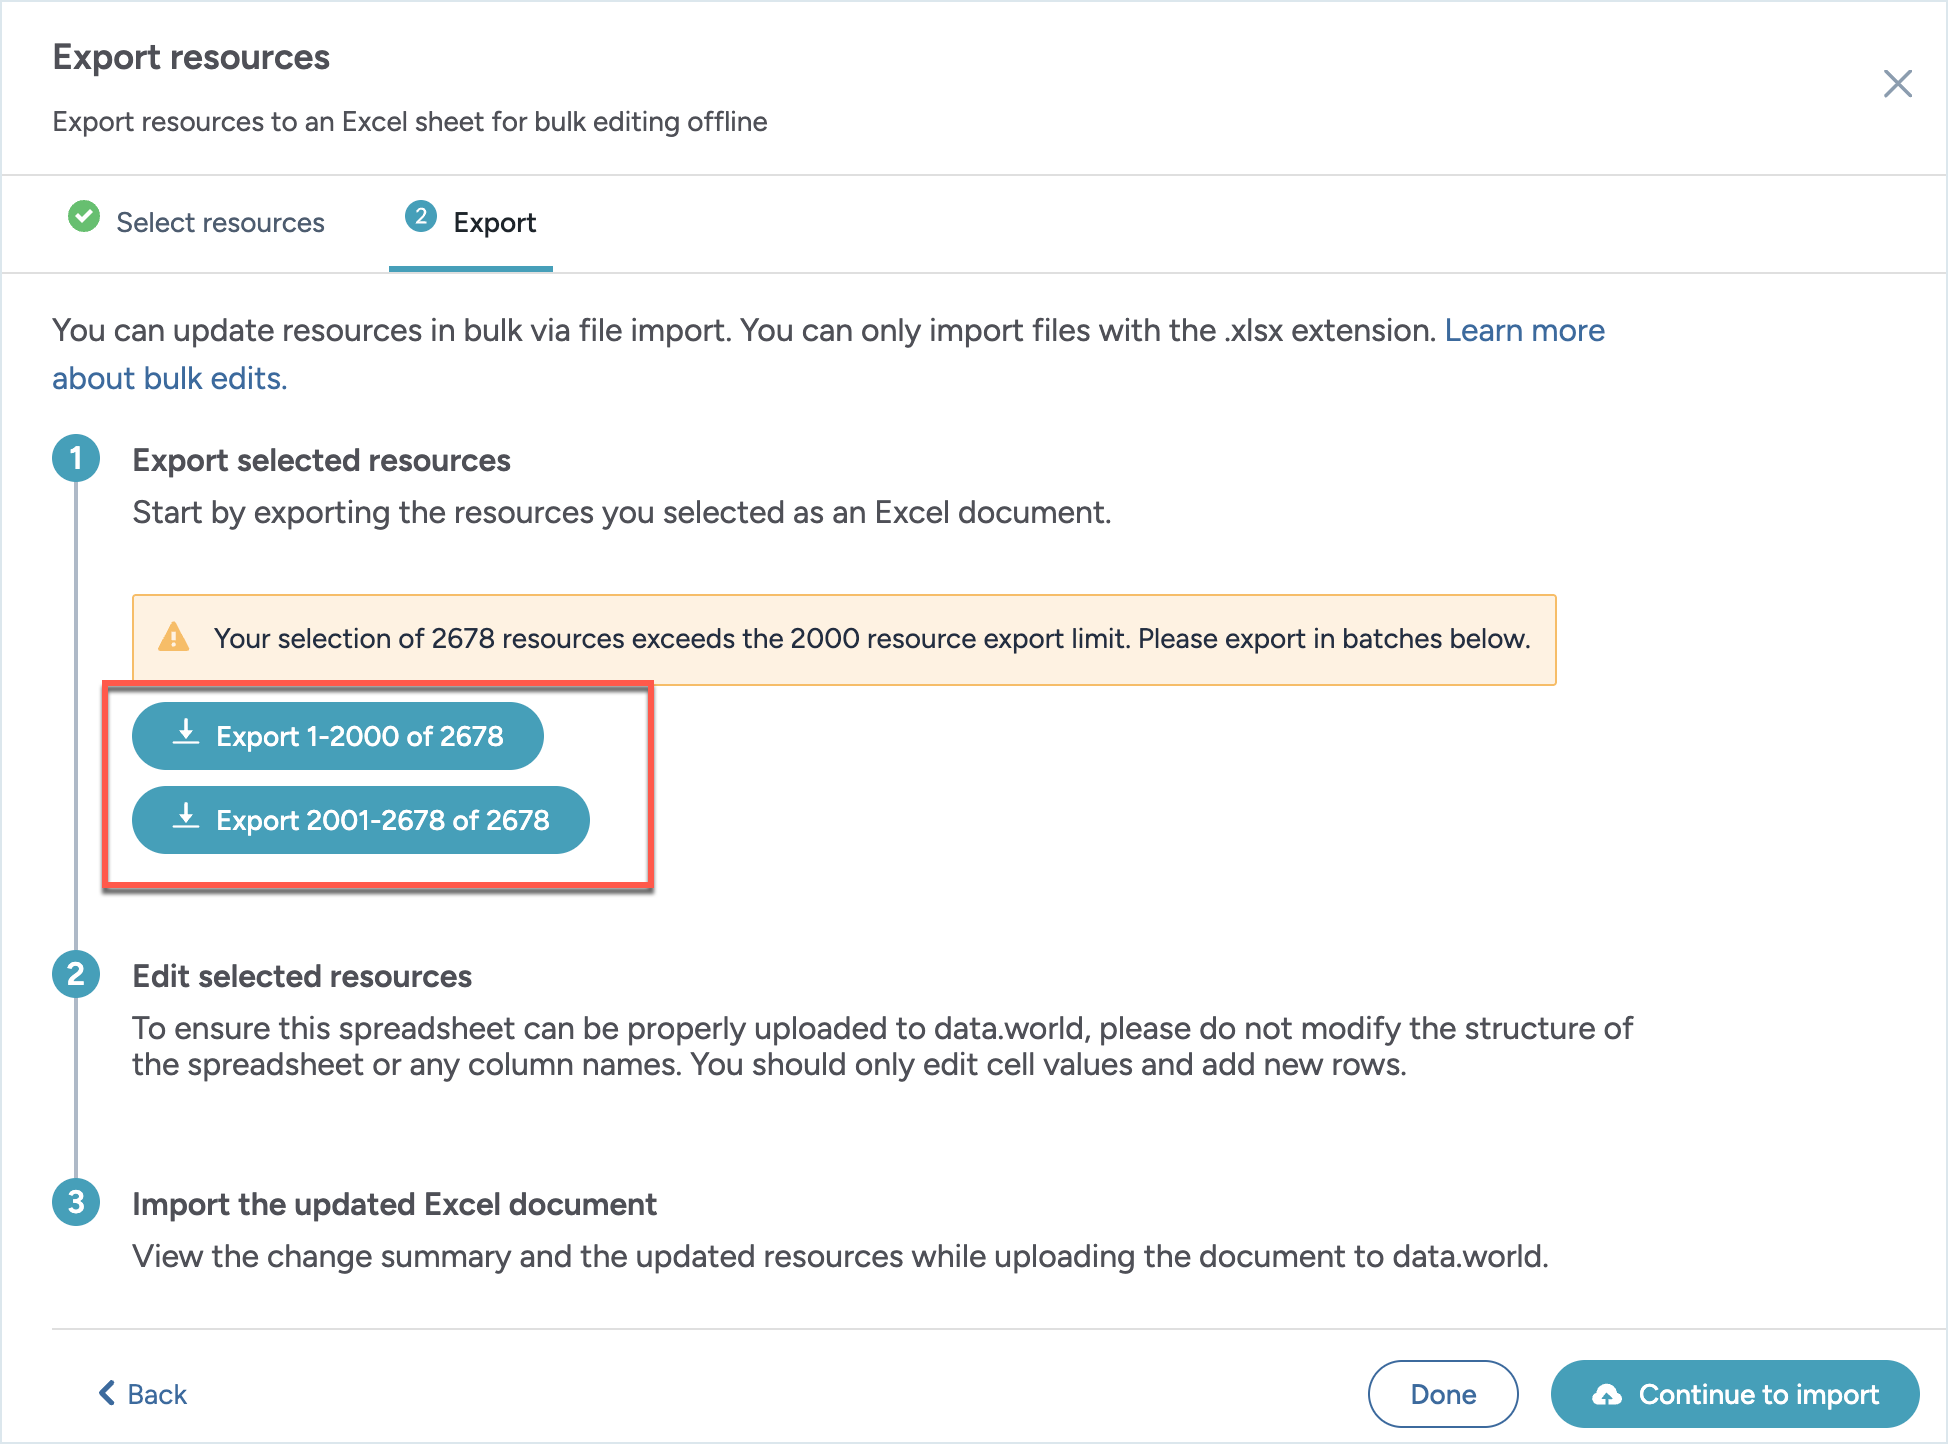
When you select Tables and Database views for bulk export, you can choose Automatically include columns for selected tables. When enabled, this option lets you export more than 2,000 resources for bulk editing. The export is split into multiple files, with up to 2,000 resources per file. Download all exported files for offline editing.
Editing the downloaded file
Key things to note while editing the downloaded file
All authors must work on the same downloaded spreadsheet and upload one consolidated version once all the changes are done. Also, while authors are working on the downloaded spreadsheet, you should avoid making changes to the glossary and resources from the UI.
Important
Make sure you always download the latest glossary and resources spreadsheet from the UI for edits.
You can edit the file in Microsoft Excel or in Numbers. However, the application allows only uploading files in .xlsx format. If you edit the file with Numbers, you must export it to Excel (File > Export to > Excel) before uploading it to the application.
The downloaded spreadsheet file has a set structure and has all the sheets you need to add and edit the resources. Read the instructions available in the Overview tab carefully before you start editing the file.
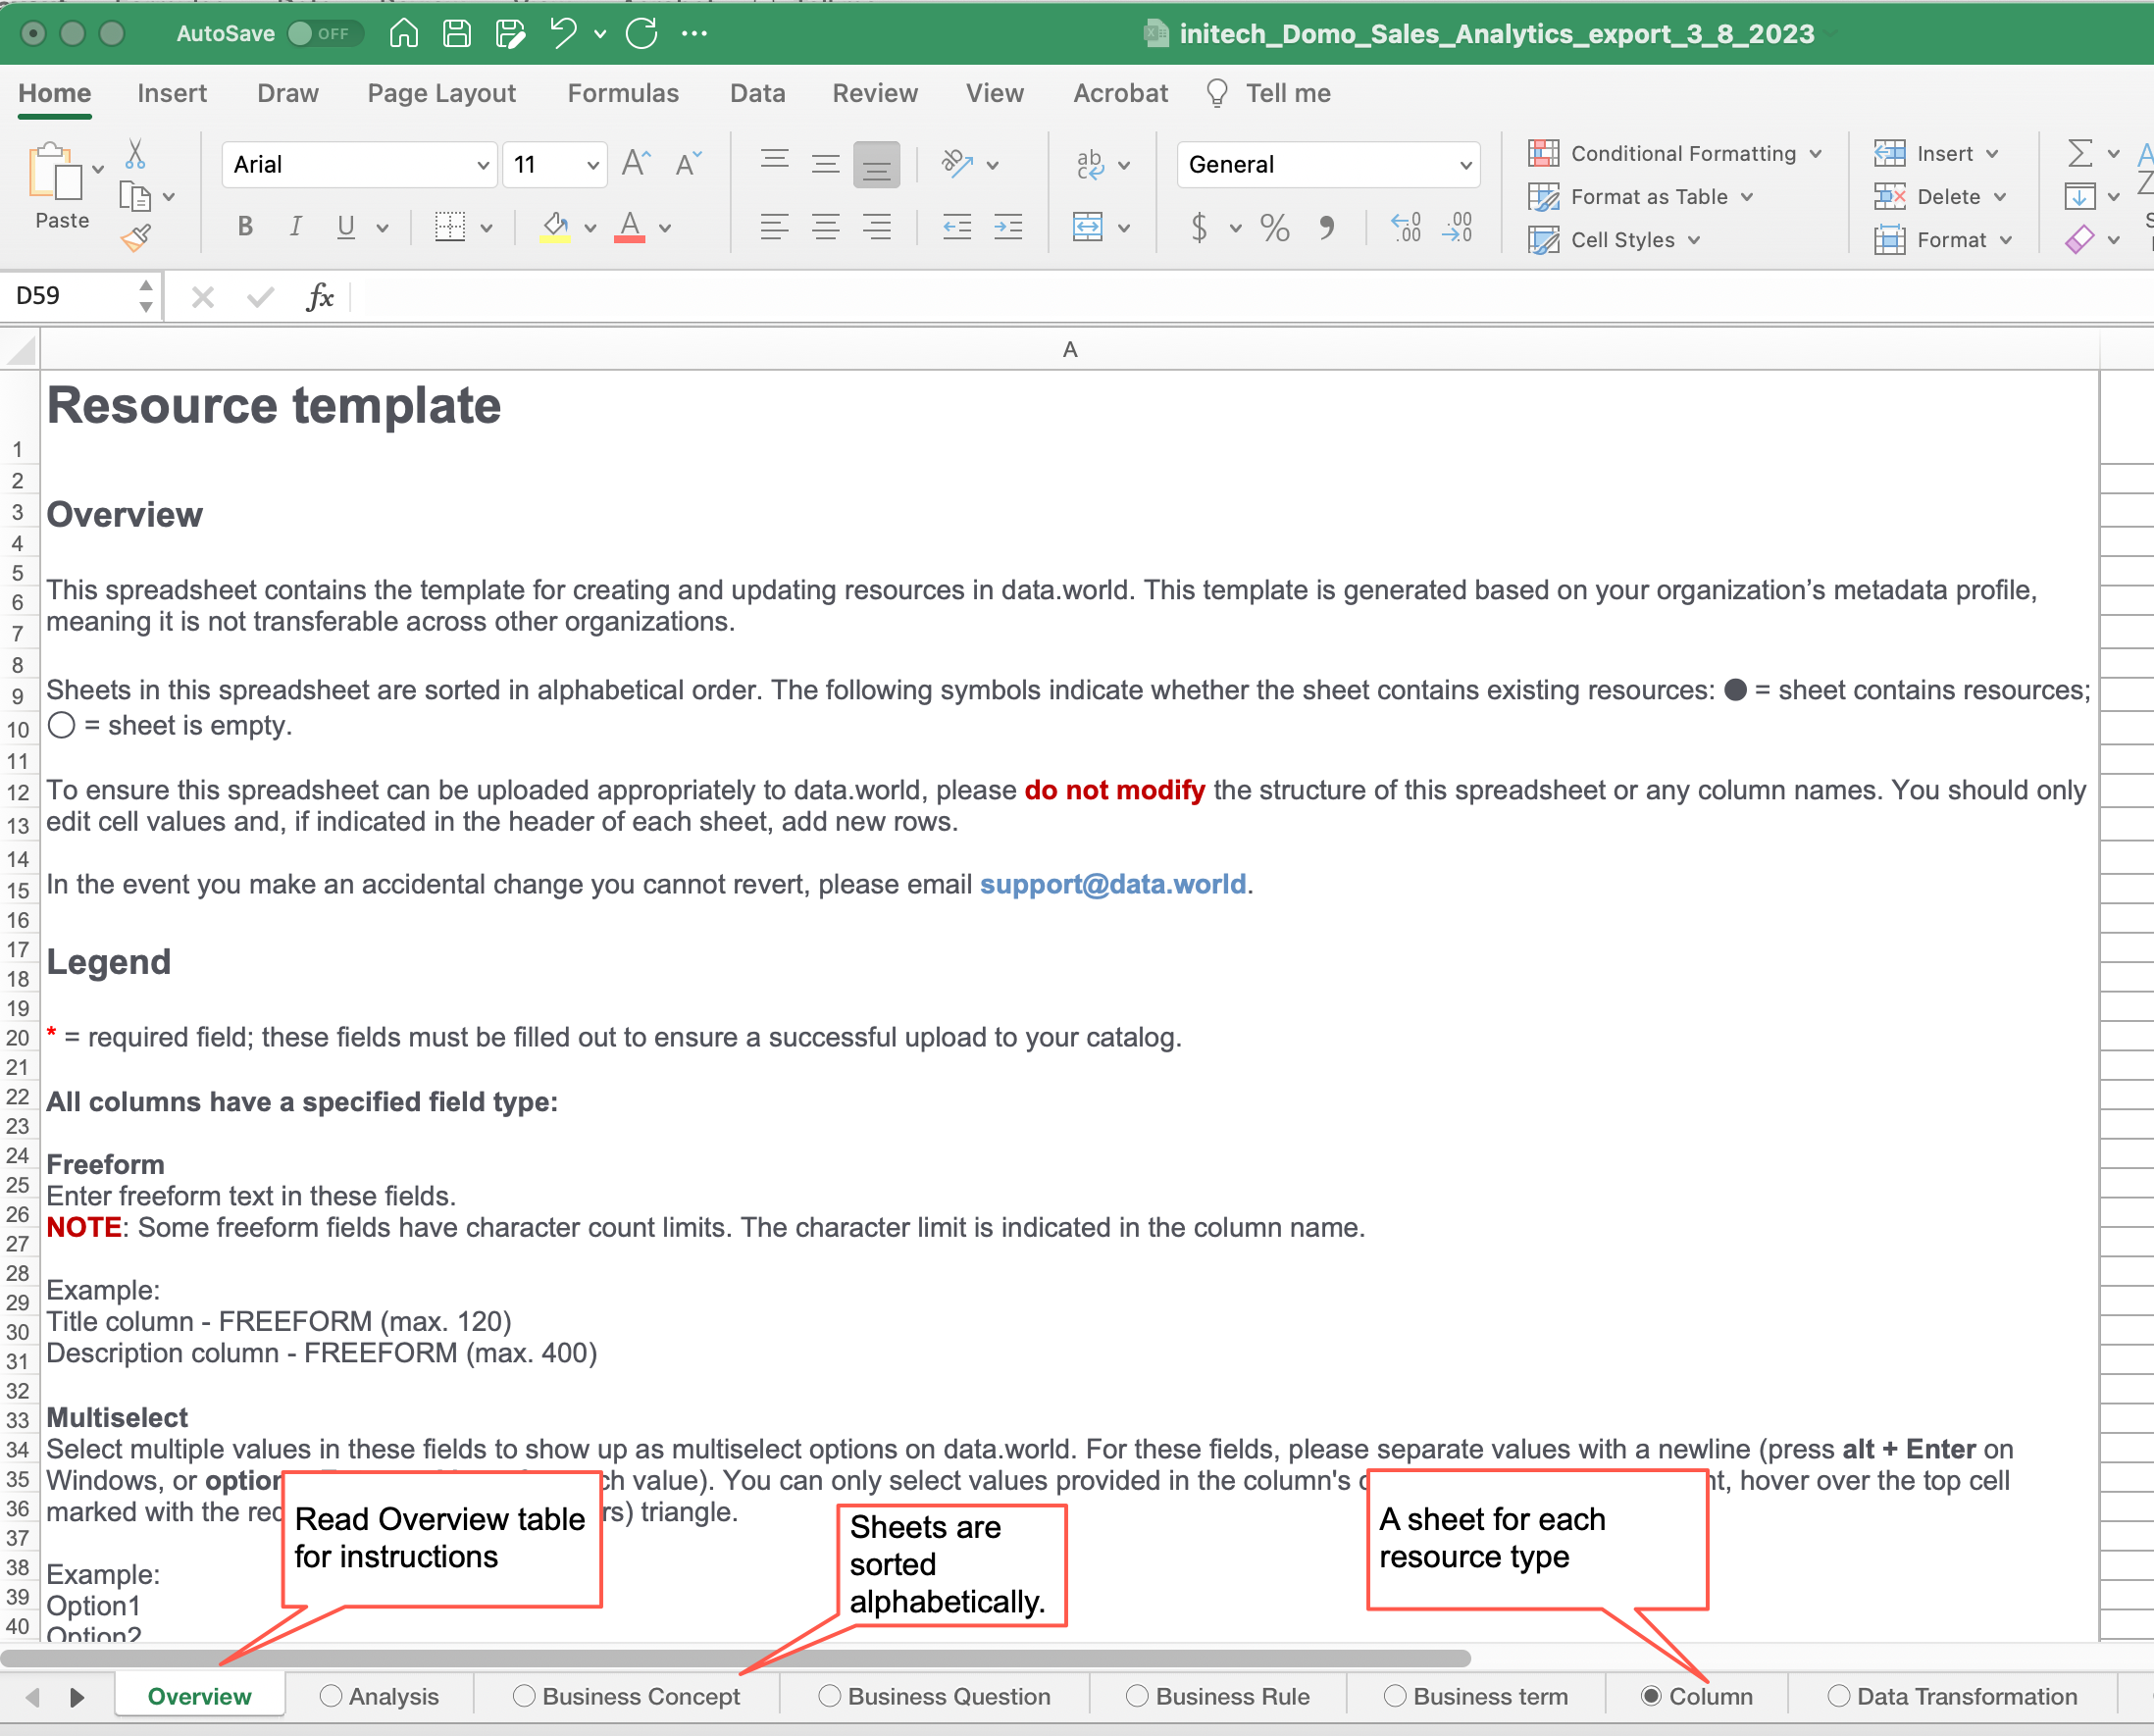
Each sheet in the spreadsheet is a resource type. In the sheetname there is a circle that indicates if it’s empty or not (empty circle = empty sheet). Sheets are sorted in alphabetical order.
Read the instructions on other sheets as well to follow guidelines for setting values for fields. Each sheet tells you if you can only edit the fields or if you can add new resources.
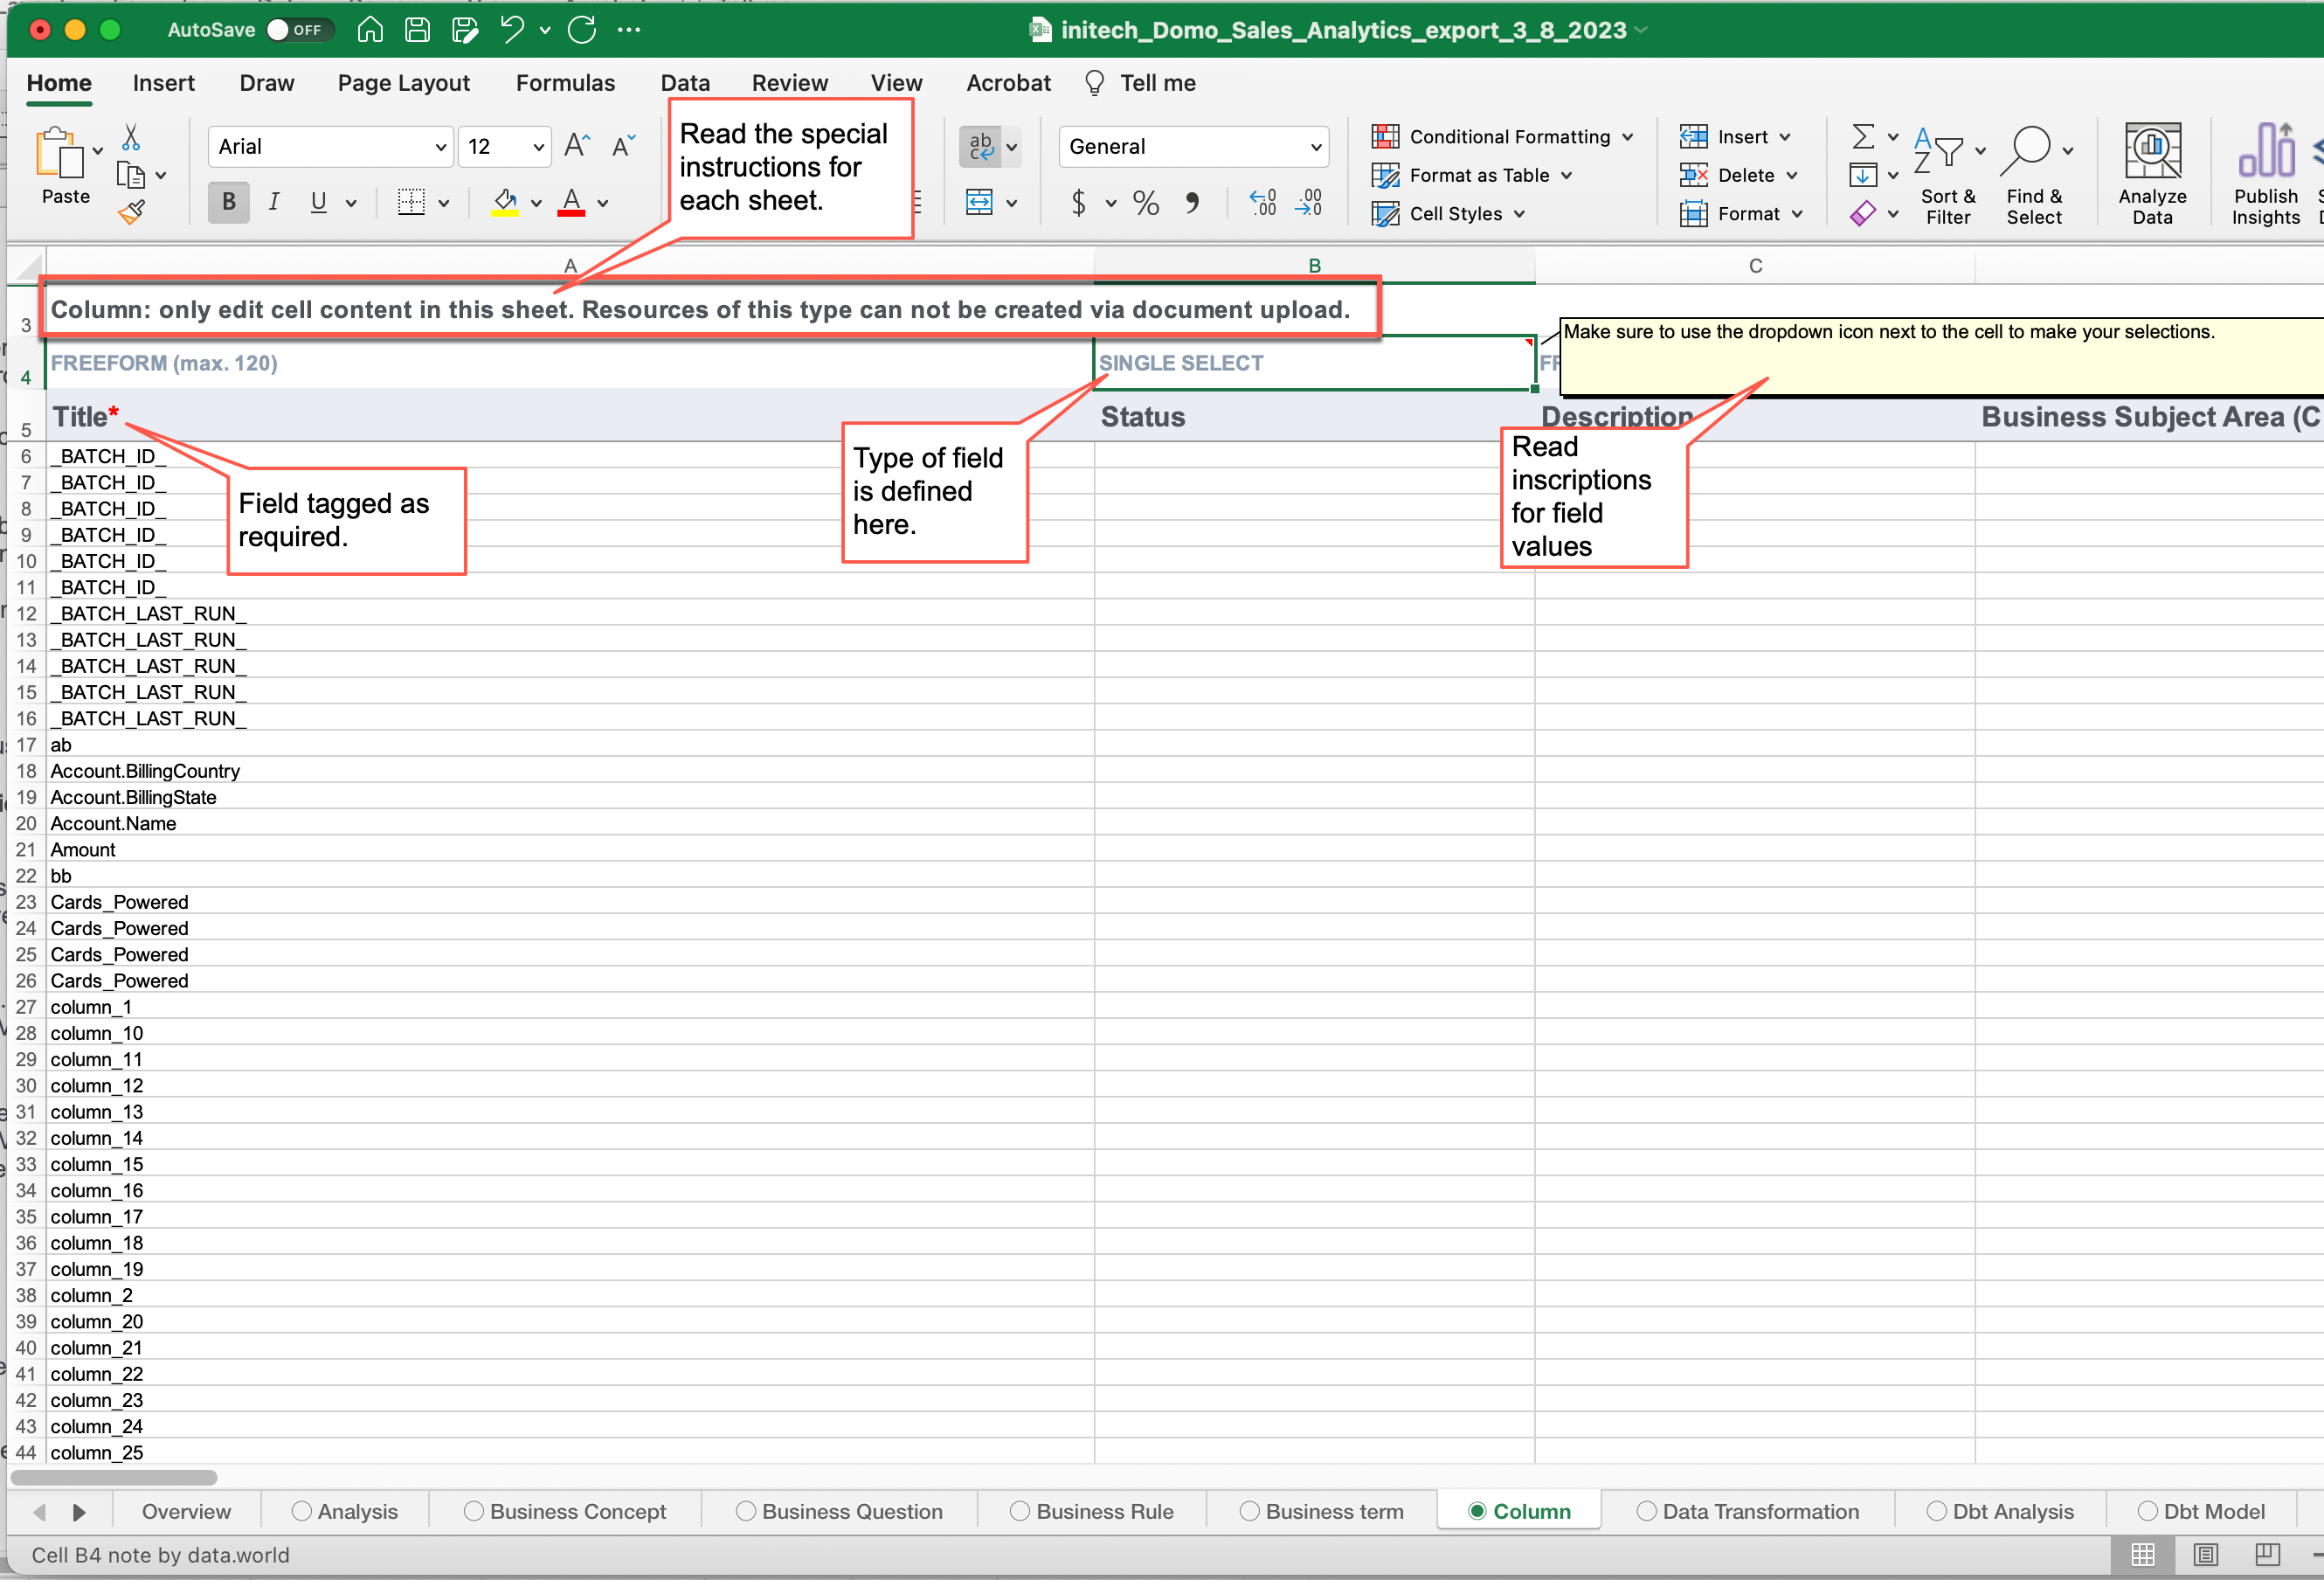
You should only Edit cell values and Add new rows. Do not delete rows or columns. Do not add, delete, or move the header rows.
Make sure that all the fields that are marked as required have a value set in them.
Do not move resources from one sheet to another by using cut and paste.
While adding dates to field values, follow the format: YYYY-MM-DD .
When adding values in the accounts as people fields, ensure you enter the data.world usernames as values. If not added correctly, the user accounts will not display properly as field values in the UI and will appear as plain text.
To edit resources in Microsoft Excel
Important
Make sure you always download the latest spreadsheet from the UI for edits.
Open the downloaded file in Microsoft Excel. Make edits to the different sheets.
Follow the instructions on the Overview tab carefully in the downloaded file to avoid unintended errors.
To edit resources using Numbers
Important
Make sure you always download the latest spreadsheet from the UI for edits.
Open the downloaded file in Numbers.
Follow all the guidelines on the Overview tab in the file and make edits to the content of the file.
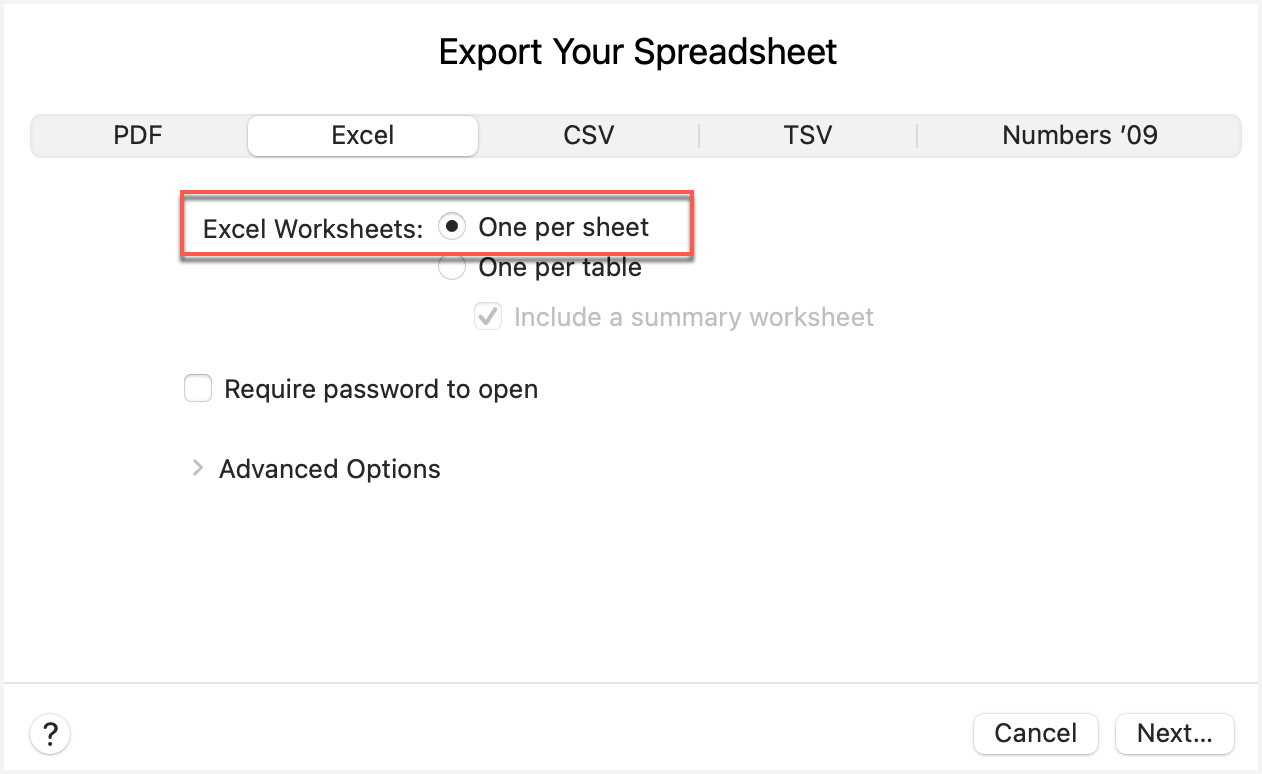
Once you are done, export the file to Excel by using the File > Export to > Excel option. The export setting must be set to One per sheet. Do not set the value to One per table.
Uploading the updated file
Possible error scenarios while uploading the excel sheet
When you upload a file that does not follow the guidelines, you will be notified with Error messages and Warning messages.
An error state indicates that the file cannot be uploaded without fixing the issue.
A warning state means, two things can happen: if the required columns are not filled out correctly, the specific resource with the warning is skipped. If the non-required columns are not filled out correctly, that particular edit to the resource is skipped.
The following table explains the possible error scenarios.
Scenario | Type | Will import succeed? |
|---|---|---|
Maximum file size of 500 MB exceeded. | Error | NO |
If a file has more than 20,000 edits, we recommend splitting up the uploads. Contact the support team ffor assistance. | Error | NO |
All or some of the required columns [Title] are missing from the uploaded file. (for edit and add) | Error | NO |
Values are missing for required columns [Title] (for edit and add). | Warning | The entire resource will be skipped. Rest of the edits in the spreadsheet are imported. |
User sets a value of a field that is not valid. For example, if the possible values for a field are Active and Inactive and user sets the value as Not in use. This applies to fields that have pre-defined values available, for example, multi-select fields, fields with values available as drop down options. | Warning | The particular edit to the resource will be skipped. Rest of the edits in the spreadsheet are imported. |
Date value is not set in correct format. Dates must be in the YYYY/MM/DD format. | Warning | The particular edit to the resource will be skipped. Rest of the edits in the spreadsheet are imported. |
If the metadata profile changes between export and import and a new field gets added or removed from the metadata profile. | Warning | The column is skipped. Rest of the edits in the spreadsheet are imported. |
To upload the updated spreadsheet
Important
Make sure you always download the latest spreadsheet from the UI for edits.
Once you are done making edits to the file, you can quickly upload to the application.
Go to the same location from where you had downloaded the resources for editing. From the Actions menu, click the Import resources button.
For collections, you can also go to the Settings tab, and in the Edit resources in this collection section, click the Upload document button.
If you are looking to only bulk edit columns in a table, browse to the table in the collection and click the Three dot menu and click Edit via document upload.
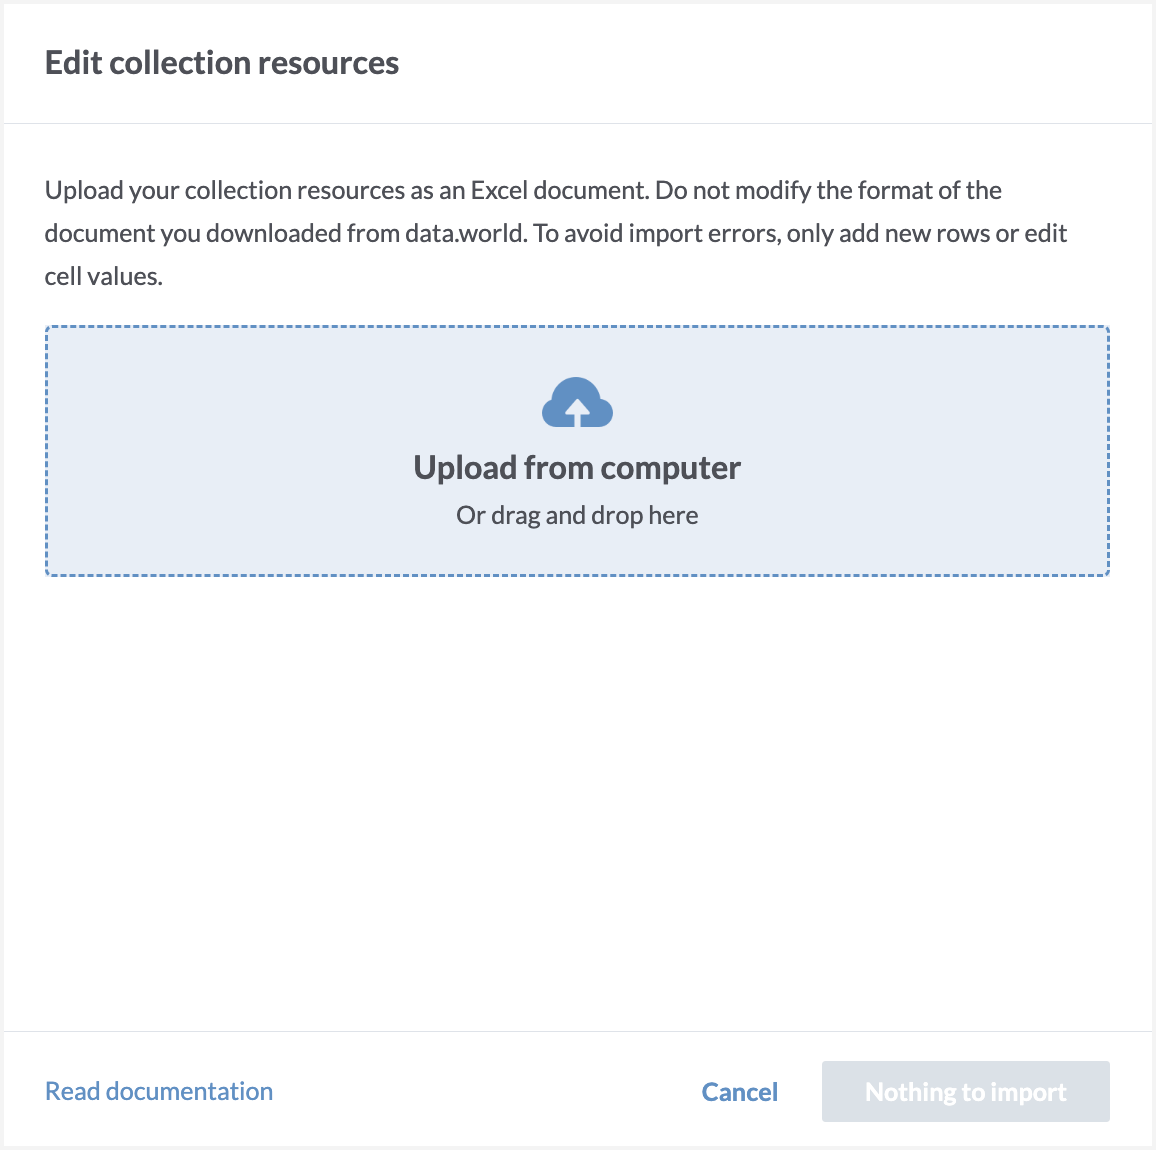
On the next screen click the Upload from computer button or drag and drop the updated spreadsheet. The file must be in .xlsx format.
The application does a check on the file you are uploading. If any errors are found you are prompted with a list of issues you need to fix before you can upload the file. You cannot continue with the upload if there are errors in the file. If there are warnings, continuing will mean that the changes with warning are skipped and rest of the changes are saved in the application.
If there are no errors, you are shown a list of changes to review. The preview window has a tab for each resource type each tab lists the New and Updated resources, with details about all the changes made to the resources.
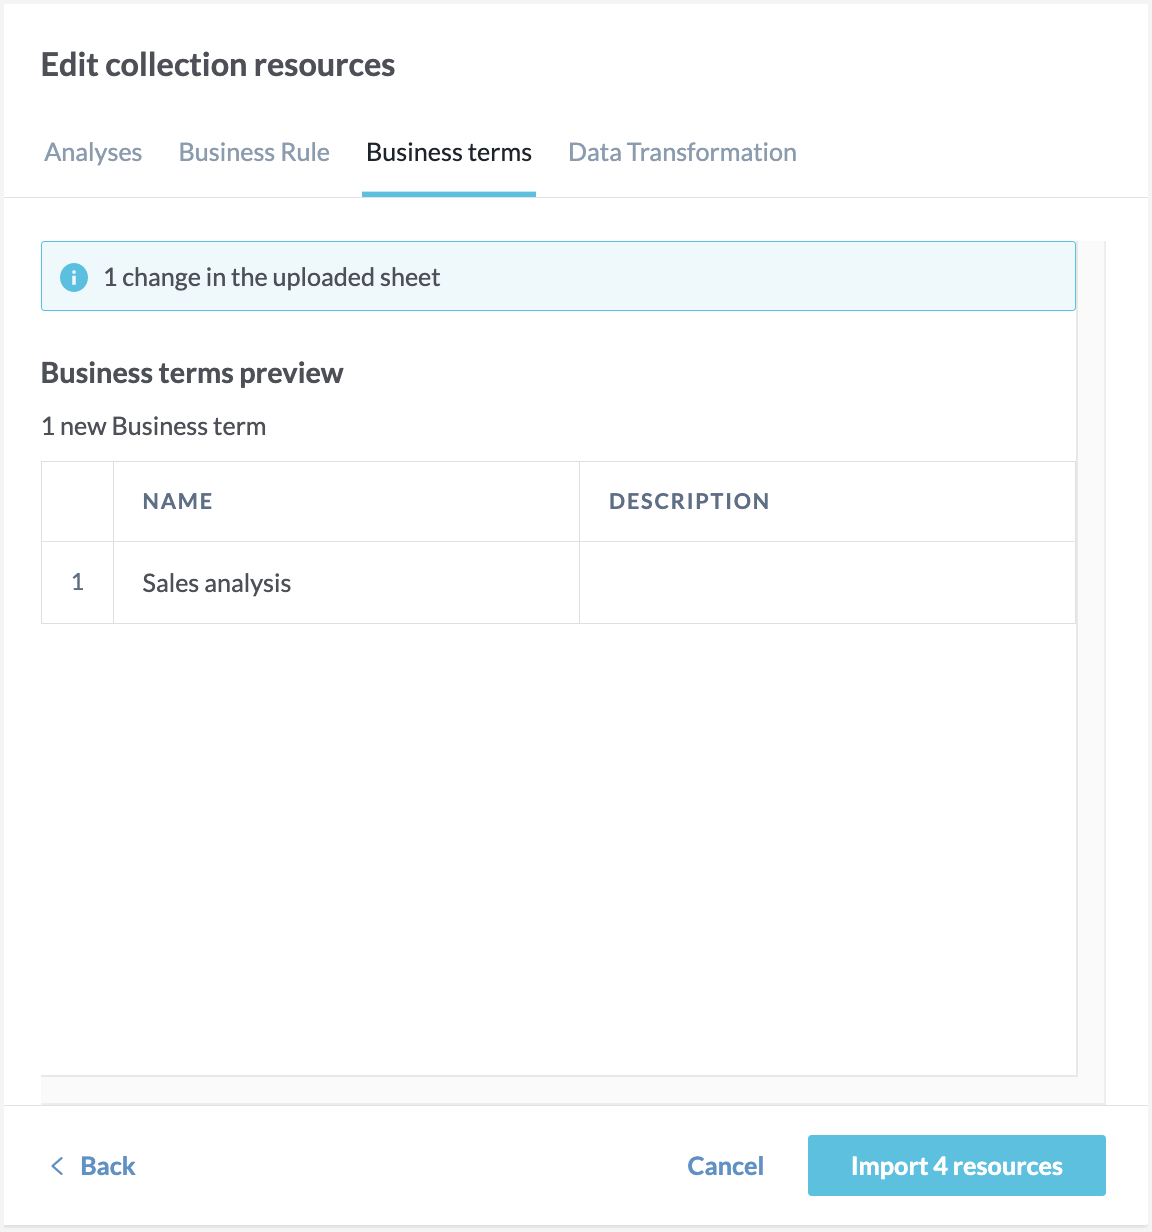
Click the Import resources button to continue with the import. You are notified when the import is successful or if there are any errors.